(FRONT)

(BACK)
Check that baby off the list! Finally!
I started this quilt last year. And when I say "last year" I don't mean the last half of 2010. I don't even mean the first half of 2010. I really mean last January, this quilt was started.
You see, a year and a half ago, I had a woman at church who offered to teach anyone interested how to quilt. I was two years into being a proud owner of a sewing machine, meant for the purpose of quilting, and I didn't know how to use it. I was suddenly feeling confident enough to take this "new talent" on. So I showed up for class.
This quilt was the first quilt assigned to us to work on. It's a "log cabin" block quilt. It was my first real experience at piecing together a quilt. I loved how the quilt came together for me. It was exciting and thrilling. I sent it off to be professionally quilted.

When I got the quilt back I quickly sewed the binding to the front of the quilt using this method. But because this quilt didn't have a purpose, it was in trouble.

And once I got the binding attached to my quilt, it just sat. It's been sitting for a long time. It's been sitting long enough that I don't even notice it sitting in my room, next to my chair, waiting for me to handstitch the backside while watching all those shows waiting for me on my DVR.
So with the new year beginning, I decided it was time. It was time to cross this off my list...mostly because my oldest daughter kept reminding me that it wasn't finished and it was really starting to ware on me.
But here's where I admit that I cheated. I decided if I was going to get this quilt checked off my list, it was going to have to be finished by my machine.
So this is what a did.
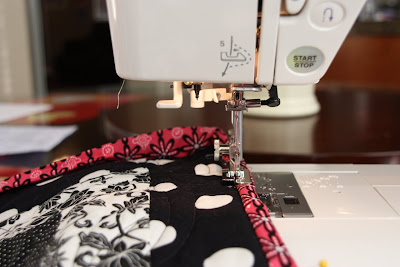
I pinned the other side of my binding to the back side of the quilt. I made sure that it was just on the other side of the stitching from attaching the binding to the front.

I then pulled out my blind hem foot. It has a metal bit that I used to have it run in the ditch between my binding and my quilt while I stitched on the front of the quilt using a thread that matched my pink binding.


Now, if I were an expert sewer, I could try to actually "stitch in the ditch" and have the thread just barely grab the material on the other side. But I am very aware of my skill, or lack thereof, and I decided to have my stitching show.
I am also able to create my mitered corners. I stitched from corner to corner (backstitching at both ends. I then would cut my thread. Fold my corners under, then begin again on the next side stitching from corner to corner.
I save that hand stitching on the backside for special quilts. But I'm beginning to learn that sometimes, you've got to take the easy route if you're going to get it finished.


No comments:
Post a Comment