Wednesday, September 15, 2010

Masterpiece Display Case

Do you ever feel like all your friends are such incredible moms, but you don’t feel the “incredible-ness” for yourself? All their kids have perfect hair, with their matching outfits, sitting quietly in their uber-clean home. Their kids are either reciting scriptures, poetry or the capitals of all the countries in the world or they are masterfully playing their musical instruments.

Then I look at myself, with my messy house, mac’n’cheese for dinner, kids with wild “caveman” style hair, wearing that ugly shirt I’ve tried to throw away four times and they are reciting lyrics to songs that I pray they don’t understand while making “gassy” noises in their armpits. Yeah – sometimes I feel like kicking my friends.

However, today, I don’t harbor any of that animosity because today, I think I’m a pretty good mom. Why? Because I have found a way to make my child feel extra-special, while keeping the house a little cleaner…let me explain.

I love my children’s artistic tendencies. I love their creativity. I love their exploration of color, textures, and shapes. What I don’t love, is pretending that every single one of their creations is wall worthy. I tried that…all we got was a wall full of tape and torn pictures. They are always drawing me something and sending me off to work with their creations. But they insist that I keep ALL of their artwork somewhere, preferably displayed. TOO…MANY…PAPERS….

Insert the Artwork Display Case. It’s basically a shadow box frame that opens in the front (Michael’s $9.99, less with the 40% coupon). I bought it unfinished and just painted it inside and out.


Each child has his or her own display case. The rule is that each case can display their latest creation. They can fill it up, but when it gets full, they have to throw away some of their earlier pictures.


Of course if some of their artwork is exceptional, I put it in their memory box!


So, we all feel good. They feel like their pictures are getting their proper treatment and I don’t have any more tape on the walls…who am I kidding…I still have tape on my walls...tape and spaghetti (that's another post for another day).


 http://linda-coastalcharm.blogspot.com/BCD 125Organize and Decorate Everything

Monday, September 13, 2010

Project Runway


As Heidi is famous for saying:

"One day you're in. And the next day you're out."

And that's how I'm feeling about the seasons. Summer, I love you, but you're out. I'm ready for Fall. I'm ready for apples and pumpkins and crunchy leaves and sweatshirts.

So today I'm getting ready for Halloween, Project Runway style.

Yes, Halloween.

Over the Summer, I took a few weeks to visit my parents with my children. One day I walked into a store to find that all of their fabric was 75% off. They were closing their fabric section. So I started grabbing. I had no idea what I was going to make, but I couldn't pass up buying fabric for a quarter of the cost. I decided I could figure out what I'd use it for later.

They had this Halloween material.


It is a panel.

This weekend, I figured out what to do with it. And this is where I felt like I was channeling my love for Project Runway.

I cut the panels apart and turned them into skirts for my girls.

(Just saying that makes me feel like I was channeling Julie Andrews on The Sound of Music. But I want to feel cool so we're going to stick with Project Runway).

I used 5 panels for my oldest daughter's skirt (she's 8). I then used 3 panels for my two little girls (age 3 and almost 1). I cut those 3 panels in half for the appropriate lengths and sewed them together.


I then sewed a band the same length of the material to the bottom and hemmed it.


After, I cut a strip of material (half the length of the bottom band) for the top band. I gathered the material and sewed the top band to the body of the skirt.

You can then sew the skirt together to finish the circle and add the elastic to it.


For full details of lengths and instructions, I used this awesome pattern I bought on Etsy. I made many skirts using her pattern. Love It!


DISCLAIMER: No buttons or zippers were used in the making of these skirts. That is far beyond my skill set. That's how simple this is!


The Girl Creative Party BlogMaking

Friday, September 10, 2010

Excuses Excuses!

I have been a sick Mama this week. My 4 year old brought some kind of bug home from preschool and we've all had the chance to enjoy it! So I apologize for not having a project to share. But if you've ever had a sick family, a full time job and a household to run, you can understand my predicament!

So enjoy the list of some of my favorite blogs and I promise to be back next week with a fantastic (and huge) project that I've had in the works for some time!

Wednesday, September 8, 2010

Stationary Obsessions and a Notebook How-To

I don’t know if you’ve noticed or not, but I kind of use this blog like therapy. I talk about my childhood and crazy things that have gone in my life. I make confessions and talk about my weaknesses.

Well, this week is no different. I want to confess. I’m obsessed with office supplies. I love paper, pencils, pens, markers, glue, envelopes, paper clips, tape, notebooks, journals, cardstock, stencils, office supply organizers, etc. I’m especially a sucker for cute office supplies, office supplies on sale and the killer…cute office supplies on sale. I don’t even use them all. I think I will, but I just love having them. It’s a sickness really.

This week I was at Walmart and I found these composition notebooks for $0.25. I instantly wanted to buy the rest of their supply. But reason set in and I only bought 32 of them (in my defense 22 were for part of my daughter’s birthday party favors). So what do I do with extra composition notebooks. I make them pretty. And I can give them away when I visit my neighbors, or a little thank you gift, or I just keep them :)!

Here’s how you make them pretty. You will need:
A composition notebook
2 pieces of matching scrapbook paper
1 thin piece of contrasting scrapbook paper, vinyl, contact paper or in this example ribbon
Glue stick
Scissors
Pencil
Optional: piece of ribbon and maybe some beads


1. Open your notebook and trace the shape on the back of the scrapbook paper so that you have a piece of scrap book paper the exactly fits the one cover.


2. Cut it out and then glue to the cover with a glue stick (be generous with your glue stick)

3. Repeat that step for the other cover.


4. Cut a piece of ribbon about 6-8 inches longer than the height of our notebook.

5. Glue about 2 inches of the ribbon to the outside spine of the notebook.


6. Cut a piece of paper or vinyl or contact paper (4 inches wide is ideal) and glue/adhere it to the outside spine of the notebook. (I would have used wider ribbon. I like a broader edge...but this works, too!)


7. You’re done. To make sure your ribbon doesn’t fray, burn the edges like we did here. You can add beads to weigh the ribbon down.


8. You can add a name plate or use clear vinyl/contact paper to protect the cover.


P.S. This project did NOT help my office supply addiction! It just made me want to buy more while they are so cheap!

Monday, September 6, 2010

My Trophy Child


It's that time of year again...

Soccer Season!

And if your league is anything like ours, that means clear some space for a new trophy. A "just because you signed up" trophy.

What's happened?

I am the proud, I'll say it again, PROUD recipient of two (that's 2) trophies. One was for winning the Utah State History Fair in the 4th grade when I interviewed my Grandma Great with an extra large video camera. It was titled "A Century in Utah" because she was 100 years old. And I still remember that she was looking for her hair brush through the whole interview and we found it in the back of her hair. Plus she was so amazed at being able to see herself on TV (so was I). It was very cutting edge. Well deserved trophy! The other trophy was for 1st place in Orem City Softball. Go Shazam! (Picture a lightening bolt). I played 3rd base. Another well earned trophy! Hence: Proud.

But now we're so concerned with making everyone feel good that we hand out trophies for their "attendance"? No, their "effort"? Maybe it's just for "team spirit". Either way, my 8 year old has far passed up my PROUD number. Maybe that's why I'm bothered. Or maybe it's because I'm in charge of dusting. When you only have 2 trophies to dust, it's a happy task. When they reproduce, it's not so happy. It's more a bother.

So I have come up with a dust free alternative. I'm sure they still need dusting, I just don't have to see them.

I bought some shelves from Home Depot/Lowe's. And I hung them OVER her closet. I'm typically a lower shelf person. I like to admire what's been placed on the shelf. However, we don't need to manhandle the trophies. So they sit proudly over the closet. Dust out of sight. And she can collect as many as the shelf can handle. Problem solved.


I shared this idea with my sister. She has 5 athletes in her family. That's 5 times the trophies we have collected. This is what she did in one of her boys rooms.

(nice and high so one doesn't have to see the dust they collect)


And for any coaches or team moms out there, here are some other feel good options (strictly my opinion):

* Last year, my little athlete received a medal instead of a trophy. I liked that.

* One of my friends teams decided to present them with team sweatshirts instead of trophies. I really like that.

Other ideas would be team bags, team water bottles, or team shirts. After all, I'm usually asked to donate money for the trophy she'll receive. I think she'd be just as happy with something she can use often. Or maybe she's already been brainwashed into thinking she deserves that trophy.

I hope that means she feels good about herself.


Making

Friday, September 3, 2010

Quick Re-do!

It has been one of those weeks! I had a demanding week at work while I have been fighting a cold. But I didn't want to surrender and skip out on my blog post. My craft projects are my therapy! I love to escape the workshop and get my hands dirty! So since it was Thursday night, my head felt like it was full of bricks and I didn't have any ideas, I ran to a thrift store and scoured the aisles of junk. And of course, my love of junk came through!

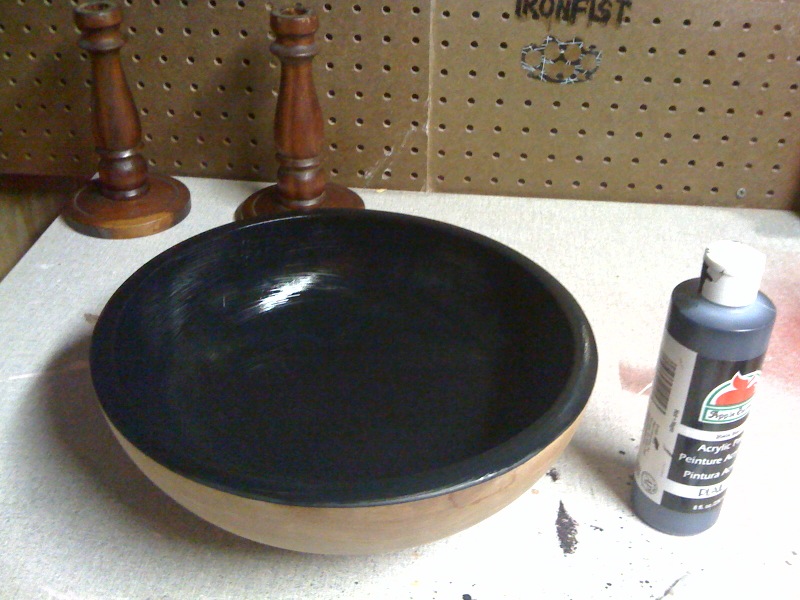
I found this old, beat-up, wooden bowl. It had it's share of stains and it looked pretty neglected but I saw it's potential. It's an amazingly heavy bowl. I grabbed it and ran to the check out!


That's right! Fifty cents baby!


It had bits of the old finish still on it so I sanded that off and then I painted the inside black with acrylic paint.


And because my week wasn't crazy enough, after I took the picture above, my camera battery died. And because we were in the midst of a thunderstorm, I did not want to run to the drugstore to get a new one!

So I'll tell you that I painted the outside with natural stain and then I coated the whole bowl with a shiny, polycrylic top coat to make it shiny and to protect it.


It turned out pretty nice! And those apples....another thrift store find! A while back I found a bag of wood apples for $1.75! My kids love them and for $1.75 I don't really care if they disappear out of the centerpiece and wind up in the play kitchen.


I think I'll fill it with little pumpkins for Halloween! So many possibilities!


Enjoy your long weekend!


Tuesday, August 31, 2010

T-Shirt Backpacks

You may wonder why I love projects with t-shirts so much. I don't know where my fascination began, really. I had a lot of t-shirts growing up from family reunions, school projects, fund raisers, girls camp, etc. It seems like t-shirts are the easiest and most popular souvenir around. The thing is...I hate wearing t-shirts. Maybe it comes from being chubby all my life, and I would always have over-sized t-shirts so as to not display the muffin tops.  But, to me t-shirts are the most unflattering article of clothing I can wear...well...except maybe for stir-up pants, pant suits, and fanny packs (you may not think fanny packs are clothing, but I have seen some old men in the park who beg to differ).

So I've had a lot of really cute t-shirts in my life (I've even worked at a t-shirt company), like all my shirts from Hawaii (YEAH-BOY, 10 shirts for $20 at the Aloha Stadium Swap Meet), my senior class t-shirt "The Untouchables" (uh...did I just date myself?) and the very cute t-shirt my dad drew for me for girls' camp. We had to draw the thing we'd miss most while we were at camp for a week. Some people had a t.v., or a toilet...I had...Charlie Sheen. I'm such a dork.

Anyway, I guess my obsession with finding alternative uses for t-shirts comes from then. I felt guilty throwing away perfectly great shirts and I wanted to keep them as momentos...but how?

I wish I knew this trick back in the Charlie Sheen t-shirt days.  This post is dedicated to my son who saw this project in a magazine and begged me to make this for him.


You will need:
A t-shirt (i used child size)
Scissors
Sewing machine
7/8 Eyelet and eyelet tool (GROMMETS)
about 2 yards of rope or something for the straps.
Safety pin
Seam Ripper or small scissors
Exacto knife or something to punch a whole in fabric
Hammer
Piece of wood or something to protect the surface of your table

Click on pictures for a bigger view!


1. Find a t-shirt
2. Cut off the arms and cut across the chest.
3. Turn it inside out and sew across the area you just cut.


4. Turn right side out & using an exacto or fabric punch, make a whole in the corner area.  If t-shirt material is thin, cut and small extra piece of material and stick it on the inside and poke a whole through that, too.
5. Take your eyelet and punch it through that hole.
6. Place your eyelet top on...oh wait...don't do this yet...you'll do it again in step 8, but I didn't want to change the picture.


7. Over your protection board, place the black holder down, place the bottom of the eyelet that you put through the hole over the black holder.
8. Place eyelet cap (with the teeth face down).
9. Place the tool into the eyelet and HAMMER HARD!!


10. Take a seam ripper or small scissors and rip the side seams of the hemming of the shirt. Do this to both seams. This is where your string will come through.
11. Place safety pin on string and pull the string through the casing (that use to be a hem). Go all the way through till you come out the same area you went in (picture 2).  Do this to both sides...so that string is coming out from both sides. This is going to be your straps.
12. Pull so strings are all even. Measure your child so you know how much rope you need for straps. The with even ends, pull both ends of string through eyelet and then make a knot. Do this to both sides.

NOTE: If you were using string like I was, I burnt the edges so it wouldn't fray.  You can also tape the ends with colored tape to make it more interesting.

And here you have it. 

He was so excited to have this. His church bag had two huge holes at the bottom, so he's excited to have everything stay in the bag.

Pay no attention to his choice of mis-matched pajamas. I'm worried he'll grow up to be that man at the park with a fanny pack.


NightOwlCrafting