Business trips always mess me up. Actually, 6 am flights mess me up. When scheduling my 6 am flight, I just thought, "6 am is not that early." Uh, yes it is when you have to drive an hour to the airport. Yikes! That was stupid. So that was just a long excuse for why I'm posting on Thursday instead of Wednesday...business trip - mess me up!
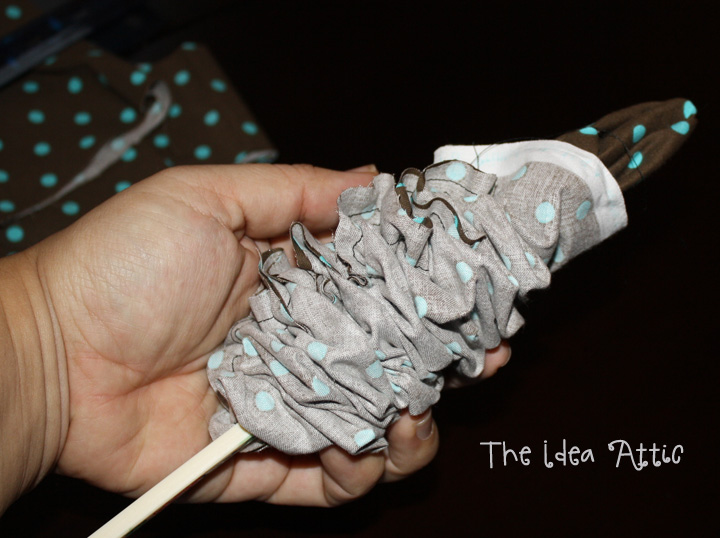
Anyway, for those of you who remember the swirly felt wreath from last month (click here) I used that same technique to make this cute felt topiary for my friend's birthday.
I got a tall vase (on sale at Michael's), green floral foam, mossy grass, dowel, round styrofoam ball, 1/2 yard of felt, pins, paint, glitter and ribbon....oh, and don't forget the glue gun.
First I used the technique I used for the swirly felt wreath and cut out 150 2.5 inch circles. I pinned all the pieces in. Then I took the foam and pushed it into the vase like this....
First I painted the dowel and sprinkled glitter all over it.
Then I stuck the dowel into the styrofoam ball with felt and glued it in place. I used a lot of glue. When that cooled and dried, I shoved the dowel into the foam and did the same thing with the glue....LOTS of GLUE!
Then I glued the moss over the foam and glue to cover the mess I had made with the glue in the first place.
If I could do it all over again, I would have wrapped the dowel in a pretty satin ribbon instead of the paint and glitter. It would have made it look more classy I think.
I'm going to make a few of these for me with different heights and different diameters of balls. I think that it will be cute!!
Thursday, January 13, 2011
Monday, January 10, 2011
Check!
(FRONT)
(BACK)
Check that baby off the list! Finally!
I started this quilt last year. And when I say "last year" I don't mean the last half of 2010. I don't even mean the first half of 2010. I really mean last January, this quilt was started.
You see, a year and a half ago, I had a woman at church who offered to teach anyone interested how to quilt. I was two years into being a proud owner of a sewing machine, meant for the purpose of quilting, and I didn't know how to use it. I was suddenly feeling confident enough to take this "new talent" on. So I showed up for class.
This quilt was the first quilt assigned to us to work on. It's a "log cabin" block quilt. It was my first real experience at piecing together a quilt. I loved how the quilt came together for me. It was exciting and thrilling. I sent it off to be professionally quilted.

When I got the quilt back I quickly sewed the binding to the front of the quilt using this method. But because this quilt didn't have a purpose, it was in trouble.
And once I got the binding attached to my quilt, it just sat. It's been sitting for a long time. It's been sitting long enough that I don't even notice it sitting in my room, next to my chair, waiting for me to handstitch the backside while watching all those shows waiting for me on my DVR.
So with the new year beginning, I decided it was time. It was time to cross this off my list...mostly because my oldest daughter kept reminding me that it wasn't finished and it was really starting to ware on me.
But here's where I admit that I cheated. I decided if I was going to get this quilt checked off my list, it was going to have to be finished by my machine.
So this is what a did.
I pinned the other side of my binding to the back side of the quilt. I made sure that it was just on the other side of the stitching from attaching the binding to the front.
I then pulled out my blind hem foot. It has a metal bit that I used to have it run in the ditch between my binding and my quilt while I stitched on the front of the quilt using a thread that matched my pink binding.
Now, if I were an expert sewer, I could try to actually "stitch in the ditch" and have the thread just barely grab the material on the other side. But I am very aware of my skill, or lack thereof, and I decided to have my stitching show.
I am also able to create my mitered corners. I stitched from corner to corner (backstitching at both ends. I then would cut my thread. Fold my corners under, then begin again on the next side stitching from corner to corner.
I save that hand stitching on the backside for special quilts. But I'm beginning to learn that sometimes, you've got to take the easy route if you're going to get it finished.
Wednesday, January 5, 2011
Magnet Curtains
I know, I know...Magnet Curtains sounds like some new Infomercial product, but I promise I'm not trying to sell you anything. Although, this idea did come from necessity. Now I know this post won't apply to most of you, but for the few of you in my situation, it might be helpful.
Problem #1: Front door has a big window on it. People can just walk right up to our front door and observe our lives. See exhibit A.
Problem #2: Door is a metal door and I don't want to screw in anything to the door to hold a window treatment.
Problem #3: We want to leave our kids home alone for a few hours while we do a little Christmas shopping. Our oldest is almost 10 and we think they can handle watching TV for two straight hours, but we don't want people peering into our door.
Hurried Solution #1: Husband wants to tape packing material in the window. (NOT SHOWN because I had a better idea...although still a little W.T.)
Hurried Solution Idea #2: Use magnets to hold said packing material to window so we don't get tape residue. See exhibit B.
New Problem #1: It's weeks later and this is still on the the door. As you can see, the kids have been playing with the magnets.
New Solution #1: Made a curtain with Magnets in it. See Exhibit C.
Here's how I did it.
First I tried to go to Joann's to buy some material, but they were closed. So, I sauntered over to Target next door and found this 42" wide x 84" long, brown window panel for $7.99 (which I think is actually cheaper than if I bought material at Joann's). Plus, there was already a big hem sewn in for me at the top so i could drop my magnets in it.
Then I measured how long I needed the panel and added 7 inches so I could make a big hem at the bottom to match the top (we need the magnets at the bottom, too). I cut the material and then pinned and sewed the bottom hem to match the top.
Then I tried to figure out how many magnets I would need to keep this weight of fabric up. I figured out it was 9 magnets. So then I measured out nine slots for the magnets evenly spaced.
Then I sewed the first side, dropped a magnet in and sewed the other side so the magnet stayed inside it's little pouch.
I sewed in all the magnets at the top and used that to guide my pockets for the bottom hem so they lined up.
There you have it! A curtain for my metal door.
And when I'm feeling open and free and want more sunlight in, I just pull the curtain down. I think I'm going to make a few different colors or even find a patterned material.
NO-SEW VERSION: Decorate the magnets with buttons, or bling or flowers or anything you want. And then just magnet the material to the door folding over the hems. I might try that as an option, although then the kids start playing with the magnets....but you don't have to SEW!!!
Problem #1: Front door has a big window on it. People can just walk right up to our front door and observe our lives. See exhibit A.
![]() |
| Exhibit A |
Problem #2: Door is a metal door and I don't want to screw in anything to the door to hold a window treatment.
Problem #3: We want to leave our kids home alone for a few hours while we do a little Christmas shopping. Our oldest is almost 10 and we think they can handle watching TV for two straight hours, but we don't want people peering into our door.
Hurried Solution #1: Husband wants to tape packing material in the window. (NOT SHOWN because I had a better idea...although still a little W.T.)
Hurried Solution Idea #2: Use magnets to hold said packing material to window so we don't get tape residue. See exhibit B.
![]() |
| Exhibit B |
New Solution #1: Made a curtain with Magnets in it. See Exhibit C.
![]() |
| Exhibit C |
First I tried to go to Joann's to buy some material, but they were closed. So, I sauntered over to Target next door and found this 42" wide x 84" long, brown window panel for $7.99 (which I think is actually cheaper than if I bought material at Joann's). Plus, there was already a big hem sewn in for me at the top so i could drop my magnets in it.
![]() |
| Sorry, I took it out of the package before I took a picture! |
![]() |
| Pinned hem and then I sewed. |
![]() |
![]() |
| Can you see the little round heavy duty magnet? It's inside it's little pocket. |
![]() |
| On the top hem I even sewed a littler pouch for the magnet so it stayed at the bottom of the hem to give it the gathered look. |
![]() |
| Notice my Christmas decorations still up...Saturday's project will be to pack up Christmas! |
And when I'm feeling open and free and want more sunlight in, I just pull the curtain down. I think I'm going to make a few different colors or even find a patterned material.
NO-SEW VERSION: Decorate the magnets with buttons, or bling or flowers or anything you want. And then just magnet the material to the door folding over the hems. I might try that as an option, although then the kids start playing with the magnets....but you don't have to SEW!!!
Monday, January 3, 2011
Memories...Light the Corners of My Mind
It always seems this time of year brings on nostalgia...
A great childhood brings even better memories. And I am thankful to say that my childhood was everything I hope my children will experience!
My dad was often busy between his job and church service. Because of this, he always made sure to build in those bonding moments with the six of us. And they say the kitchen is what brings families together. He always made breakfast for us on Saturday mornings (still does when I go home to visit). We're talking pancakes, waffles, and our personal favorite Norwegian pancakes. One of the other things he would do is make dessert on Sunday evenings. There were always two family favorites: Tapioca pudding and Carmel popcorn.
This New Years Eve was the first time the hubs and I decided to stay home and begin our own family traditions. There were personal pizzas, milkshakes, movies, and a puzzle that we obsessed with for 3 days. Seriously, we just finished it. But one of the things I decided to do with my kids is to make carmel popcorn. And as I poured the carmel over the popcorn, I was taken back to my childhood watching my dad do this same thing. And I remember keeping my eye on the parts that were drowning in carmel in hopes that I could be the lucky recipient.
So I'm sharing the recipe that I take no credit for but simply sharing a tried a true with you.

Ingredients:
Freshly popped popcorn
1 stick of butter
2 cups of brown sugar
1 cup of Karo syrup
1 can of Eagle Brand milk
Pop your popcorn first. My sister swears by her Whirley Pop. "It makes the best popcorn!" That's a direct quote. I used a microwave bowl that I got at Target for popping corn. It did the job.
On a stove top, bring butter, brown sugar and Karo to a boil. Add in the milk. Stir constantly while bringing it back to a boil. Pour over popcorn. Mix it all up.
Enjoy!
A great childhood brings even better memories. And I am thankful to say that my childhood was everything I hope my children will experience!
My dad was often busy between his job and church service. Because of this, he always made sure to build in those bonding moments with the six of us. And they say the kitchen is what brings families together. He always made breakfast for us on Saturday mornings (still does when I go home to visit). We're talking pancakes, waffles, and our personal favorite Norwegian pancakes. One of the other things he would do is make dessert on Sunday evenings. There were always two family favorites: Tapioca pudding and Carmel popcorn.
This New Years Eve was the first time the hubs and I decided to stay home and begin our own family traditions. There were personal pizzas, milkshakes, movies, and a puzzle that we obsessed with for 3 days. Seriously, we just finished it. But one of the things I decided to do with my kids is to make carmel popcorn. And as I poured the carmel over the popcorn, I was taken back to my childhood watching my dad do this same thing. And I remember keeping my eye on the parts that were drowning in carmel in hopes that I could be the lucky recipient.
So I'm sharing the recipe that I take no credit for but simply sharing a tried a true with you.

Ingredients:
Freshly popped popcorn
1 stick of butter
2 cups of brown sugar
1 cup of Karo syrup
1 can of Eagle Brand milk
Pop your popcorn first. My sister swears by her Whirley Pop. "It makes the best popcorn!" That's a direct quote. I used a microwave bowl that I got at Target for popping corn. It did the job.
On a stove top, bring butter, brown sugar and Karo to a boil. Add in the milk. Stir constantly while bringing it back to a boil. Pour over popcorn. Mix it all up.
Enjoy!
Thursday, December 30, 2010
Resolutions of the Harried Housewife
It's New Year's Eve so everyone is saying that word: Res-o-lution. Of course, there is the obvious resolution, the "I'm going to lose weight" one. But I'm gonna skip over that and talk about my #1 goal for the year....Get and STAY organized!I have two kids, a husband, two dogs and a full time job. If I don't stay on top of things, my world can collapse quickly! The weeks when I'm really on top of things and I've spent the weekend meal planning, laundry and wardrobe planning for the coming week, things run like clock work. I love that and my resolution is to have more weeks like that!
So for today's post, I thought I'd share some of the little things that make my life just a wee bit easier. Enjoy!
Let's start in the bathroom.....
For a long time bath toys were the bane of my existence. They drove me crazy! I tried various storage options. Most of them involved suction cup holders that would work temporarily. But one day this idea came to me:
A plastic bucket. I had this from Easter. It's the same size as an ice cream bucket.

For a long time bath toys were the bane of my existence. They drove me crazy! I tried various storage options. Most of them involved suction cup holders that would work temporarily. But one day this idea came to me:
A plastic bucket. I had this from Easter. It's the same size as an ice cream bucket.
Flip it over and drill or poke holes in the bottom.
Now you have a bucket of wet toys to perch in the corner of the tub that will drain on it's own.
This time of year seems to bring an abundance of coffee mugs in gift baskets from vendors and coworkers. I've put some of those mugs to use in the medicine cabinet with the kids toothpaste and brushes.
And also in the medicine cabinet a coffee mug or an old butter container can hold all those tubes and small bottles.
And in the tub, these Link-a-doos clip anywhere and are great for holding shower/bath accessories.
On to the kids rooms...
I discovered these jumbo, 2.5 gallon ziploc bags and I love them!
Perfect for the toys with lots of pieces! And the zipper top makes it kid-friendly. I put games, train sets, Lego sets.... I just seal them up and toss them into the toy box. Takes a little bit of training but the kids eventually start to cooperate and put the stuff back in the bags!
And don't forget the wipe boxes. Perfect for some toys too!
This last idea is a great one for the summer months. If you have kids in and out all day asking for drinks, doing this keeps the beverages coming quickly.
I used these snack containers. They are 9.5 oz each.
I put a cup of sugar and add a packet of kool-aid in the container.
Seal it up and tape the flavor to the top.
And I have Kool-aid ready to mix when the thirsty neighborhood invades my backyard.
These aren't life-changing ideas but I know, in my house, any shortcut helps!
I'd love to hear any household ideas/tips you have to share!
Happy New Year!!

Labels:
baby/kids,
Children,
Kitchen Tips,
Melissa,
organize,
Storage Ideas,
Time Saving Ideas
Wednesday, December 29, 2010
Door Draft Blocker
So I totally missed last week, but we were Oh-so-busy. I figured you were all, too...so you'd forgive me. I actually had a very cute craft for last week, but just couldn't find the time to sit and blog about it, so I'm saving it for next year. :)
Today's idea came out of necessity. While we love the new house, we don't love the little draft that comes through the front door. This is how the husband has taken care of it:
Kind of creative...right? Yeah, so he asked me to come up with a nicer solution. So I looked around. There were some really creative door draft blockers (or whatever the name of this contraption is), there were dogs and snakes and other fun animals, but I'm a simple gal that likes the look of simplicity and also likes to make simple things so I just made this...
There's a perfectly good explanation for the white at the end of this door draft blocker thingy...but I'll explain later.
So, you will need fabric that is about 2-3 inches longer than the width of the door and at least 8 inches wide (the one shown at the bottom of my door was a 12 inch wide piece because there is a riser on the bottom of the door frame and the draft comes in above that so I needed a pretty big draft blocker).
You'll also need a sewing machine, needle and thread, scissors, a chopstick or pencil and a bag (or more) of kitty litter.
I've done it before with rice, but I read somewhere that if you did it with rice or beans, it would attract "pests" so one suggestion was kitty litter and it was cheap. It was $1.50 for this bag.
Cut your piece and then pin right sides together to form a long tube. You will sew down the long side and down one short side (you have to leave a side open to turn the tube around and fill it up). Please note that these pictures are of the first one I made where the fabric was 7 inches wide. After filling it up, I realized that it wasn't tall enough for the raised bottom of the door frame, so I had to cut a different tube that was from a piece of fabric 12 inches wide. So that's why these pictures the tube looks so skinny and the final one looks so fat!
I sewed a double stitch because in case one of the stitches came loose, I wanted a back up stitch so I didn't have kitty litter all over the place.
I used the chopstick to turn the tube right-side-out and also to poke out the corners so they are crisp.
Now it's time to fill it up. If you are like me, you didn't want to use your kitchen funnel to fill the tube up with kitty litter, so I cut the top off of a 2-liter bottle and used it to funnel the kitty litter in. I cut the bottom of the 2-liter bottle to use as the scooper as well.
When it's full you tuck in the edges and hand-sew it shut. I don't have a picture of this because I haven't hand-sewed mine yet. For my large and in charge draft blocker, one bag of kitty litter wasn't enough, so I just knotted the end until I can run to the store.
But for now, our rug is folded up and there is no drafty air coming in. And now that my sewing machine is out, I can fix all the clothing items that I said I would "get to" sometime.
And for those of you who were interested in what our christmas card display described in this post looked like this year, here it is:
Happy New Year!

Today's idea came out of necessity. While we love the new house, we don't love the little draft that comes through the front door. This is how the husband has taken care of it:
Kind of creative...right? Yeah, so he asked me to come up with a nicer solution. So I looked around. There were some really creative door draft blockers (or whatever the name of this contraption is), there were dogs and snakes and other fun animals, but I'm a simple gal that likes the look of simplicity and also likes to make simple things so I just made this...
There's a perfectly good explanation for the white at the end of this door draft blocker thingy...but I'll explain later.
So, you will need fabric that is about 2-3 inches longer than the width of the door and at least 8 inches wide (the one shown at the bottom of my door was a 12 inch wide piece because there is a riser on the bottom of the door frame and the draft comes in above that so I needed a pretty big draft blocker).
You'll also need a sewing machine, needle and thread, scissors, a chopstick or pencil and a bag (or more) of kitty litter.
I've done it before with rice, but I read somewhere that if you did it with rice or beans, it would attract "pests" so one suggestion was kitty litter and it was cheap. It was $1.50 for this bag.
Cut your piece and then pin right sides together to form a long tube. You will sew down the long side and down one short side (you have to leave a side open to turn the tube around and fill it up). Please note that these pictures are of the first one I made where the fabric was 7 inches wide. After filling it up, I realized that it wasn't tall enough for the raised bottom of the door frame, so I had to cut a different tube that was from a piece of fabric 12 inches wide. So that's why these pictures the tube looks so skinny and the final one looks so fat!
I sewed a double stitch because in case one of the stitches came loose, I wanted a back up stitch so I didn't have kitty litter all over the place.
I used the chopstick to turn the tube right-side-out and also to poke out the corners so they are crisp.
Now it's time to fill it up. If you are like me, you didn't want to use your kitchen funnel to fill the tube up with kitty litter, so I cut the top off of a 2-liter bottle and used it to funnel the kitty litter in. I cut the bottom of the 2-liter bottle to use as the scooper as well.
When it's full you tuck in the edges and hand-sew it shut. I don't have a picture of this because I haven't hand-sewed mine yet. For my large and in charge draft blocker, one bag of kitty litter wasn't enough, so I just knotted the end until I can run to the store.
But for now, our rug is folded up and there is no drafty air coming in. And now that my sewing machine is out, I can fix all the clothing items that I said I would "get to" sometime.
And for those of you who were interested in what our christmas card display described in this post looked like this year, here it is:
Happy New Year!
Subscribe to:
Posts (Atom)