Monday, February 28, 2011

Hide, but Don't Seek


Forgive me...

I've just recently returned from a trip to temporary insanity.

This is what sent me there:

Problem: Oldest daughter can't find her iPod Touch. She swears she left it on her desk in her room. Now it's not there. It's no where!

Suspects:
#1: small little 15 month old. Her latest trick is to reach on top of tables and swipe what's in her grasp. If she took it off the desk, who knows where she could have dropped it.

#2: 3 year old sneak. She loves to go into her sister's room and browse the luxury department, i.e. everything her older sister has told her she's not allowed to touch. (Older sister is not aware that some days while she's at school, I let little sister in her room to play...Oh the things I can get done in the rest of the house while she's visiting heaven)

#3: a little brother. His favorite part of the new Christmas present is the ability it has to beep when lost. As soon as he learned about the "Find Me" function, he decided it's fun to play hide and seek with the iPod. When we send out the Ping signal, it's usually found in the towels, or the game cupboard, or inside the couch. Our problem, the battery had died before we knew it was lost and there was no power in it to beep.

When the Suspects were asked if they took it, not one of them denied doing it.

We seriously spent 5 days looking for this, including President's Day. But I couldn't function until it was found. This wasn't something that could easily be replaced. So towels and linens were folded and refolded. The games were all sorted through, just in case it got placed inside a box. Toy boxes were shuffled through. Couches were vacuumed out. Under the beds were cleaned and organized. Drawers had been opened and organized. The hubs even went through the outside garbage...just in case. Nothing. And then I moved on to closets. First suspect #3s. Then mine. Then to the victim.

That's when I pulled out her laundry basket to go through it and I heard something. It sounded like an angel got her wings...because it was the sound of an iPod sliding down the basket.

{Sound the Heavenly Choirs}

If my detective skills are on, I would point my finger at Suspect #1 because of the hiding spot. I'm guessing she swiped and dropped not too far from the original location. If it were Suspect #2, I probably would have found it in her bed, waiting to be used when the lights went out. And Suspect #3 would have gone much farther to hide it.

So we have now decided the she needs a spot to put her iPod. My husband came across a clever idea. We knew it needed to be something that those Suspects won't know about. So we did this in secret. (Although if truth be told, I did it in front of them, but they never notice me anyway. Seriously...it takes 3 times of asking if they've brushed their teeth before they look at me funny). And we made this:


We went to a used bookstore and bought a book. Funny enough, my oldest is a big reader. And when my husband brought this book home she asked if they had another one at the store because she might want to read this. I'm hoping she feels this same way when she gets to high school!

We also used some mod podge and felt.


My honey then used a razor to cut out a rectangle big enough to house the iPod. (We laughed that the next chapter is titled "Ruined!").


I then placed plastic bags around both sides of the book to keep the mod podge from sticking to those pages. I took my brush and first put mod podge around the pages inside the rectangle. After that had dried, I brushed mod podge around the outside pages of the book.


Once it was all dry, I mod podged the felt to the inside of the rectangle. I then cut the remaining fabric. I chose to try to cut the felt square at the top.


If I were to do it again, I think I would leave a little border of fabric and glue it down. I didn't like how it looked when I was done, so I added some scrapbook paper to pretty it up.


And now it can stay safe hiding inside this book. Shh! It's our secret.

We found the idea HERE


Monday, February 21, 2011

Tank It


My oldest spends every other Tuesday evening with the girls her age at church. She is often coming home with great things. A few weeks ago, she was asked to bring a tank top to the activity. I bought a bag of 4 tank tops for about $3, just in case other girls needed one. She came home with 3 extra tank tops and one darling bag. It was cute. It was simple. And she loves it.

So the other day when she had a friend over, she asked if they could make bags with the left over tanks. This is what we did.


I printed out the first initial of their name on Word. I taped it (backwards) to the window and had the girl trace the letter on Wonder Under.

After they cut the letter out, we ironed it onto the back side of some scrap fabric that they chose. Then cut the letter out of the fabric and iron it on the tank top.

They then chose ribbon and we sewed it around the tank top.


Finally we turned the tank top inside out and just sewed up the bottom.

Turn it back out and you have a bag.


These two little girls are currently rehearsing for the school musical. They are using these bags to keep their scripts in as they go to play practice.


Wednesday, February 16, 2011

Crocheted Wire Necklace

Okay. I have a husband story slightly related to Valentines Day. One day we found a leak in our ceiling and cute and handy hubby tears through the ceiling to fix the problem. Can't find it, can't find it...and then goes on the roof to find that one of the clay shingles moved and all he had to do was move it back. So for the next 3 years I ask him to fix the hole in my kitchen ceiling....nothin'.  Fast forward to last Wednesday.

I was getting ready for work and thinking about the upcoming events. We were having my friend's surprise birthday party at my house on Saturday so I was thinking about cleaning the house and desserts, etc. The party was with the kids and so I was going to have about 9 kids over and I was thinking that it would be nice to lock them in the bedroom so it was less noisy.  I say to the husband, "Wouldn't it be nice if we had a T.V. in our room so we could lock all the kids in the master bedroom to watch a movie?"

That was it.  Two hours later I was checking my bank balance and saw a very large debit from Costco. I called the husband who said, "You told me to buy a flat panel LCD TV for the bedroom for Saturday, so I did."  Me, "WHAT?!" Him, "Happy Valentine's Day?"

Well, that story has nothing to do with my project for this week, but maybe some of you have a husband just like my model. I thought I'd let you know that you're not alone.

This week I was very surprised to find out how EASY it is to crochet wire.  I literally made this project in like 20 minutes.  All you need to know is how to crochet a chain stitch...and it's a great project to use up all those odds and ends beads you may have.


I found this tutorial on YouTube (click here) and it was simple to follow.

You will see in the tutorial that you crochet three different chains and braid them together. I made one braid with just white beads and the others with random colored beads.

I like this project so much that I'm going to invest in sterling silver wire and then get some glass beads maybe all in one color family or maybe do another one of these hodge-podge designs.  Guess what all the girls in my family are going to get this year!!!

Sunday, February 13, 2011

Tootsie Pop Love!

I know...I'm squeezing this post in at the last hour since Valentine's Day is tomorrow! But my good friend Katie showed me this blog post and I LOVED the idea! You may remember from previous posts, I am not a huge fan of Valentine's Day so I'm not going to break the bank and my back for school parties. So when I saw this I knew I had to do it! So simple!

1. Snap a pic of the little guy holding his arm out (I told him to hold an imaginary balloon.)


2. Use Photoshop or a site like Picnik.com and add your text.
3. Print at the drugstore.
4. Get out your exacto and make slits for the lollipop.


And your kid is ready for the party!


Love it!

Happy Love Day!


Wednesday, February 9, 2011

Look what CAN's can do!

This post is dedicated to my friend Jennifer who was staying at my house last week. And you know how on day FIVE you've both talked about your families, work, kids, church, kids, and families? And so you start talking about weird things like food storage. But not just food storage in general, but where to hide money in the house and your gold and silver coins....YEAH. That's what we were talking about. I know!

Anyway, Jen said that she saw a good idea about using a peanut can or something. Then you cut out the bottom with one of those can openers that leaves no sharp edges...you know the ones that cut the side of the lid instead inside the lid.  Here's a link to the one I have!

Empty the can, clean it out and  fill it with your valuables. Then you carefully glue the bottom back on and shove the can of nuts in with the rest of your cans in your food pantry or food storage.

So, yesterday while I was making spaghetti sauce for dinner and was looking at all those cans, I thought I'd try her idea....but not to hide valuables or money....to wrap presents.

So, I cleaned the cans and took off the labels.

I filled one of them with candies (wrapped) for a Valentine's gift. And the other one I put a present in for a friend. I even squished a hat I crocheted for a baby into one of these.

Then I glued the lid on.  I think I might have put too much glue, but I tried to use a toothpick to poke the glue into the crevices. (I used tacky glue for this.)

So you can see the glue squished out the top (that's why I think I used too much).

I just used my finger to wipe the excess away. Hopefully my presents inside didn't get glue on it.


I decided to wrap the cans with paper and ribbon. After using many different adhesives, the good old glue gun worked the best. If I had any more creativity, I'm sure I could have used cute stamps to decorate or write on the can...but it was late and I wanted to watch GLEE on DVR.

So this is how they turned out...


I thought this would be a good idea to disperse goodies at Christmas time because you don't have to buy a container, and you don't have to fill them up too much. And I think it would be fun to open these treats. You can use a regular can opener, or just use the grippy part to lift the lid on your No-sharp edges can opener.

-Put a piece of tissue paper inside and stack cookies almost the exact size of the can inside.
-Fill the can half with raffia and put movie tickets and some bags of m&m's inside for a quick birthday present.
-The small cans are perfect for lipgloss, chapstick, erasers, or any small gift.
-Or you can always fill it up with cash and store it next to your green beans.

Whatever it is...."You CAN do it!"  Cheesy, I know...but a can of creamed corn to whoever can name the movie first...

Monday, February 7, 2011

What About Love

Name the band and you'll know what today's post is about:


HEART...of course!


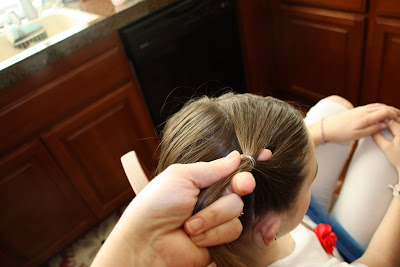
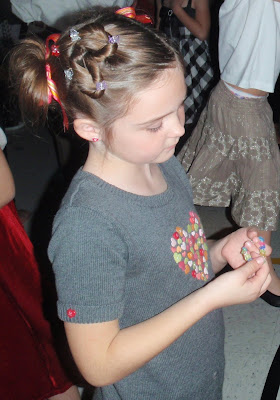
My Sugar has worn this HEART hair-do the last two years around Valentine's day and it's the one hair-do that she gets stopped by the yard duties, teachers and other parents. It's darling and it's easy. Here we go:

Start with a small pony. I like to use the little elastics.


Right on top of the pony, you're going to split it into two with your finger.


You're then going to take the pony through the hole. You're going to take it under so the pony ends up coming out the top. I think it's easiest if the hair is slightly damp.


You'll then split the pony into two. Once again, it's helpful if the hair is damp. I then start with one side and twist it. Have 5 small clippies ready to form it into the heart shape. I twist and put a clip at the top. I then twist a little more and put a clip in the middle of the side. Then I go to the next side to do that half.


I then finish off the heart at the bottom. Here I pulled her hair into one pony.


I've done it in the past where I do two ponies (with a side part on top for the heart).


I found this cute hairstyle a few years ago on a hair blog that I LOVED! I was so sad when she decided to stop blogging. She had the cutest hair styles and great tutorials. Luckily she has kept the blog active so YOU can now go and partake of her goodness. I'll link you to all of her HEART hair styles right HERE.

Before she quit blogging, she was blogging buddies with this momma stylist. If you haven't stumbled across her blog before, you probably aren't a mother of a Princess. Her link is HERE and she has amazing styles.

My friend used one of her HEART styles on her girls at church yesterday. You can see their darling do's HERE.

HAPPY HEARTS DAY! (That's for you Noreen! - I love ya!)


Friday, February 4, 2011

For the little mommies...

Once upon a time I bought some flannel. I put those 2 yards of flannel in a bag in a closet and my life resumed. End of story. But then I saw this: 'click here' And then I remembered why I had purchased that flannel at the fabric store clearance sale! I had seen a similar tutorial and I had every intention of making a wrap for my daughter's baby dolls. She is constantly bringing me a doll and a blanket and wanting me to swaddle her baby, only to walk away and to have the doll completely unraveled within seconds!

I owe a big THANK YOU to Leslie at Little Apple Seed for reminding me why I had a bag of flannel in my closet!

I followed her excellent directions:

Here's my 24" x 24" square (cute fabric, huh?)


Before I sewed on the pocket, I grabbed the largest of the dolls to make sure all of the babies could enjoy the comforts of swaddling (this baby is in one of my daughter's preemie outfits. Bittersweet memories!)


All sewn together:


Now here's where my wrap takes a different turn from the tutorial I referenced. I added some velcro:


I used sticky back so it would stay put when I figured out where to place it. Then I sewed the strips on.


I placed a set on the bottom tip and on the pocket:


And then one on each "wing." One on the inside and the other piece on the outside.


And swaddling your baby doll is as easy as 1 - 2 - 3!


And then watch your baby love her baby!


(She was not in a cooperative mood today so I had to sneak up on her and snap a pic while she was in a Little Bear trance!)


Wednesday, February 2, 2011

Nordstrom Knock-Off

Last week Melissa talked about how she hated Valentine's Day. Melissa - I can still remember the Valentine's Days of college when we'd dress in black and watch women power movies like....Thelma and Louise (was that really Brad Pitt) or watch Steel Magnolia's and cry and hug and tell each other that we didn't need boyfriends because we had each other. And truth be told, we were more fun...that's why all the "dating" roommates dreaded their dates because we were going to do something fun in their absence. (It's 18 years later and we're still all friends...where are you now Cold-Sore Curt?)

Anyway, at that time I thought I hated Valentine's Day because I didn't have a boyfriend...but that's not the case...I now have a very cute, loving husband and I still don't much love Valentine's Day. Restaurants are booked, babysitters are taken, we feel forced to look lovingly in each other's eyes when, really, we both want to watch the game on the T.V.'s above. [Although, Valentine's Day is perfect for giving each other the things we bought right after Christmas at the sales, but couldn't justify spending money on ourselves. I think that's really why Valentine's Day was invented.]

So in honor of Melissa, I decided NOT to do a Valentine's Day themed post. (Deb's all about Valentine's Day...guess who always had dates in college!)  I guess this can be a Valentine's post if you are going to make this fabulous gift for a friend.

DISCLAIMER: If your name is Lisa and I'm going to your birthday party tonight...don't read on because I'm about to reveal your present.

I was looking for something cool to make my friend for her birthday and I stumbled upon a fabulous tutorial from a fabulous blog.  Here it is!

Basically she recreated a $595 necklace from Nordstrom for less than $20.  Uh...that wasn't a typo...a $595 necklace and there are no real gold, real silver, real pearl parts.

Because she gave such a great tutorial, I didn't document my every step. But I decided to make this necklace instead:

Here's the link to the necklace (click here)

But here's a screen shot in case they don't sell that necklace anymore. CLICK the PIC to see it bigger.


I only had 15 min in Joann's yesterday because I was in a hurry for an appointment. They didn't have everything I really wanted (like a dark chain and glass pearl beads) and I didn't have time to go to any other stores, so I settled on a longer silvery chain and crystals. And this is how it turned out. [Thanks to my friends Elita for modeling & Hazel for photographing.]


FYI, I singed the edges of the blue fake silk to make sure they didn't fray.

Hopefully she likes it! I saved $585 by making this by myself. Maybe I can use that money I saved to get my husband a Valentine's Gift....oh wait, I already have a few things for him.