
Showing posts with label Gifts. Show all posts

Wednesday, March 23, 2011

Life - Trying to have a Ball

My deepest apologies to Debbie who seems to have been the only one posting lately.  I'm not going to try to get any sympathy from you, but (here's where I actually do try) I've had my hands full the last few weeks.

First, I had strep throat and my family caught something else almost as bad. Then I had a week long business trip in freezing Chicago (ok...I admit, it wasn't that cold, but So. Cal Girl was NOT comfortable). Then a quick family vacay to Disneyland which brought on bronchitis.  Again, the bronchitis itself wasn't that horrible...it was the almost peeing or peeing my pants every time I coughed. Let's just say there was a lot of coughing and a lot of laundry to do. So between all that, work, church, family and 4 prescriptions for anti-biotics...I'm feeling a lot better and can focus on a craft or two.

I'm not mentally prepared to make Easter projects, so I decided to make something for the baby shower I get to go to on Saturday. So I whipped up a diaper cake and decided that I wanted to top it with homemade fabric balls. All kids and babies like balls! So, here's what I made:
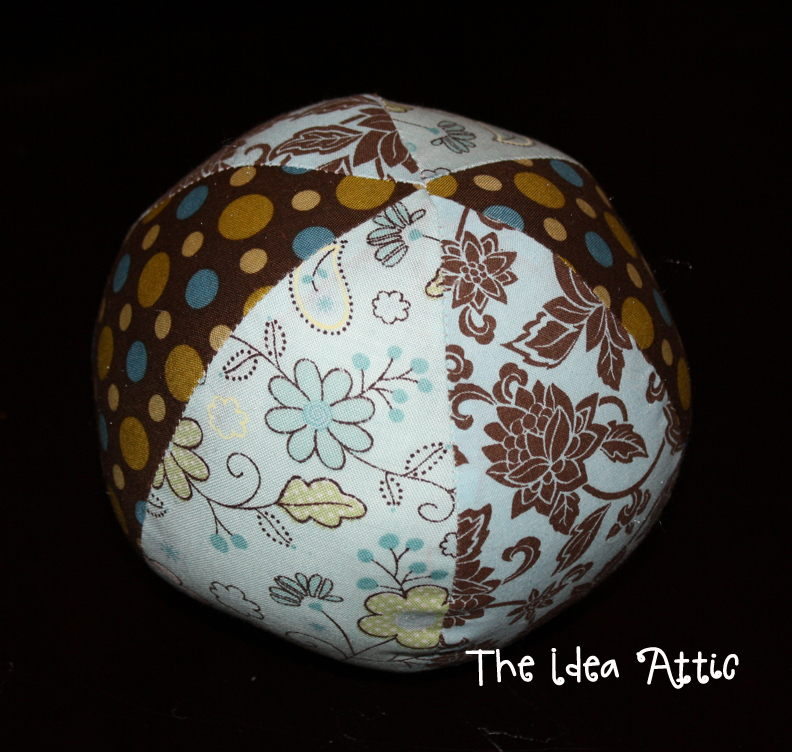


This is a perfect project for using all those left over fabric scraps. I looked for a pattern and I found a site that taught me how to make my own pattern as well as the cute easter bunny out of this same ball pattern.  Here is the link. Post pictures of your creation on our Facebook page if you make it. I think it's so cute but like I said, I'm not mentally ready for Easter stuff yet. So I created my own pattern. Here is the pic or you can click on this link to download the pdf version with instructions.


I cut a version of my pattern out of some thicker plastic like a thick sheet protector or something. Then I cut out 6 pieces from my fabric. The ball above was two pieces of three fabrics or you can do three pieces of two fabrics. Make sure you iron your pieces. I know...I know...I hate ironing. But it makes sewing your pieces together so much easier.

Decide how you want your patterns to go and then sew 3 pieces together, side by side. (Remember right sides facing for sewing.) Then with rights sides facing, sew the two sides of the ball together leaving a space to stuff the ball.Turn it right side out and stuff the ball. I like to put a jingle bell in there...just to make some noise. Then hand stitch the opening.


Here is one ball not stuffed with a section left open and the other one done.
I'm not a very good hand-sewer...but this is my "closing of the hole."
Here it is again.
My kids are loving playing with these. And they are so anxious to make their own. I told them it was like build-a-bear and they can put their own treasures inside their ball.


Here are the balls on top of the diaper cake. You can also see cute baby socks my friend Stacy decorated with crocheted on buttons. Maybe I'll convince her to be a guest blogger soon.

Oh...one more idea I had with this ball. I have to teach the kids music on Sunday at church, so I'm going to cut out 10 "pins" actually circles and I'm going to write songs on the back or ways to sing the song (ie whisper, hum, only girls, etc.) and I'm going to let them go bowling. They have to roll this ball and whichever "pin" it lands on will determine their singing fate. It should be fun!

Now that I'm healthy and there's less stress at work, maybe I'll take some time to have a ball, too!

Wednesday, February 16, 2011

Crocheted Wire Necklace

Okay. I have a husband story slightly related to Valentines Day. One day we found a leak in our ceiling and cute and handy hubby tears through the ceiling to fix the problem. Can't find it, can't find it...and then goes on the roof to find that one of the clay shingles moved and all he had to do was move it back. So for the next 3 years I ask him to fix the hole in my kitchen ceiling....nothin'.  Fast forward to last Wednesday.

I was getting ready for work and thinking about the upcoming events. We were having my friend's surprise birthday party at my house on Saturday so I was thinking about cleaning the house and desserts, etc. The party was with the kids and so I was going to have about 9 kids over and I was thinking that it would be nice to lock them in the bedroom so it was less noisy.  I say to the husband, "Wouldn't it be nice if we had a T.V. in our room so we could lock all the kids in the master bedroom to watch a movie?"

That was it.  Two hours later I was checking my bank balance and saw a very large debit from Costco. I called the husband who said, "You told me to buy a flat panel LCD TV for the bedroom for Saturday, so I did."  Me, "WHAT?!" Him, "Happy Valentine's Day?"

Well, that story has nothing to do with my project for this week, but maybe some of you have a husband just like my model. I thought I'd let you know that you're not alone.

This week I was very surprised to find out how EASY it is to crochet wire.  I literally made this project in like 20 minutes.  All you need to know is how to crochet a chain stitch...and it's a great project to use up all those odds and ends beads you may have.


I found this tutorial on YouTube (click here) and it was simple to follow.

You will see in the tutorial that you crochet three different chains and braid them together. I made one braid with just white beads and the others with random colored beads.

I like this project so much that I'm going to invest in sterling silver wire and then get some glass beads maybe all in one color family or maybe do another one of these hodge-podge designs.  Guess what all the girls in my family are going to get this year!!!

Wednesday, February 9, 2011

Look what CAN's can do!

This post is dedicated to my friend Jennifer who was staying at my house last week. And you know how on day FIVE you've both talked about your families, work, kids, church, kids, and families? And so you start talking about weird things like food storage. But not just food storage in general, but where to hide money in the house and your gold and silver coins....YEAH. That's what we were talking about. I know!

Anyway, Jen said that she saw a good idea about using a peanut can or something. Then you cut out the bottom with one of those can openers that leaves no sharp edges...you know the ones that cut the side of the lid instead inside the lid.  Here's a link to the one I have!

Empty the can, clean it out and  fill it with your valuables. Then you carefully glue the bottom back on and shove the can of nuts in with the rest of your cans in your food pantry or food storage.

So, yesterday while I was making spaghetti sauce for dinner and was looking at all those cans, I thought I'd try her idea....but not to hide valuables or money....to wrap presents.

So, I cleaned the cans and took off the labels.

I filled one of them with candies (wrapped) for a Valentine's gift. And the other one I put a present in for a friend. I even squished a hat I crocheted for a baby into one of these.

Then I glued the lid on.  I think I might have put too much glue, but I tried to use a toothpick to poke the glue into the crevices. (I used tacky glue for this.)

So you can see the glue squished out the top (that's why I think I used too much).

I just used my finger to wipe the excess away. Hopefully my presents inside didn't get glue on it.


I decided to wrap the cans with paper and ribbon. After using many different adhesives, the good old glue gun worked the best. If I had any more creativity, I'm sure I could have used cute stamps to decorate or write on the can...but it was late and I wanted to watch GLEE on DVR.

So this is how they turned out...


I thought this would be a good idea to disperse goodies at Christmas time because you don't have to buy a container, and you don't have to fill them up too much. And I think it would be fun to open these treats. You can use a regular can opener, or just use the grippy part to lift the lid on your No-sharp edges can opener.

-Put a piece of tissue paper inside and stack cookies almost the exact size of the can inside.
-Fill the can half with raffia and put movie tickets and some bags of m&m's inside for a quick birthday present.
-The small cans are perfect for lipgloss, chapstick, erasers, or any small gift.
-Or you can always fill it up with cash and store it next to your green beans.

Whatever it is...."You CAN do it!"  Cheesy, I know...but a can of creamed corn to whoever can name the movie first...

Wednesday, February 2, 2011

Nordstrom Knock-Off

Last week Melissa talked about how she hated Valentine's Day. Melissa - I can still remember the Valentine's Days of college when we'd dress in black and watch women power movies like....Thelma and Louise (was that really Brad Pitt) or watch Steel Magnolia's and cry and hug and tell each other that we didn't need boyfriends because we had each other. And truth be told, we were more fun...that's why all the "dating" roommates dreaded their dates because we were going to do something fun in their absence. (It's 18 years later and we're still all friends...where are you now Cold-Sore Curt?)

Anyway, at that time I thought I hated Valentine's Day because I didn't have a boyfriend...but that's not the case...I now have a very cute, loving husband and I still don't much love Valentine's Day. Restaurants are booked, babysitters are taken, we feel forced to look lovingly in each other's eyes when, really, we both want to watch the game on the T.V.'s above. [Although, Valentine's Day is perfect for giving each other the things we bought right after Christmas at the sales, but couldn't justify spending money on ourselves. I think that's really why Valentine's Day was invented.]

So in honor of Melissa, I decided NOT to do a Valentine's Day themed post. (Deb's all about Valentine's Day...guess who always had dates in college!)  I guess this can be a Valentine's post if you are going to make this fabulous gift for a friend.

DISCLAIMER: If your name is Lisa and I'm going to your birthday party tonight...don't read on because I'm about to reveal your present.

I was looking for something cool to make my friend for her birthday and I stumbled upon a fabulous tutorial from a fabulous blog.  Here it is!

Basically she recreated a $595 necklace from Nordstrom for less than $20.  Uh...that wasn't a typo...a $595 necklace and there are no real gold, real silver, real pearl parts.

Because she gave such a great tutorial, I didn't document my every step. But I decided to make this necklace instead:

Here's the link to the necklace (click here)

But here's a screen shot in case they don't sell that necklace anymore. CLICK the PIC to see it bigger.


I only had 15 min in Joann's yesterday because I was in a hurry for an appointment. They didn't have everything I really wanted (like a dark chain and glass pearl beads) and I didn't have time to go to any other stores, so I settled on a longer silvery chain and crystals. And this is how it turned out. [Thanks to my friends Elita for modeling & Hazel for photographing.]


FYI, I singed the edges of the blue fake silk to make sure they didn't fray.

Hopefully she likes it! I saved $585 by making this by myself. Maybe I can use that money I saved to get my husband a Valentine's Gift....oh wait, I already have a few things for him.


Thursday, January 20, 2011

Crocheted Beanies & Flowers

I don't think I ever told you guys that it snowed here in my little Southern California town on the first Sunday of the year. It was amazing! The kids had so much fun playing in the slushy snow. My son kept running to the back to see if the "pool has frozen, yet." Poor guy, I had to explain that that probably wouldn't happen, but he was excited nonetheless.

Now I don't want to make any of you jealous, so I'll try to refrain from talking about the 75 degree weather we're experiencing. It almost makes up for the ridiculous cost of living!

But knowing that most of the country is still experiencing winter, I decided that the perfect baby gift for twin girls would be Flower Beanies.


I'm all about the fast projects that look like you spent so much time on but seriously, these were pretty simple. I know not all of you have grasped the love of crochet or knitting, but it really is a stress reliever.

To me knitting is more difficult, I have to watch a youtube video every time I need to cast on. But crocheting is simple and if you use a big needle and thick yarn, these projects are QUICK!

There are a million free beanie patterns on the web, youtube, etc. You can find help with how to start, how to chain, how to double crochet...videos are helpful. I love this tutorial for the flower (click here).

I put my flowers on a hair clip so the parents could decide whether or not they want the flower on or off.
Then my baby girl got jealous of the presents for the newborns, so I had to whip this one out for her, too...with both colored flowers. I did this all in one evening, so you see...it's not too difficult.


I love making gifts for people. And it really is pretty cost effective. I spent $4/skein (2 skeins) and was able to do 3 beanies and 5 flowers. I think shipping is going to cost more than the present.

Happy Winter!

Thursday, January 13, 2011

Felt Topiary

Business trips always mess me up. Actually, 6 am flights mess me up. When scheduling my 6 am flight, I just thought, "6 am is not that early." Uh, yes it is when you have to drive an hour to the airport. Yikes! That was stupid. So that was just a long excuse for why I'm posting on Thursday instead of Wednesday...business trip - mess me up!

Anyway, for those of you who remember the swirly felt wreath from last month (click here) I used that same technique to make this cute felt topiary for my friend's birthday.


I got a tall vase (on sale at Michael's), green floral foam, mossy grass, dowel, round styrofoam ball, 1/2 yard of felt, pins, paint, glitter and ribbon....oh, and don't forget the glue gun.

First I used the technique I used for the swirly felt wreath and cut out 150  2.5 inch circles. I pinned all the pieces in. Then I took the foam and pushed it into the vase like this....


First I painted the dowel and sprinkled glitter all over it.

Then I stuck the dowel into the styrofoam ball with felt and glued it in place. I used a lot of glue. When that cooled and dried, I shoved the dowel into the foam and did the same thing with the glue....LOTS of GLUE!

Then I glued the moss over the foam and glue to cover the mess I had made with the glue in the first place.

If I could do it all over again, I would have wrapped the dowel in a pretty satin ribbon instead of the paint and glitter. It would have made it look more classy I think.


I'm going to make a few of these for me with different heights and different diameters of balls. I think that it will be cute!!

Friday, December 17, 2010

Quick and Easy Gift Idea

If you're like me, you love this time of year and you love giving small gifts to the people you interact with daily and that you appreciate. BUT...it can get overwhelming! Before you know it, you find yourself up to your eyeballs in candy and glue at 2:00 AM wondering what in the bleepity bleep you got yourself into!! So this year I resolved to keep it simple. When I was brainstorming gift ideas and found my mind wandering to big and grand ideas, I'd reel myself back in!

So here's my idea for co-workers, school workers, day care workers, neighbors, etc.


I started with a super easy cookie recipe for Peanut Butter Cup Cookies.


Mix up the dough as directed on the package. Roll into small balls and fill a mini muffin pan.


Bake as directed. Immediately after removing them from the oven, press a peanut butter cup down into the baked cookie.


Let them cool (you can put them out on a patio table or garage if it's 15 degrees out and it will speed up the process significantly!) And carefully remove them from the pan.


Meanwhile... I prepared the bags to put the cookies in. I found these colorful lunch bags at my local grocery store in the card and party aisle (Schnucks, if you're a Missourian!) They were only $.25 each! I wrapped the cookies in plastic wrap and dropped them into the bags.


And to close the bags...

I spray painted a bunch of clothespins. These are $.97 for a pack of 50 at Walmart!


I cut some scrapbook paper and modge podged it onto the clothespins.


After that dried I flipped them over and glued a small magnet onto them.


And once that was all dry, I sanded them a bit and rubbed a tiny bit of distress ink to give them some character. Then I clipped them onto the bag.


Now they have a bag full of goodies and a magnet clip for their fridge!

I have a bunch of these on my fridge and they are great for pictures, lists, coupons,artwork, etc!


Merry Christmas!!


Wednesday, December 15, 2010

Some gift ideas, Christmas Card Display & a Yummy Treat

The count-down to Christmas is so exciting. Christmas cards - check, gingerbread houses - check, rearranging the ornaments on the tree after the kids go to bed - check, Christmas shopping - check...oh wait, what about those neighborhood and office gifts. Yikes!

There are so many people and we budgets are tight this year. Even baking and making treats are pretty expensive activities. So I'm going to share some quick and inexpensive Holiday gifts I've done accompanied by a suggestion of copy for the gift tag. Scroll down and you can see my new way of displaying our Christmas cards and don't forget to get all the way down for a fabulous yummy treat my friend gave me the recipe for after I pretty much inhaled her dessert.

1. Hand soap. One year I made foaming handsoap which is so easy. You buy a foaming pump dispenser from here or someplace like that supply store. You buy a scented soap base and fill the dispenser about 1/3 of the way and then fill the rest with water.  I don't have a picture...although I think one of my co-workers still has it on her desk from last year, but you get the idea. Or you can just buy a soap from the dollar store and attach this to it :


‘Tis the season for family and friends,
And your to-do list that never ends.
‘Tis the season of kisses and hugs,
And those viruses, bacteria and bugs.
So as you spread goodwill toward man(s)
Don’t forget to wash your hands!


2.  Door bell or star. These cute antique door bells are on sale at Michael's right now for only $.64. Then you take ribbon you bought at after-Christmas sales from last year and just make a pretty bow.


The Holidays are here - what a celebration,
Except sometimes they're full of stress & frustration.
So here's a little bell (or star) to hang on your door
To remind you again what the 25th is for.
As you open your home and hear this bell (or star) of tin,
Let the real spirit of Christmas come and enter in.

(Just letting some of my friends know that I dibs this this year. Some of you may be getting this.)


3. Home spray infused with essential oils. You can see the tutorial here. I think that was my very first post. I just wrote on the card:
 

Infused with Lavender & Chamomile, this spray helps calm the soul, allowing you to enjoy friends, family and the coming of the New Year.


CHRISTMAS CARD DISPLAY 
We've always just taped our Christmas cards to the wall every year, but then the kids got carried away the tape or the cards wouldn't stay on the wall and then our friends would come over on the day their card fell off the wall...how embarrassing. Anyway, this year we decided to make use of the blinds that always stay closed and some clothes pins.  I found a bag of many snowflakes at Michaels for $2.49 and glued them to the cloths pins I found for $1.49 at Walmart. And then we just clipped the cards to the blinds. It looks really cute.


YUMMY PEPPERMINT PIE (or cake...whatever) 
1/4 cup butter
1 pkg oreos (crushed)
Container of Peppermint Ice Cream
Hot Fudge
Container of Cool Whip
Crushed up peppermint candy
9x13 pan

Crush the oreos and mix with butter and press into pan making an oreo cookie crust. Keep about 4 Tablespoons of crumbs to decorate the top.


Take your softened container of peppermint ice cream and spread over oreo cookie crust and smooth the top.

Drizzle hot fudge all over the peppermint ice cream.


Spread softened cool whip all over the hot fudge and ice cream. Then top with left over oreo cookie crumbs and crushed peppermint. Put in the freezer for a few hours to harden. Serve and then MOVE OUT THE WAY, because people are going to be knockin' you down to have a treat.


I hope your Christmas and Holiday season is filled with joy and love with minimal stress! :)
Sew Much Ado
Someday Crafts 
Blue Cricket Design 
The Trendy Treehouse 
Hope Studios 
Paisley Passion 
Allie Makes