Showing posts with label family time. Show all posts

Wednesday, March 23, 2011

Life - Trying to have a Ball

My deepest apologies to Debbie who seems to have been the only one posting lately.  I'm not going to try to get any sympathy from you, but (here's where I actually do try) I've had my hands full the last few weeks.

First, I had strep throat and my family caught something else almost as bad. Then I had a week long business trip in freezing Chicago (ok...I admit, it wasn't that cold, but So. Cal Girl was NOT comfortable). Then a quick family vacay to Disneyland which brought on bronchitis.  Again, the bronchitis itself wasn't that horrible...it was the almost peeing or peeing my pants every time I coughed. Let's just say there was a lot of coughing and a lot of laundry to do. So between all that, work, church, family and 4 prescriptions for anti-biotics...I'm feeling a lot better and can focus on a craft or two.

I'm not mentally prepared to make Easter projects, so I decided to make something for the baby shower I get to go to on Saturday. So I whipped up a diaper cake and decided that I wanted to top it with homemade fabric balls. All kids and babies like balls! So, here's what I made:
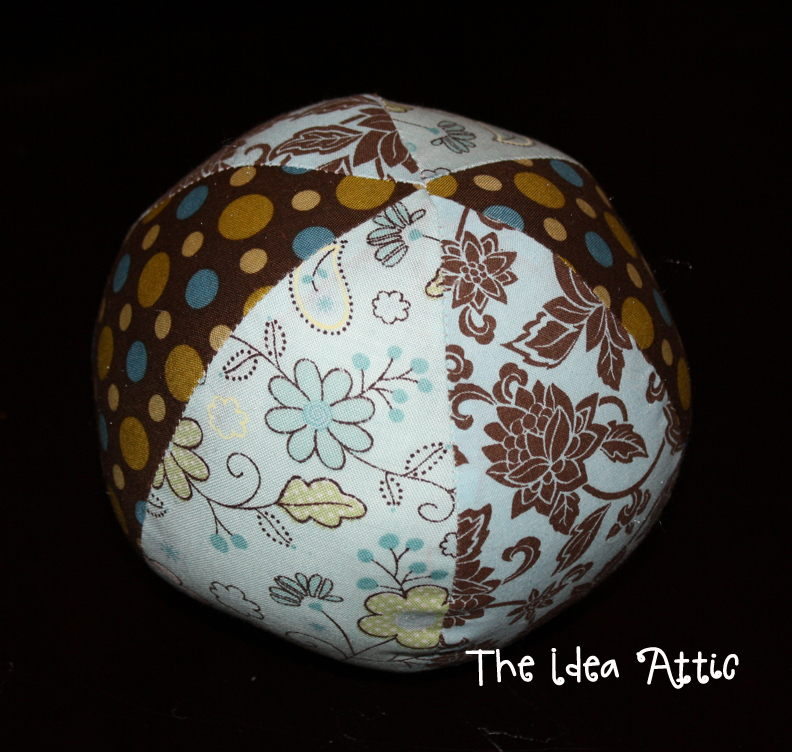


This is a perfect project for using all those left over fabric scraps. I looked for a pattern and I found a site that taught me how to make my own pattern as well as the cute easter bunny out of this same ball pattern.  Here is the link. Post pictures of your creation on our Facebook page if you make it. I think it's so cute but like I said, I'm not mentally ready for Easter stuff yet. So I created my own pattern. Here is the pic or you can click on this link to download the pdf version with instructions.


I cut a version of my pattern out of some thicker plastic like a thick sheet protector or something. Then I cut out 6 pieces from my fabric. The ball above was two pieces of three fabrics or you can do three pieces of two fabrics. Make sure you iron your pieces. I know...I know...I hate ironing. But it makes sewing your pieces together so much easier.

Decide how you want your patterns to go and then sew 3 pieces together, side by side. (Remember right sides facing for sewing.) Then with rights sides facing, sew the two sides of the ball together leaving a space to stuff the ball.Turn it right side out and stuff the ball. I like to put a jingle bell in there...just to make some noise. Then hand stitch the opening.


Here is one ball not stuffed with a section left open and the other one done.
I'm not a very good hand-sewer...but this is my "closing of the hole."
Here it is again.
My kids are loving playing with these. And they are so anxious to make their own. I told them it was like build-a-bear and they can put their own treasures inside their ball.


Here are the balls on top of the diaper cake. You can also see cute baby socks my friend Stacy decorated with crocheted on buttons. Maybe I'll convince her to be a guest blogger soon.

Oh...one more idea I had with this ball. I have to teach the kids music on Sunday at church, so I'm going to cut out 10 "pins" actually circles and I'm going to write songs on the back or ways to sing the song (ie whisper, hum, only girls, etc.) and I'm going to let them go bowling. They have to roll this ball and whichever "pin" it lands on will determine their singing fate. It should be fun!

Now that I'm healthy and there's less stress at work, maybe I'll take some time to have a ball, too!

Monday, March 7, 2011

Kiss Me...I'm Irish!


Really.

I am.

My Grandpa was born in the green country before he came to this Great Land.

I won't really make you kiss me. I'll save that for the Mister and the Munchkins.

But I've always been proud of my Irish heritage.

So one might think that I would be thrilled when the 3rd grader came home last week with a "family assignment": Build a Leprechaun Trap. I was a little overwhelmed at the thought. But then we came up with this.


Yes, it doesn't look like a trap. There's more to the story:

As part of her assignment, she is supposed to write an essay about her trap and what she will do if she catches a leprechaun. She then will have to present the trap and give a speech to her class.

So I asked her what her plans were if Luck was on her side and she caught a little fella:

One might think the obvious - have them lead you to their gold. But not my little girl. The genes apparently run deep. Her plans with her little friend is to play dress up. She wants to dress him up. Did someone say "shopping"?

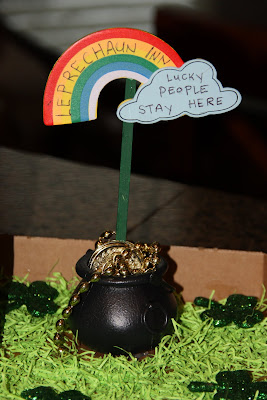
So we built the Leprechaun Inn, Where Lucky Little People Stay...Forever.

Her plans are to get him through the door, get him to make himself comfortable at the Inn, then put a rock in front of the door to trap him. Then she can lift the roof off and start her play date. Here are a few pictures of how our trap turned out:


For the materials, we bought the cardboard house at Michaels. It was under $3. Meg painted it green while I used Mod Podge and glitter for the roof. I placed where we wanted the house and then drew out a pathway. I used glitter for the path. After it dried, I used hot glue to glue the house and pots to the cardboard. For the grass, we took Easter Basket grass and I cut it up in small pieces. Meg used the Mod Podge and painted the bottom of the box then sprinkled the grass on. For the sign, we bought the pot and coins at the Party store. We bought the pre-made rainbow at Michaels and wrote on it with a Sharpie.

It came together pretty quickly.

Now wish us Luck on the essay and speech...oh and on catching the little fella...


Monday, January 31, 2011

Please Leave Us a Message...

Tomorrow is February and that's one of my most favorite months!

It may or may not have something to do with a birthday, but throw in Valentine's Day and there's nothing but LOVE.

And once you become a parent, Valentine's Day seems to be focused on your kids. And that's what we're beginning today.

We're making a message center:


A few weeks ago, I ordered these mailboxes from Oriental Trading for *cough, cough* $3.99 a piece. I justified the price with the idea that we will re use these each year. On Saturday night I was racing against the girl locking the doors of Target to get to their pharmacy department. As I was hurrying across the store (because I got locked out of the green doors but slipped through the blue doors) I walked by the dollar section. And what did I see...these exact mailboxes for $1 a piece. So if you like, hurry to your nearest Target!

Last night, we pulled out some stickers and got to work decorating our own mailboxes.


And then I took my napkin/utensil holder and turned it into our card/pen holder. 3x5 cards fit perfectly inside the mailboxes.


Now the kids can leave messages for each other. My little 6 year old boy was busy this morning before school writing notes. And he walked in the door after school and went straight to the table. I love it! In fact he even left a message for himself: "Dear Me, I make me laugh. Love, Me" We're not worried about self-confidence over her.


It's my goal to leave a note for everyone each night before I go to bed. I figure surely this won't be too difficult to do until Valentine's Day. We will then collect all their notes, put them in an envelope and into their memory boxes. These notes will be great to look back on someday.

Simple.

Easy.

Wednesday, January 26, 2011

Actual Conversation Hearts

For those of you who may know me, the following fact may come as a surprise to you...I love quiet time. Most of you know me as the person who fills the air waves with constant chatter and who does everything in her power to avoid the "7 minute lull" (you know that part in a conversation where no one has anything to say?). I do enjoy quiet time when I'm by myself and/or the kids are all in bed (like right now), when I can read, or think or rest my vocal chords.

But when I'm in the presence of people, I really don't like having awkward pauses in conversation. Unfortunately, my children are the same way. They all have a story (or 14) to tell and I have to organize the conversation chaos or I'll put everyone in quiet timeout. So some of you may remember my iPod app coasters and my ideas to encourage organized family conversation (click here to remind yourself). It worked for awhile, but then they started fighting about who got which coaster. As if my kids need yet ANOTHER reason to fight.

So, this Valentines I came up with "Real Conversation Hearts." None of this Hug Me, Be Mine mumbo jumbo...I mean how does that start a conversation?

Heart: Hug me.
Person: Okay.

Nice conversation.

Heart: Be Mine.
Person: Okay or No (in which a bad conversation will start)


So I cut out paper hearts and put real conversation starters on the back. Here are a few:

If you could meet anyone in the world who would it be and why?
If you could only eat one kind of food for the rest of your life, what kind of food would it be and why?
If dogs could talk, in which ways would the world be different?
If you could choose one talent that you could have and you'd be the best in world, what would it be and why?
Try to convince the family to go on your dream vacation this summer.
Describe the person on your left in 27 words.

You get the idea. I came up with a lot of story prompts in my post for a cheap quiet book (click here to remember). I used them for my conversation hearts since conversing is different than writing.

And since texting is the preferred method of communication among our youth, I think they are missing out on the art of conversation. Hopefully this can help.


Also, to add a little Va-Voom to my kids lunch, during Valentine's season, I use a cookie cutter to cut their sandwiches into hearts.

It makes it a little more exciting for them. Maybe I'll get one of those food markers and write Hug Me and Be Mine on their sandwiches.....hmmmm.

Monday, January 24, 2011

Roll the Dice

I'm betting on my family today...

With Valentine's, comes Love.

With Love, comes my Family.

So tonight's Family activity will be focusing on loving each other with these two:


For the game, we'll sit in a circle and everybody takes turn rolling the dice.

One dice has things to do. Ours say: Blow a Kiss, Hug, Compliment, Handshake (I made up a fun handshake sequence we'll use), Chest Bump (a family favorite that gets everyone laughing), and Wish (which it helps to be specific when you tell them to say something you "wish" for that person so that your son doesn't say, "I WISH that she'd brush her teeth so her breath doesn't smell" - yes he said that while playing with this last night).

The other dice has pictures of each of us. That is the person who will receive the action you roll.

When we've played this game in the past, we've let the turns go around the circle several times until we've hit an obvious "time to stop now" moment. But the kids have always loved doing this.

When we've done this before, we just used a regular dice and I've typed up who is what action is what number (i.e. one = hug, two = compliment and one = mom, two = dad, etc.).

For tonight, I'd thought I'd make our own dice. So I gathered these items:

(Can you see my Spice Cookie trying to get into the picture?)

* Wood Blocks
* Pictures for each person in the family
* Pencil
* Scissors
* Sayings/Actions
* Mod Podge
* brush

Because my blocks were so small (they're just a little bigger than 1 inch), I just placed my block over the picture and traced the square around each person and action. Then I cut with scissors.


I then brushed my mod podge on the block, placed my picture on, then brushed more mod podge on. I didn't want to have to deal with corners matching up, so I cute my squares to be just a little bit smaller than the block. So you can see the edge of the blocks.

As soon as they were dry, my kids started playing. They love this. And it does help us to focus more on each other instead of a typical game where we're trying to beat each other...because I may or may not be competitive with my kids when we play games.


Today's Creative Blog

Monday, January 3, 2011

Memories...Light the Corners of My Mind

It always seems this time of year brings on nostalgia...

A great childhood brings even better memories. And I am thankful to say that my childhood was everything I hope my children will experience!

My dad was often busy between his job and church service. Because of this, he always made sure to build in those bonding moments with the six of us. And they say the kitchen is what brings families together. He always made breakfast for us on Saturday mornings (still does when I go home to visit). We're talking pancakes, waffles, and our personal favorite Norwegian pancakes. One of the other things he would do is make dessert on Sunday evenings. There were always two family favorites: Tapioca pudding and Carmel popcorn.

This New Years Eve was the first time the hubs and I decided to stay home and begin our own family traditions. There were personal pizzas, milkshakes, movies, and a puzzle that we obsessed with for 3 days. Seriously, we just finished it. But one of the things I decided to do with my kids is to make carmel popcorn. And as I poured the carmel over the popcorn, I was taken back to my childhood watching my dad do this same thing. And I remember keeping my eye on the parts that were drowning in carmel in hopes that I could be the lucky recipient.

So I'm sharing the recipe that I take no credit for but simply sharing a tried a true with you.


Ingredients:
Freshly popped popcorn
1 stick of butter
2 cups of brown sugar
1 cup of Karo syrup
1 can of Eagle Brand milk

Pop your popcorn first. My sister swears by her Whirley Pop. "It makes the best popcorn!" That's a direct quote. I used a microwave bowl that I got at Target for popping corn. It did the job.

On a stove top, bring butter, brown sugar and Karo to a boil. Add in the milk. Stir constantly while bringing it back to a boil. Pour over popcorn. Mix it all up.

Enjoy!

Tuesday, November 23, 2010

Family Time Around the Dinner Table

You'll have to excuse me for not actually making something this week. I'm on vacation visiting some family for Thanksgiving and I didn't bring my crafting supplies with me. Not to mention we are all "hunkering" down waiting for the worst blizzard in 30 years and so when I was running errands today, I decided to stock up on food and DVD's instead of crafting items.

I did, however, visit with one of the other contributors to this blog and it was a fun reunion! And if you remember my post from last week when I talked about living on a cul-de-sac with my college roommates and their families?...yep, we brought up the idea again, and again the husbands didn't look too excited (wait, I take that back. HER husband was totally excited, but this is the same man that picks purses out for her and she really loves them....i need her husband to give tips to mine.) But I digressed.

Anyway, this past week my kids were fighting about the iPhone App coasters (click here for that post). They were "dibs-ing" the one they wanted. In order to keep the peace, I came up with a little game that they all loved and they beg to do it every night now. (What have I done?)

I turn all the coasters upside down and they choose one. Each app icon represents a question I'm going to ask them about their day and it's exciting to hear what they have to say. So here are my questions to each app....I'll start from the top left icon and move across.


(under the glass) Message Icon: If you could text message Mommy or Daddy during school today, what would you have said?

Camera Icon: Think of your whole day and try to remember something you would have loved to take a picture of. Describe it to us.

Picture Icon (flower): Can you remember a time that a picture was taken of you? Describe the time/place/event and what you can remember about it.

Facebook Icon: Think of someone you haven't talked to in a long time or haven't seen and tell us who it is and why you'd want to talk to them.

Words with Friends Icon: Tell me about a conversation you've had with your friends today.

Date Icon: If you were to write in your journal about today, what would you say?

Scriptures Icon: Tell us your favorite scripture story.

Phone Icon: We did a fake phone conversation. I pretend to call them and they can make up who they are and we have a short conversation.

Weather Icon: They got to name a few places in the world and we looked up the weather in those areas.

Map Icon: I told them that we look at a map to make decisions and plan where we're going. What decisions good or bad did you make today and what direction did that decision send you.

iPod Icon: Sing us a song you like or tell us about a song you like or let us guess the song if you give us hints.

Email Icon: Anything can be done in email. This was kind of like a free space that they could choose what they wanted to do.

We've had some really good family conversations. I've heard things that I would never have known if we didn't play this. One rule I have for myself is that I can't get mad at their answers. I'm hoping to foster so good communication at dinner. I have plenty of time to get mad at them when they don't clear the table or do the dishes.

So here's to making your family bonds better over dinner.

Wednesday, September 29, 2010

Funny Stuff My Kids Say

Not sure if you all are on facebook or not, but one of my favorite things about the social network is when my friends post funny things their kids say on their status. Let the record show that I'm not all about posting your every move during the day, but if you have funny kids...post away. I think I love it because it amazes me how smart kids are and i love it because my kids say some funny things.

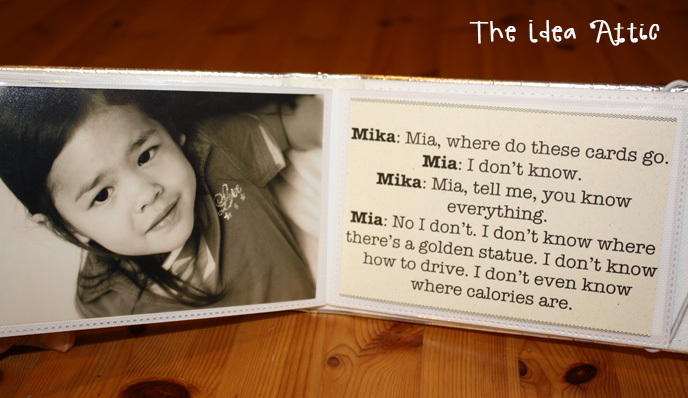
Whenever I post something cute my kids say on FB (that's text talk for facebook) guarantee someone says, "Make sure you're writing those things down." Which I do...on facebook. Then every few weeks or so, I look at my status updates and record the really funny ones in my journal.

As a treat or a fun game, my kids love for me to read the funny things I've recorded in my journal. They laugh and laugh and laugh. So I thought of a great gift for grandparents, stocking stuffers for spouses (YES....I did just make a Christmas reference) or even a fun gift for that child to have.

I just got a small photo album from michaels for $2.99 or so and I made a cover page. Then I put pictures on one side and funny quotes on the other. I'm sure you really crafty types could scrapbook those quote pages, but I'm lucky I printed them out.


Here are some of my pages...I'm sharing because I think they're funny.


Thanks for indulging me. For the record both Debbie and Melissa have the funniest boys. They are always saying great stuff...I'd actually love getting a book from them :)

I'd love to hear some of the funny things your kids say!


P.S. I made this for my mother, but the kids won't stop stealing it!

Wednesday, August 25, 2010

Dial-A-Prayer : A Timely Upcycle Project

I know not all The Idea Attic readers are religous, so don’t let the title of this post deter you from a great upcycling project. You can use this idea for a whole bunch of stuff…I promise to give you a list at the end.

Last week I wrote about how much of a struggle it is to get my kids ready in the morning. I think I’ve blogged about how hard it is for them to get to bed at night. And if my husband was posting, he would talk about how hard it is for him to get them to do their homework in the afternoon.

But I don’t want you thinking my kids are horrible. Much of the time, they are little angels. And what do little angels like to do besides make mommy A BUNCH of artwork to take to her office? They like to give kisses, laugh a lot and argue about whose turn it is to pray. Isn’t it ironic…don’t you think?

Now, each one of them has their own “argument.” The baby always wants to pray. Her sister always wants to pray. Their brother never wants to say the prayer. And no one wants Mommy or Daddy to pray because "it takes too long."

So, enter our Prayer Dial. And easy way to remember whose turn it is to pray.

You can use an old clock (one that is getting slow, or one you really want to replace). If you don't have a spare clock...Target has cheap ones for $3.99 right now.

First, take the plastic face off. This clock it was easy to slip something in between the plastics to pop it out. Others may be a challenge...just don't hurt yourself.

When you get the plastic off, the hands of the clock should pull right off (maybe some gentle tugging is required).


Then measure your clock diameter and cut out a circle from some pretty paper. Find the exact middle and make an "X" with an exacto knife.


I have a vinyl cutter, so I typed my phrase "Time for Family Prayer" and our names and cut them out. And then I applied it to the paper! You can also use a compass (think school supplies) to draw pencil circles and write whatever you want to write with a sharpie.

After that, you put your hands back on the clock. You need to put all the hands back on in order to keep it stable...so I just cut off the hand part and left the ring snug around the center of the clock.

And there's our Whose-Turn-Is-It-To-Pray Dial. It's working great!


You can also use pictures instead of names for families with non-readers.

So as promised, I'm going to list a couple of other things you can use this for...
- Chores. You can have different clocks for different rooms and different chores.
- Spotlight. You can take turns being extra kind to the Spotlight person in your home.
- Who's Birthday is next.
- Paint the face with chalkboard paint and use the clock for whatever you want like a "what's-for-dinner-dial
- A clean or dirty dial for the dishwasher.
- Feel free to add anymore ideas if you'd like.

As I write this my kids are running around screaming and tying each other up with rope (dad just gave son a lesson on knots for boy scouts). There's a mixture of laughter and tears and more screaming. Looks like Mommy needs a prayer dial with only her name on it!


NightOwlCrafting