Showing posts with label Upcycle. Show all posts

Wednesday, April 6, 2011

Plarn Part Deux

If you don't remember Plarn Part 1, click here. It's basically where I confessed my slight obsession with the show Hoarders which was freaky, but did not give me the heebeegeebees (sp?) like the show Animal Hoarders. There was a man who was living in a house what hundreds of rats...oh I just shivered...and he loved them. He cried when they were all taken away. Again, while I was completely grossed out, I watched until the end...and even had a tear in my eye for the old man (remember, I cry at everything since the kids have come along).

Okay, enough of the Hoarders. I finally finished my Plarn bag. It wasn't that it was hard, I had to build up plastic bags in my house. It's amazing how many bags you don't have once you're trying to stay on a budget. In total, I think I used 60-80 bags. But here it is...

Add caption

Here is the Plarn bag holding a bag of apples!
For you crocheters or even no crocheters...this is the pattern.

26 chains
Double chain in 2nd back and in each chain
At the end of the row make a chain and go back for a total of 15 rows.

Make two of these and use a contrasting plarn color to stitch together using a single stitch.

For the handle I made mine 5 stitches across. It could have been skinnier. I don't remember how long I made the strap, but make it to fit your liking remembering that the plarn stretches. I then attached the strap to the bag using single stitches.

There you have it! Plarn bag! My girls love carrying it around. And I feel eco-friendly.

Have a great week!

Wednesday, March 30, 2011

Sweet and Salty

SWEET

It's true. Call the presses. I'm trying to eat more healthy. And that is the reason for my posts today. So, instead of treating myself at the end of a long day with ice cream or cookies, I've been treating myself with strawberries. We are blessed to live near some farms, so there's a guy with a small stand (okay the back of his truck) that sells flats of freshly picked strawberries.

I love eating them just whole...so yummy. But lots of strawberries means...lots of strawberry baskets. I feel bad throwing these things away...I'm sure I can do something useful with them. So much to my hubbie's chagrin, I saved a few. I found some mini binder clips (and if you're looking for a post solely about binder clips, click here) and decided to attach all the strawberry baskets together. I then found a few different ways I could use them.
You can use it as an organizer for craft time with the kids!

We made a game. They had three tries and they tried to get the most points. This version helped with their adding of fractions.
Other Games:
-Put letters on the papers at the bottom and when your ball lands on a letter, you have to say a word that starts with that letter, but no repeats.
-If you have a deck of cards, you can give each person a different suit and you can try throwing your cards in the baskets to see who gets the most points.
-If you lead the kids music at church, a song can be under each of the papers and the kids can try to throw a bean bag in there.

Anyway, you get the idea.

SALTY
Because of previously stated attempt at eating healthier, I discovered that you can make your own potato chips in the microwave. You probably already knew this...but I didn't and I love potato chips so I love this.

With a mandolin slicer, thinly slice the potato.
Kinda' like so
Then with the olive oil cooking spray, lightly coat the potato slices and the microwaveable plate. Place slices on plate.
Microwave for 3 minutes first, check on them. They should be like this, lightly brown. I cooked these for a total of 6 minutes. Make sure you use hot pads to take that plate out of the microwave.
Then lightly sprinkle on your favorite flavor. I love this salt. It's so tasty! I think you can see the phone number on the bottle if you want to order. The shop is owned by a friend of a friend who is so nice. They have so many yummy spices there and the prices are so reasonable. It's better to call than go online because she gives you a ton of cooking ideas.
I like to put mine on a cookie rack to cool and crisp. Plus, I'm using the plate to make the rest of my chips.
There you have it! The Sweet and Salty of my healthier eating.

Wednesday, March 23, 2011

Life - Trying to have a Ball

My deepest apologies to Debbie who seems to have been the only one posting lately.  I'm not going to try to get any sympathy from you, but (here's where I actually do try) I've had my hands full the last few weeks.

First, I had strep throat and my family caught something else almost as bad. Then I had a week long business trip in freezing Chicago (ok...I admit, it wasn't that cold, but So. Cal Girl was NOT comfortable). Then a quick family vacay to Disneyland which brought on bronchitis.  Again, the bronchitis itself wasn't that horrible...it was the almost peeing or peeing my pants every time I coughed. Let's just say there was a lot of coughing and a lot of laundry to do. So between all that, work, church, family and 4 prescriptions for anti-biotics...I'm feeling a lot better and can focus on a craft or two.

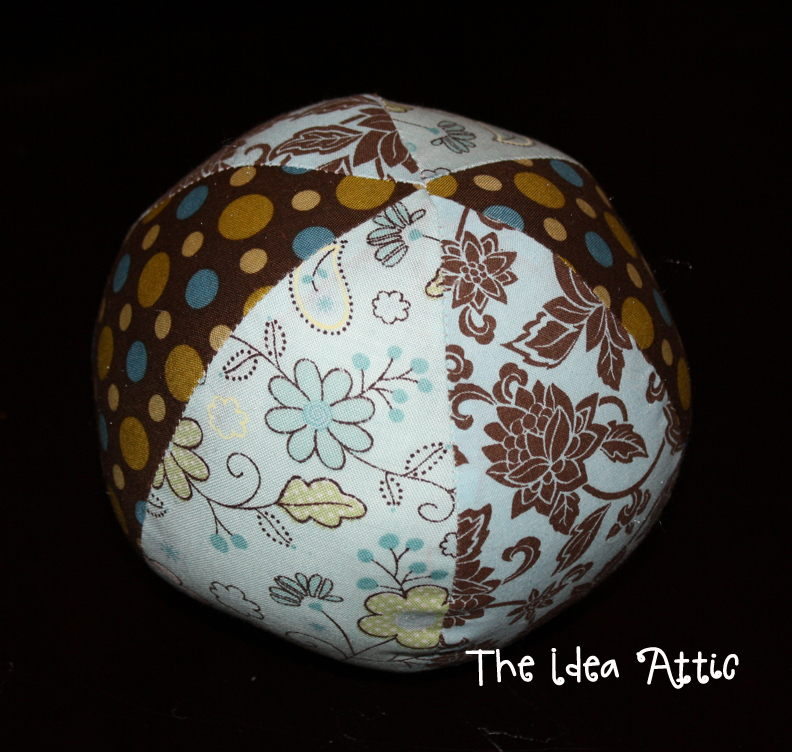
I'm not mentally prepared to make Easter projects, so I decided to make something for the baby shower I get to go to on Saturday. So I whipped up a diaper cake and decided that I wanted to top it with homemade fabric balls. All kids and babies like balls! So, here's what I made:


This is a perfect project for using all those left over fabric scraps. I looked for a pattern and I found a site that taught me how to make my own pattern as well as the cute easter bunny out of this same ball pattern.  Here is the link. Post pictures of your creation on our Facebook page if you make it. I think it's so cute but like I said, I'm not mentally ready for Easter stuff yet. So I created my own pattern. Here is the pic or you can click on this link to download the pdf version with instructions.


I cut a version of my pattern out of some thicker plastic like a thick sheet protector or something. Then I cut out 6 pieces from my fabric. The ball above was two pieces of three fabrics or you can do three pieces of two fabrics. Make sure you iron your pieces. I know...I know...I hate ironing. But it makes sewing your pieces together so much easier.

Decide how you want your patterns to go and then sew 3 pieces together, side by side. (Remember right sides facing for sewing.) Then with rights sides facing, sew the two sides of the ball together leaving a space to stuff the ball.Turn it right side out and stuff the ball. I like to put a jingle bell in there...just to make some noise. Then hand stitch the opening.


Here is one ball not stuffed with a section left open and the other one done.
I'm not a very good hand-sewer...but this is my "closing of the hole."
Here it is again.
My kids are loving playing with these. And they are so anxious to make their own. I told them it was like build-a-bear and they can put their own treasures inside their ball.


Here are the balls on top of the diaper cake. You can also see cute baby socks my friend Stacy decorated with crocheted on buttons. Maybe I'll convince her to be a guest blogger soon.

Oh...one more idea I had with this ball. I have to teach the kids music on Sunday at church, so I'm going to cut out 10 "pins" actually circles and I'm going to write songs on the back or ways to sing the song (ie whisper, hum, only girls, etc.) and I'm going to let them go bowling. They have to roll this ball and whichever "pin" it lands on will determine their singing fate. It should be fun!

Now that I'm healthy and there's less stress at work, maybe I'll take some time to have a ball, too!

Wednesday, March 2, 2011

PLARN Part 1

Okay...small confession...I kinda' like watching the show Hoarders. Well, let me re-phrase that. It's not the I truly enjoy grossing myself out to the point of gagging, but I can't take my eyes off the T.V. and I can't stop watching the next episode on Netflix.

I've analyzed myself because this fact kinda' disturbs me and I think I watch it so that I can feel good that my NOT-ALWAYS-SPOTLESS home, or more appropriately ALMOST-NEVER-SPOTLESS home has crumbs on the floor and the couch pillows aren't arranged, and there are remnants of kids games throughout the house...but at least I can see the floor and I don't have to sleep in my bathtub because there's food rotting in my bed.

I'm amazed that people live like that and I feel sad for them. It also makes me think as I step over the unfolded blanket on the floor, "If I don't pick that up now, I'm one step closer to the T.V. show" and I pick it up. I mean, I do have some Hoarder tendencies...I like to buy things on sale, even if I don't really need them, and I don't like to throw things away because I might need them someday (especially craft supplies). I'm not as bad as I was when I was younger. My mother and grandmother were...ehem...are very frugal and wasting was and is a sin. So we saved a lot of things and (like I exposed in an earlier post) cut the mold off of cheese and ate the good part.

Mom has gotten a lot better about throwing things away, but one thing she has an over abundance of is plastic grocery bags. Seriously, those things are like bunnies. They multiply so quickly. My mom has this holder that you shove plastic grocery bags in and it is FULL. I once emptied it and I'm not kidding that there were nearly 100 bags in there or more.  So when I saw a purse made from plastic grocery bags at a fair, I had to know how to reuse these things that way.

Introducing PLARN. Plastic bag yarn.  This is part one because this is just showing you how to make the plarn and part two will be a cute bag I'll crochet from it.  I'll show you a preview:
The whole purse will be cute!

Be warned, PLARN takes more time to make than you think...but it's kind of a fun thing for the kids to do and it can make them feel like they are helping the planet.

First, fold the bag in half and then in half again as shown below:
Then, cut the bottom (you can recycle) and the handles (you can recycle) and cut the rest into 1 inch strips.
Then unfold the plastic bag strips and keep them in a loop.  Then, loop the circle strip under the other loop and through and pull...i know, confusing...just look at the pictures below:
Keep doing that till all your loops are connected. Because I had different colored bags, I did three brown loops then three white loops. Those brown plastic bags were REALLY thin and kept breaking. You can either tie them back together or just throw them away in the recycle bin.
Then wind up your plarn into a ball ready to crochet. For my purse I will need about 60 bags.  This section below was about 10 bags.

Stay tuned for my finished purse (about 2 weeks because I'm leaving for a business trip to Chicago and will be gone for a while!!)

Monday, February 21, 2011

Tank It


My oldest spends every other Tuesday evening with the girls her age at church. She is often coming home with great things. A few weeks ago, she was asked to bring a tank top to the activity. I bought a bag of 4 tank tops for about $3, just in case other girls needed one. She came home with 3 extra tank tops and one darling bag. It was cute. It was simple. And she loves it.

So the other day when she had a friend over, she asked if they could make bags with the left over tanks. This is what we did.


I printed out the first initial of their name on Word. I taped it (backwards) to the window and had the girl trace the letter on Wonder Under.

After they cut the letter out, we ironed it onto the back side of some scrap fabric that they chose. Then cut the letter out of the fabric and iron it on the tank top.

They then chose ribbon and we sewed it around the tank top.


Finally we turned the tank top inside out and just sewed up the bottom.

Turn it back out and you have a bag.


These two little girls are currently rehearsing for the school musical. They are using these bags to keep their scripts in as they go to play practice.


Wednesday, February 16, 2011

Crocheted Wire Necklace

Okay. I have a husband story slightly related to Valentines Day. One day we found a leak in our ceiling and cute and handy hubby tears through the ceiling to fix the problem. Can't find it, can't find it...and then goes on the roof to find that one of the clay shingles moved and all he had to do was move it back. So for the next 3 years I ask him to fix the hole in my kitchen ceiling....nothin'.  Fast forward to last Wednesday.

I was getting ready for work and thinking about the upcoming events. We were having my friend's surprise birthday party at my house on Saturday so I was thinking about cleaning the house and desserts, etc. The party was with the kids and so I was going to have about 9 kids over and I was thinking that it would be nice to lock them in the bedroom so it was less noisy.  I say to the husband, "Wouldn't it be nice if we had a T.V. in our room so we could lock all the kids in the master bedroom to watch a movie?"

That was it.  Two hours later I was checking my bank balance and saw a very large debit from Costco. I called the husband who said, "You told me to buy a flat panel LCD TV for the bedroom for Saturday, so I did."  Me, "WHAT?!" Him, "Happy Valentine's Day?"

Well, that story has nothing to do with my project for this week, but maybe some of you have a husband just like my model. I thought I'd let you know that you're not alone.

This week I was very surprised to find out how EASY it is to crochet wire.  I literally made this project in like 20 minutes.  All you need to know is how to crochet a chain stitch...and it's a great project to use up all those odds and ends beads you may have.


I found this tutorial on YouTube (click here) and it was simple to follow.

You will see in the tutorial that you crochet three different chains and braid them together. I made one braid with just white beads and the others with random colored beads.

I like this project so much that I'm going to invest in sterling silver wire and then get some glass beads maybe all in one color family or maybe do another one of these hodge-podge designs.  Guess what all the girls in my family are going to get this year!!!

Wednesday, February 9, 2011

Look what CAN's can do!

This post is dedicated to my friend Jennifer who was staying at my house last week. And you know how on day FIVE you've both talked about your families, work, kids, church, kids, and families? And so you start talking about weird things like food storage. But not just food storage in general, but where to hide money in the house and your gold and silver coins....YEAH. That's what we were talking about. I know!

Anyway, Jen said that she saw a good idea about using a peanut can or something. Then you cut out the bottom with one of those can openers that leaves no sharp edges...you know the ones that cut the side of the lid instead inside the lid.  Here's a link to the one I have!

Empty the can, clean it out and  fill it with your valuables. Then you carefully glue the bottom back on and shove the can of nuts in with the rest of your cans in your food pantry or food storage.

So, yesterday while I was making spaghetti sauce for dinner and was looking at all those cans, I thought I'd try her idea....but not to hide valuables or money....to wrap presents.

So, I cleaned the cans and took off the labels.

I filled one of them with candies (wrapped) for a Valentine's gift. And the other one I put a present in for a friend. I even squished a hat I crocheted for a baby into one of these.

Then I glued the lid on.  I think I might have put too much glue, but I tried to use a toothpick to poke the glue into the crevices. (I used tacky glue for this.)

So you can see the glue squished out the top (that's why I think I used too much).

I just used my finger to wipe the excess away. Hopefully my presents inside didn't get glue on it.


I decided to wrap the cans with paper and ribbon. After using many different adhesives, the good old glue gun worked the best. If I had any more creativity, I'm sure I could have used cute stamps to decorate or write on the can...but it was late and I wanted to watch GLEE on DVR.

So this is how they turned out...


I thought this would be a good idea to disperse goodies at Christmas time because you don't have to buy a container, and you don't have to fill them up too much. And I think it would be fun to open these treats. You can use a regular can opener, or just use the grippy part to lift the lid on your No-sharp edges can opener.

-Put a piece of tissue paper inside and stack cookies almost the exact size of the can inside.
-Fill the can half with raffia and put movie tickets and some bags of m&m's inside for a quick birthday present.
-The small cans are perfect for lipgloss, chapstick, erasers, or any small gift.
-Or you can always fill it up with cash and store it next to your green beans.

Whatever it is...."You CAN do it!"  Cheesy, I know...but a can of creamed corn to whoever can name the movie first...

Friday, January 14, 2011

Because Super Heros need a place for their cape....

In case you don't know this, now is a great time to hit the thrift stores! Folks have donated to clear their closets for all of the new stuff from Santa. Plus it's a great way to beat cabin fever. It gets the kids out, it doesn't break the bank if I buy a $.50 plastic boat and it keeps an extremely busy 4 1/2 year old occupied for part of the day. (Plus I don't feel bad if I donate it right back a couple of weeks later!)

So thanks to these little escapes to the thrift stores, my project pile has grown! Fun and exciting things are coming your way!

Let's start with this little thing....


It was kind of a mess. It had bright, splotchy, pink paint. And whoever painted it must have done it on newspaper because there was paper stuck to it. But it was half off of $.69 and I had an idea!


I sanded the paint blobs and newspaper off. And then I gave it a coat of primer to try to hide some of the bright pink. And I used my paint pyramids. My brilliant husband got me these for Christmas! Are these perfect for my spray paint addiction or what?!


So after I primed it and sprayed it an off white.


I took it apart....


Modge Podged....


And look how pretty! Perfect for my daughter's room!


I used Command Adhesive strips to hang it. I didn't want to put holes in the door and with the strips I can move it up or down as much as I want.


Now my super hero child has a place to hang her cape and her ever-important purse, that has to go everywhere we go, has a peg as well!

Happy Friday!