Showing posts with label Children. Show all posts

Wednesday, April 20, 2011

Tie-Dye Easter Eggs

It's that time of year again. I think I'm the only crafter that doesn't really like to craft holiday crafts (if you followed that sentence, you've gotten more sleep than me). Last week I was too busy to post. I was making things for the auction we were having at church to raise money for the youth. I made two signs and crocheted two beanies and tried to finish the felt bunny I was making.

Before I knew it, it was Friday and all I had were fuzzy pictures of my projects. See below.

But I know many of you will be dying eggs in the next few days, so I thought I quickly put up this post for tie-dye Easter eggs. The only problem is dying eggs like this goes quickly because you can do 4-5 at a time. But you don't need any egg dye...just vinegar and food coloring (I like the neon colors).

First you arrange the eggs in the colander and splash them with vinegar. This cup wasn't such a good idea. I found out the a little 1/2 tsp or medicine dropper works best. You don't have to coat the whole egg...just pour and let it drip around the eggs.

Then take your food coloring and put one drop on a few of the eggs.

Then gently roll the eggs around.

Then add your second color and gently roll your eggs around. Don't roll them around too much, or you'll just get brown eggs...just roll a little.


Then pick them up and set them on a paper towel for about a minute or so. Then lightly rinse an wipe dry. And here they are.


There you go! I hope you have fun dying eggs. Happy Easter!

Wednesday, March 30, 2011

Sweet and Salty

SWEET

It's true. Call the presses. I'm trying to eat more healthy. And that is the reason for my posts today. So, instead of treating myself at the end of a long day with ice cream or cookies, I've been treating myself with strawberries. We are blessed to live near some farms, so there's a guy with a small stand (okay the back of his truck) that sells flats of freshly picked strawberries.

I love eating them just whole...so yummy. But lots of strawberries means...lots of strawberry baskets. I feel bad throwing these things away...I'm sure I can do something useful with them. So much to my hubbie's chagrin, I saved a few. I found some mini binder clips (and if you're looking for a post solely about binder clips, click here) and decided to attach all the strawberry baskets together. I then found a few different ways I could use them.
You can use it as an organizer for craft time with the kids!

We made a game. They had three tries and they tried to get the most points. This version helped with their adding of fractions.
Other Games:
-Put letters on the papers at the bottom and when your ball lands on a letter, you have to say a word that starts with that letter, but no repeats.
-If you have a deck of cards, you can give each person a different suit and you can try throwing your cards in the baskets to see who gets the most points.
-If you lead the kids music at church, a song can be under each of the papers and the kids can try to throw a bean bag in there.

Anyway, you get the idea.

SALTY
Because of previously stated attempt at eating healthier, I discovered that you can make your own potato chips in the microwave. You probably already knew this...but I didn't and I love potato chips so I love this.

With a mandolin slicer, thinly slice the potato.
Kinda' like so
Then with the olive oil cooking spray, lightly coat the potato slices and the microwaveable plate. Place slices on plate.
Microwave for 3 minutes first, check on them. They should be like this, lightly brown. I cooked these for a total of 6 minutes. Make sure you use hot pads to take that plate out of the microwave.
Then lightly sprinkle on your favorite flavor. I love this salt. It's so tasty! I think you can see the phone number on the bottle if you want to order. The shop is owned by a friend of a friend who is so nice. They have so many yummy spices there and the prices are so reasonable. It's better to call than go online because she gives you a ton of cooking ideas.
I like to put mine on a cookie rack to cool and crisp. Plus, I'm using the plate to make the rest of my chips.
There you have it! The Sweet and Salty of my healthier eating.

Wednesday, March 23, 2011

Life - Trying to have a Ball

My deepest apologies to Debbie who seems to have been the only one posting lately.  I'm not going to try to get any sympathy from you, but (here's where I actually do try) I've had my hands full the last few weeks.

First, I had strep throat and my family caught something else almost as bad. Then I had a week long business trip in freezing Chicago (ok...I admit, it wasn't that cold, but So. Cal Girl was NOT comfortable). Then a quick family vacay to Disneyland which brought on bronchitis.  Again, the bronchitis itself wasn't that horrible...it was the almost peeing or peeing my pants every time I coughed. Let's just say there was a lot of coughing and a lot of laundry to do. So between all that, work, church, family and 4 prescriptions for anti-biotics...I'm feeling a lot better and can focus on a craft or two.

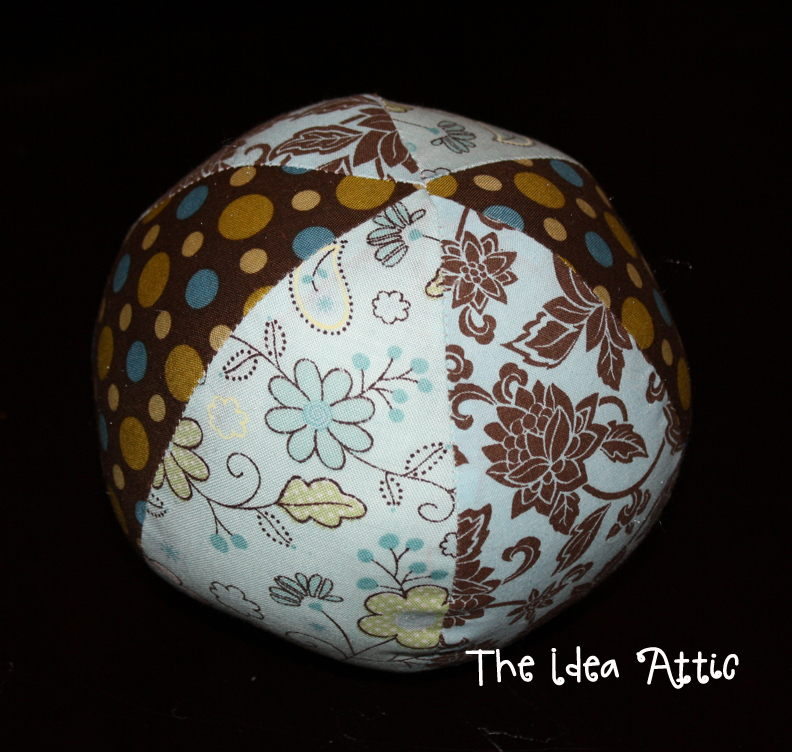
I'm not mentally prepared to make Easter projects, so I decided to make something for the baby shower I get to go to on Saturday. So I whipped up a diaper cake and decided that I wanted to top it with homemade fabric balls. All kids and babies like balls! So, here's what I made:


This is a perfect project for using all those left over fabric scraps. I looked for a pattern and I found a site that taught me how to make my own pattern as well as the cute easter bunny out of this same ball pattern.  Here is the link. Post pictures of your creation on our Facebook page if you make it. I think it's so cute but like I said, I'm not mentally ready for Easter stuff yet. So I created my own pattern. Here is the pic or you can click on this link to download the pdf version with instructions.


I cut a version of my pattern out of some thicker plastic like a thick sheet protector or something. Then I cut out 6 pieces from my fabric. The ball above was two pieces of three fabrics or you can do three pieces of two fabrics. Make sure you iron your pieces. I know...I know...I hate ironing. But it makes sewing your pieces together so much easier.

Decide how you want your patterns to go and then sew 3 pieces together, side by side. (Remember right sides facing for sewing.) Then with rights sides facing, sew the two sides of the ball together leaving a space to stuff the ball.Turn it right side out and stuff the ball. I like to put a jingle bell in there...just to make some noise. Then hand stitch the opening.


Here is one ball not stuffed with a section left open and the other one done.
I'm not a very good hand-sewer...but this is my "closing of the hole."
Here it is again.
My kids are loving playing with these. And they are so anxious to make their own. I told them it was like build-a-bear and they can put their own treasures inside their ball.


Here are the balls on top of the diaper cake. You can also see cute baby socks my friend Stacy decorated with crocheted on buttons. Maybe I'll convince her to be a guest blogger soon.

Oh...one more idea I had with this ball. I have to teach the kids music on Sunday at church, so I'm going to cut out 10 "pins" actually circles and I'm going to write songs on the back or ways to sing the song (ie whisper, hum, only girls, etc.) and I'm going to let them go bowling. They have to roll this ball and whichever "pin" it lands on will determine their singing fate. It should be fun!

Now that I'm healthy and there's less stress at work, maybe I'll take some time to have a ball, too!

Tuesday, March 15, 2011

The Switch


I am the mother of 4 young children who are still in the "bedtime routine" mode.

As is typical with most young ones, the dark is not their friend.

But, their parents LOVE the dark.

My husband came up with a solution that I think puts him in the genius category: A Dimmer Switch


Full disclosure: I thought he was weird when he first suggested putting a dimmer switch on the hallway light. Dimmers were for setting the mood, whether it was eating dinner at the dining room table or watching a movie in the family room. But he did it anyway, and I love it!

When the kids are first put to bed, we turn on the hallway light all the way on.


BUT...once they fall asleep, we dim the hallway light down. There's just enough light that if they wake up, they can find their way to the bathroom (or our room). But it's dark enough that the hallway light doesn't bother the adults that aren't scared of the dark.


Is that a "Bright Idea" or a "Dim Idea"?


Monday, March 7, 2011

Kiss Me...I'm Irish!


Really.

I am.

My Grandpa was born in the green country before he came to this Great Land.

I won't really make you kiss me. I'll save that for the Mister and the Munchkins.

But I've always been proud of my Irish heritage.

So one might think that I would be thrilled when the 3rd grader came home last week with a "family assignment": Build a Leprechaun Trap. I was a little overwhelmed at the thought. But then we came up with this.


Yes, it doesn't look like a trap. There's more to the story:

As part of her assignment, she is supposed to write an essay about her trap and what she will do if she catches a leprechaun. She then will have to present the trap and give a speech to her class.

So I asked her what her plans were if Luck was on her side and she caught a little fella:

One might think the obvious - have them lead you to their gold. But not my little girl. The genes apparently run deep. Her plans with her little friend is to play dress up. She wants to dress him up. Did someone say "shopping"?

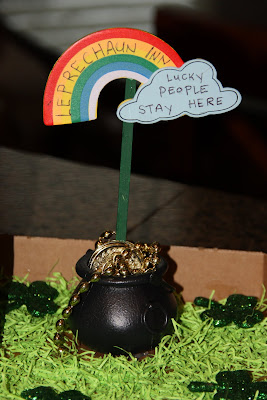
So we built the Leprechaun Inn, Where Lucky Little People Stay...Forever.

Her plans are to get him through the door, get him to make himself comfortable at the Inn, then put a rock in front of the door to trap him. Then she can lift the roof off and start her play date. Here are a few pictures of how our trap turned out:


For the materials, we bought the cardboard house at Michaels. It was under $3. Meg painted it green while I used Mod Podge and glitter for the roof. I placed where we wanted the house and then drew out a pathway. I used glitter for the path. After it dried, I used hot glue to glue the house and pots to the cardboard. For the grass, we took Easter Basket grass and I cut it up in small pieces. Meg used the Mod Podge and painted the bottom of the box then sprinkled the grass on. For the sign, we bought the pot and coins at the Party store. We bought the pre-made rainbow at Michaels and wrote on it with a Sharpie.

It came together pretty quickly.

Now wish us Luck on the essay and speech...oh and on catching the little fella...


Monday, February 28, 2011

Hide, but Don't Seek


Forgive me...

I've just recently returned from a trip to temporary insanity.

This is what sent me there:

Problem: Oldest daughter can't find her iPod Touch. She swears she left it on her desk in her room. Now it's not there. It's no where!

Suspects:
#1: small little 15 month old. Her latest trick is to reach on top of tables and swipe what's in her grasp. If she took it off the desk, who knows where she could have dropped it.

#2: 3 year old sneak. She loves to go into her sister's room and browse the luxury department, i.e. everything her older sister has told her she's not allowed to touch. (Older sister is not aware that some days while she's at school, I let little sister in her room to play...Oh the things I can get done in the rest of the house while she's visiting heaven)

#3: a little brother. His favorite part of the new Christmas present is the ability it has to beep when lost. As soon as he learned about the "Find Me" function, he decided it's fun to play hide and seek with the iPod. When we send out the Ping signal, it's usually found in the towels, or the game cupboard, or inside the couch. Our problem, the battery had died before we knew it was lost and there was no power in it to beep.

When the Suspects were asked if they took it, not one of them denied doing it.

We seriously spent 5 days looking for this, including President's Day. But I couldn't function until it was found. This wasn't something that could easily be replaced. So towels and linens were folded and refolded. The games were all sorted through, just in case it got placed inside a box. Toy boxes were shuffled through. Couches were vacuumed out. Under the beds were cleaned and organized. Drawers had been opened and organized. The hubs even went through the outside garbage...just in case. Nothing. And then I moved on to closets. First suspect #3s. Then mine. Then to the victim.

That's when I pulled out her laundry basket to go through it and I heard something. It sounded like an angel got her wings...because it was the sound of an iPod sliding down the basket.

{Sound the Heavenly Choirs}

If my detective skills are on, I would point my finger at Suspect #1 because of the hiding spot. I'm guessing she swiped and dropped not too far from the original location. If it were Suspect #2, I probably would have found it in her bed, waiting to be used when the lights went out. And Suspect #3 would have gone much farther to hide it.

So we have now decided the she needs a spot to put her iPod. My husband came across a clever idea. We knew it needed to be something that those Suspects won't know about. So we did this in secret. (Although if truth be told, I did it in front of them, but they never notice me anyway. Seriously...it takes 3 times of asking if they've brushed their teeth before they look at me funny). And we made this:


We went to a used bookstore and bought a book. Funny enough, my oldest is a big reader. And when my husband brought this book home she asked if they had another one at the store because she might want to read this. I'm hoping she feels this same way when she gets to high school!

We also used some mod podge and felt.


My honey then used a razor to cut out a rectangle big enough to house the iPod. (We laughed that the next chapter is titled "Ruined!").


I then placed plastic bags around both sides of the book to keep the mod podge from sticking to those pages. I took my brush and first put mod podge around the pages inside the rectangle. After that had dried, I brushed mod podge around the outside pages of the book.


Once it was all dry, I mod podged the felt to the inside of the rectangle. I then cut the remaining fabric. I chose to try to cut the felt square at the top.


If I were to do it again, I think I would leave a little border of fabric and glue it down. I didn't like how it looked when I was done, so I added some scrapbook paper to pretty it up.


And now it can stay safe hiding inside this book. Shh! It's our secret.

We found the idea HERE


Sunday, February 13, 2011

Tootsie Pop Love!

I know...I'm squeezing this post in at the last hour since Valentine's Day is tomorrow! But my good friend Katie showed me this blog post and I LOVED the idea! You may remember from previous posts, I am not a huge fan of Valentine's Day so I'm not going to break the bank and my back for school parties. So when I saw this I knew I had to do it! So simple!

1. Snap a pic of the little guy holding his arm out (I told him to hold an imaginary balloon.)


2. Use Photoshop or a site like Picnik.com and add your text.
3. Print at the drugstore.
4. Get out your exacto and make slits for the lollipop.


And your kid is ready for the party!


Love it!

Happy Love Day!