Showing posts with label Clothing. Show all posts

Friday, September 24, 2010

Frankly My Dear....

I made a dress for my daughter. Here's a picture of the material. Look closely. Yep! Those are tabs. I made the dress from curtains!


I was channeling Scarlett O'Hara! Or Carol Burnett....


It started when I found this cute pattern for a sweet little dress from Leila & Ben. I love simplicity when it comes to sewing and this fit the bill! When I started thinking about material my mind wandered to a pile of things that were ready to be dropped at Salvation Army. I had one long, pink panel that I had bought a while back. It's a lighter knit, not canvas or upholstery feeling. Perfect! And it didn't stop there. Also in that pile was a skirt I no longer wear and the colors were perfect.


I printed out the pattern, did a little snipping, a little sewing and I created this:


Of course my daughter was being a crabby, uncooperative toddler and wouldn't let me get a picture of her Scarlett O'Hara inspired fashion. So if you can see beyond the apple and the blankie.....


Who needs a fabric store?! This was so much fun, I'm now tearing through the closets to see what else I can repurpose!!

Have a good weekend!


Monday, September 13, 2010

Project Runway


As Heidi is famous for saying:

"One day you're in. And the next day you're out."

And that's how I'm feeling about the seasons. Summer, I love you, but you're out. I'm ready for Fall. I'm ready for apples and pumpkins and crunchy leaves and sweatshirts.

So today I'm getting ready for Halloween, Project Runway style.

Yes, Halloween.

Over the Summer, I took a few weeks to visit my parents with my children. One day I walked into a store to find that all of their fabric was 75% off. They were closing their fabric section. So I started grabbing. I had no idea what I was going to make, but I couldn't pass up buying fabric for a quarter of the cost. I decided I could figure out what I'd use it for later.

They had this Halloween material.


It is a panel.

This weekend, I figured out what to do with it. And this is where I felt like I was channeling my love for Project Runway.

I cut the panels apart and turned them into skirts for my girls.

(Just saying that makes me feel like I was channeling Julie Andrews on The Sound of Music. But I want to feel cool so we're going to stick with Project Runway).

I used 5 panels for my oldest daughter's skirt (she's 8). I then used 3 panels for my two little girls (age 3 and almost 1). I cut those 3 panels in half for the appropriate lengths and sewed them together.


I then sewed a band the same length of the material to the bottom and hemmed it.


After, I cut a strip of material (half the length of the bottom band) for the top band. I gathered the material and sewed the top band to the body of the skirt.

You can then sew the skirt together to finish the circle and add the elastic to it.


For full details of lengths and instructions, I used this awesome pattern I bought on Etsy. I made many skirts using her pattern. Love It!


DISCLAIMER: No buttons or zippers were used in the making of these skirts. That is far beyond my skill set. That's how simple this is!


The Girl Creative Party BlogMaking

Tuesday, August 31, 2010

T-Shirt Backpacks

You may wonder why I love projects with t-shirts so much. I don't know where my fascination began, really. I had a lot of t-shirts growing up from family reunions, school projects, fund raisers, girls camp, etc. It seems like t-shirts are the easiest and most popular souvenir around. The thing is...I hate wearing t-shirts. Maybe it comes from being chubby all my life, and I would always have over-sized t-shirts so as to not display the muffin tops.  But, to me t-shirts are the most unflattering article of clothing I can wear...well...except maybe for stir-up pants, pant suits, and fanny packs (you may not think fanny packs are clothing, but I have seen some old men in the park who beg to differ).

So I've had a lot of really cute t-shirts in my life (I've even worked at a t-shirt company), like all my shirts from Hawaii (YEAH-BOY, 10 shirts for $20 at the Aloha Stadium Swap Meet), my senior class t-shirt "The Untouchables" (uh...did I just date myself?) and the very cute t-shirt my dad drew for me for girls' camp. We had to draw the thing we'd miss most while we were at camp for a week. Some people had a t.v., or a toilet...I had...Charlie Sheen. I'm such a dork.

Anyway, I guess my obsession with finding alternative uses for t-shirts comes from then. I felt guilty throwing away perfectly great shirts and I wanted to keep them as momentos...but how?

I wish I knew this trick back in the Charlie Sheen t-shirt days.  This post is dedicated to my son who saw this project in a magazine and begged me to make this for him.


You will need:
A t-shirt (i used child size)
Scissors
Sewing machine
7/8 Eyelet and eyelet tool (GROMMETS)
about 2 yards of rope or something for the straps.
Safety pin
Seam Ripper or small scissors
Exacto knife or something to punch a whole in fabric
Hammer
Piece of wood or something to protect the surface of your table

Click on pictures for a bigger view!


1. Find a t-shirt
2. Cut off the arms and cut across the chest.
3. Turn it inside out and sew across the area you just cut.


4. Turn right side out & using an exacto or fabric punch, make a whole in the corner area.  If t-shirt material is thin, cut and small extra piece of material and stick it on the inside and poke a whole through that, too.
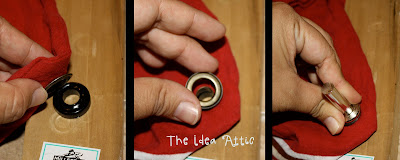
5. Take your eyelet and punch it through that hole.
6. Place your eyelet top on...oh wait...don't do this yet...you'll do it again in step 8, but I didn't want to change the picture.


7. Over your protection board, place the black holder down, place the bottom of the eyelet that you put through the hole over the black holder.
8. Place eyelet cap (with the teeth face down).
9. Place the tool into the eyelet and HAMMER HARD!!


10. Take a seam ripper or small scissors and rip the side seams of the hemming of the shirt. Do this to both seams. This is where your string will come through.
11. Place safety pin on string and pull the string through the casing (that use to be a hem). Go all the way through till you come out the same area you went in (picture 2).  Do this to both sides...so that string is coming out from both sides. This is going to be your straps.
12. Pull so strings are all even. Measure your child so you know how much rope you need for straps. The with even ends, pull both ends of string through eyelet and then make a knot. Do this to both sides.

NOTE: If you were using string like I was, I burnt the edges so it wouldn't fray.  You can also tape the ends with colored tape to make it more interesting.

And here you have it. 

He was so excited to have this. His church bag had two huge holes at the bottom, so he's excited to have everything stay in the bag.

Pay no attention to his choice of mis-matched pajamas. I'm worried he'll grow up to be that man at the park with a fanny pack.


NightOwlCrafting

Wednesday, May 26, 2010

Upcycle an old t-shirt into a cute shrug

I love the NPR shows “This American Life” and “Radio Lab.” If you haven’t listened to them you are missing out on some of the greatest journalism and human interest stories. But anyway, a few times a year they do fund raising and solicit donations before their show. And while I don’t do fund raising, I’m not to proud to do my own soliciting [insert shameless begging to “follow” our blog, and to “like” us on Facebook and to convince others to do the same].

Now back to our regularly scheduled program.

If you remember from my Mother’s Day post (here) I hate the word supple. I also hate the word moist and I despise when people say “expecially” when they mean especially, and “saltsa” when they mean salsa. But a new word that I really love is….UPCYCLE. It’s like recycle, but you’re making something even better out of it…and if I say, “I upcycle” people might actually think I exercise.

So when I found this tutorial (here) about how to make a cute shrug out of an old t-shirt, I was excited to UPCYLE. This was a great idea and I decided to  add a little more somethin’ somethin’ to this tutorial.


You will need:
An old t-shirt
Thread to match (or contrast)
Ribbon
Sewing machine
Safety Pin

First, cut your shirt up the middle of the side you want to be the front (if you have a graphic on the front, you might want that in the back so flip the shirt over and you the blank side as the front)
Then cut out the neck. I like to leave it in one piece because I’m going make a headband out of it later.


Then round out the corners. I cut one side and then used the scrap piece to guide me cutting the other side so it was even.


Then fold the edge over about an inch and pin to form a casing.


Sew the casing.

Then sew a basting stitch on the ribbon (I used the length of the casing on the shirt plus 2/3 more).
Gather the ribbon by pulling on the bottom thread. Now pin ribbon so that the basting stitch lines up with the casing stitch. Then sew.

Take your safety pin and attach it to the ribbon and string through the casing.

 And put on your shrug...or ask your very shy daughter to model it...


Just in case you don't want to do that whole ribbon thing, I did a simple one....

There you have it. That's how you make a t-shirt into a shrug. We just upcycled together...twice! Whew…I love those kind of workouts, when you don’t have to sweat and it doesn’t hurt. “Expecially” when you have something cute to show for it!
(Writing that word twice in my blog is part of my word aversion therapy!)


Sunday, May 16, 2010

...All I Got Was This T-Shirt


I've always had a desire to learn how to quilt. Recently, a woman I go to church with offered to share ALL of her quilting wisdom and knowledge with me. I'm hooked! And then one day, she introduced me to my new friend. You know those friends that you instantly know you will love. That's how I feel.

Meet Wonder Under:

You can find this magic at any fabric store. How I've gotten this far in life without this little buddy, I do not know. But I'm in love with what I can create with this. My latest joy is found in T-shirts.

I love to personalize things. I get ideas in my head of what I want, but never can find exactly that same thing in the stores. Now I can take care of it myself. Let me give you an idea of what I'm talking about.


That's right. I made those. And what's more amazing...I made them in a matter of minutes. Really!

Meg's turning 8 next week. Guess what the birthday girl will be wearing. Her new school shirt for The Stars can also double as a 4th of July shirt. And my little Cookie can wear that letter shirt to declare the first letter in her name. How cute is that!

Here's the trick:

I bought the shirts at Target (of course). They were each under $5. The little girl shirts are on sale for $3.50 this week.

I had lots of fabric left over from quilting, but did buy the star fabric for just what I had in mind.

I found the letters and shapes and used Word to get it to the right size that I wanted for each one.

Instructions for using the Wonder Under is on the packaging. I'll give a quick visual and a few tips.

Start with tracing your shape onto the paper. I always put the different shapes right next to each other to conserve to make my Wonder Under go farther.


If you are tracing letters or a shape that is not symmetrical, you will need to trace the shape backwards onto your paper. Then when you iron it to your fabric (on the wrong side of your fabric), it will face the right direction (on the right side of your fabric).


I then cut out the shape. I like to leave a little edge around the shape. That way when it gets ironed onto my fabric, the glue on the paper will adhere to all of the fabric that I need.

Then:


1. Iron on the wrong side of fabric.
2. Cut out the shape along the lines
3. Peel of the backing of the Wonder Under
4. Iron the shape to shirt exactly where you want it.


Here's a tip to find the middle of the T-Shirt. I fold my shirt in half. I then iron it in half. When I open it back up, I can see the middle to line up my shape exactly where I want it.


Now, Wonder Under says that you can be done at this point. You can wash your shirt and it shouldn't come off.

But, if you're like me, you were the kid that still did the Extra Credit in school even though your grade may not have needed it.

So if you want to take it to the next level, you can stitch around your shape.

* You can do a blanket stitch or straight stitch by hand.
* You can do a straight stitch or zig zag stitch with a machine.
* You can use a buttonhole stitch with your machine

(You may want to practice on an extra piece of fabric before you try to stitch on your finished product).

My machine actually comes with an applique stitch, so I like to use that.


*** IdEaS ***

After seeing Melissa's bandana skirt, I though it would be fun to make a star shirt out of bandana material to match.

You could also make a shirt to match Noreen's No Sew Tutu.

These would make a great Birthday gift. That personal touch. It would make for great pictures for the Year that they are turning.

To make the flower, I printed an "o" and made 7 circles (6 for petals and 1 for the middle).