Showing posts with label Debbie. Show all posts

Tuesday, March 15, 2011

The Switch


I am the mother of 4 young children who are still in the "bedtime routine" mode.

As is typical with most young ones, the dark is not their friend.

But, their parents LOVE the dark.

My husband came up with a solution that I think puts him in the genius category: A Dimmer Switch


Full disclosure: I thought he was weird when he first suggested putting a dimmer switch on the hallway light. Dimmers were for setting the mood, whether it was eating dinner at the dining room table or watching a movie in the family room. But he did it anyway, and I love it!

When the kids are first put to bed, we turn on the hallway light all the way on.


BUT...once they fall asleep, we dim the hallway light down. There's just enough light that if they wake up, they can find their way to the bathroom (or our room). But it's dark enough that the hallway light doesn't bother the adults that aren't scared of the dark.


Is that a "Bright Idea" or a "Dim Idea"?


Monday, March 7, 2011

Kiss Me...I'm Irish!


Really.

I am.

My Grandpa was born in the green country before he came to this Great Land.

I won't really make you kiss me. I'll save that for the Mister and the Munchkins.

But I've always been proud of my Irish heritage.

So one might think that I would be thrilled when the 3rd grader came home last week with a "family assignment": Build a Leprechaun Trap. I was a little overwhelmed at the thought. But then we came up with this.


Yes, it doesn't look like a trap. There's more to the story:

As part of her assignment, she is supposed to write an essay about her trap and what she will do if she catches a leprechaun. She then will have to present the trap and give a speech to her class.

So I asked her what her plans were if Luck was on her side and she caught a little fella:

One might think the obvious - have them lead you to their gold. But not my little girl. The genes apparently run deep. Her plans with her little friend is to play dress up. She wants to dress him up. Did someone say "shopping"?

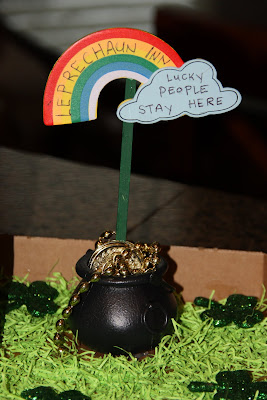
So we built the Leprechaun Inn, Where Lucky Little People Stay...Forever.

Her plans are to get him through the door, get him to make himself comfortable at the Inn, then put a rock in front of the door to trap him. Then she can lift the roof off and start her play date. Here are a few pictures of how our trap turned out:


For the materials, we bought the cardboard house at Michaels. It was under $3. Meg painted it green while I used Mod Podge and glitter for the roof. I placed where we wanted the house and then drew out a pathway. I used glitter for the path. After it dried, I used hot glue to glue the house and pots to the cardboard. For the grass, we took Easter Basket grass and I cut it up in small pieces. Meg used the Mod Podge and painted the bottom of the box then sprinkled the grass on. For the sign, we bought the pot and coins at the Party store. We bought the pre-made rainbow at Michaels and wrote on it with a Sharpie.

It came together pretty quickly.

Now wish us Luck on the essay and speech...oh and on catching the little fella...


Monday, February 28, 2011

Hide, but Don't Seek


Forgive me...

I've just recently returned from a trip to temporary insanity.

This is what sent me there:

Problem: Oldest daughter can't find her iPod Touch. She swears she left it on her desk in her room. Now it's not there. It's no where!

Suspects:
#1: small little 15 month old. Her latest trick is to reach on top of tables and swipe what's in her grasp. If she took it off the desk, who knows where she could have dropped it.

#2: 3 year old sneak. She loves to go into her sister's room and browse the luxury department, i.e. everything her older sister has told her she's not allowed to touch. (Older sister is not aware that some days while she's at school, I let little sister in her room to play...Oh the things I can get done in the rest of the house while she's visiting heaven)

#3: a little brother. His favorite part of the new Christmas present is the ability it has to beep when lost. As soon as he learned about the "Find Me" function, he decided it's fun to play hide and seek with the iPod. When we send out the Ping signal, it's usually found in the towels, or the game cupboard, or inside the couch. Our problem, the battery had died before we knew it was lost and there was no power in it to beep.

When the Suspects were asked if they took it, not one of them denied doing it.

We seriously spent 5 days looking for this, including President's Day. But I couldn't function until it was found. This wasn't something that could easily be replaced. So towels and linens were folded and refolded. The games were all sorted through, just in case it got placed inside a box. Toy boxes were shuffled through. Couches were vacuumed out. Under the beds were cleaned and organized. Drawers had been opened and organized. The hubs even went through the outside garbage...just in case. Nothing. And then I moved on to closets. First suspect #3s. Then mine. Then to the victim.

That's when I pulled out her laundry basket to go through it and I heard something. It sounded like an angel got her wings...because it was the sound of an iPod sliding down the basket.

{Sound the Heavenly Choirs}

If my detective skills are on, I would point my finger at Suspect #1 because of the hiding spot. I'm guessing she swiped and dropped not too far from the original location. If it were Suspect #2, I probably would have found it in her bed, waiting to be used when the lights went out. And Suspect #3 would have gone much farther to hide it.

So we have now decided the she needs a spot to put her iPod. My husband came across a clever idea. We knew it needed to be something that those Suspects won't know about. So we did this in secret. (Although if truth be told, I did it in front of them, but they never notice me anyway. Seriously...it takes 3 times of asking if they've brushed their teeth before they look at me funny). And we made this:


We went to a used bookstore and bought a book. Funny enough, my oldest is a big reader. And when my husband brought this book home she asked if they had another one at the store because she might want to read this. I'm hoping she feels this same way when she gets to high school!

We also used some mod podge and felt.


My honey then used a razor to cut out a rectangle big enough to house the iPod. (We laughed that the next chapter is titled "Ruined!").


I then placed plastic bags around both sides of the book to keep the mod podge from sticking to those pages. I took my brush and first put mod podge around the pages inside the rectangle. After that had dried, I brushed mod podge around the outside pages of the book.


Once it was all dry, I mod podged the felt to the inside of the rectangle. I then cut the remaining fabric. I chose to try to cut the felt square at the top.


If I were to do it again, I think I would leave a little border of fabric and glue it down. I didn't like how it looked when I was done, so I added some scrapbook paper to pretty it up.


And now it can stay safe hiding inside this book. Shh! It's our secret.

We found the idea HERE


Monday, February 21, 2011

Tank It


My oldest spends every other Tuesday evening with the girls her age at church. She is often coming home with great things. A few weeks ago, she was asked to bring a tank top to the activity. I bought a bag of 4 tank tops for about $3, just in case other girls needed one. She came home with 3 extra tank tops and one darling bag. It was cute. It was simple. And she loves it.

So the other day when she had a friend over, she asked if they could make bags with the left over tanks. This is what we did.


I printed out the first initial of their name on Word. I taped it (backwards) to the window and had the girl trace the letter on Wonder Under.

After they cut the letter out, we ironed it onto the back side of some scrap fabric that they chose. Then cut the letter out of the fabric and iron it on the tank top.

They then chose ribbon and we sewed it around the tank top.


Finally we turned the tank top inside out and just sewed up the bottom.

Turn it back out and you have a bag.


These two little girls are currently rehearsing for the school musical. They are using these bags to keep their scripts in as they go to play practice.


Monday, February 7, 2011

What About Love

Name the band and you'll know what today's post is about:


HEART...of course!


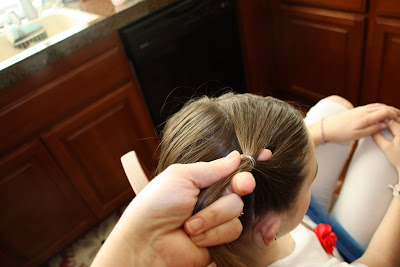
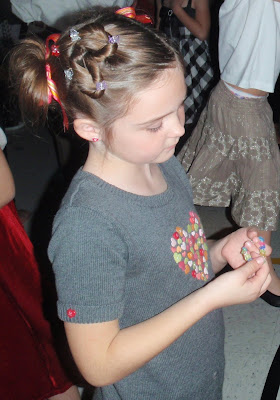
My Sugar has worn this HEART hair-do the last two years around Valentine's day and it's the one hair-do that she gets stopped by the yard duties, teachers and other parents. It's darling and it's easy. Here we go:

Start with a small pony. I like to use the little elastics.


Right on top of the pony, you're going to split it into two with your finger.


You're then going to take the pony through the hole. You're going to take it under so the pony ends up coming out the top. I think it's easiest if the hair is slightly damp.


You'll then split the pony into two. Once again, it's helpful if the hair is damp. I then start with one side and twist it. Have 5 small clippies ready to form it into the heart shape. I twist and put a clip at the top. I then twist a little more and put a clip in the middle of the side. Then I go to the next side to do that half.


I then finish off the heart at the bottom. Here I pulled her hair into one pony.


I've done it in the past where I do two ponies (with a side part on top for the heart).


I found this cute hairstyle a few years ago on a hair blog that I LOVED! I was so sad when she decided to stop blogging. She had the cutest hair styles and great tutorials. Luckily she has kept the blog active so YOU can now go and partake of her goodness. I'll link you to all of her HEART hair styles right HERE.

Before she quit blogging, she was blogging buddies with this momma stylist. If you haven't stumbled across her blog before, you probably aren't a mother of a Princess. Her link is HERE and she has amazing styles.

My friend used one of her HEART styles on her girls at church yesterday. You can see their darling do's HERE.

HAPPY HEARTS DAY! (That's for you Noreen! - I love ya!)


Monday, January 31, 2011

Please Leave Us a Message...

Tomorrow is February and that's one of my most favorite months!

It may or may not have something to do with a birthday, but throw in Valentine's Day and there's nothing but LOVE.

And once you become a parent, Valentine's Day seems to be focused on your kids. And that's what we're beginning today.

We're making a message center:


A few weeks ago, I ordered these mailboxes from Oriental Trading for *cough, cough* $3.99 a piece. I justified the price with the idea that we will re use these each year. On Saturday night I was racing against the girl locking the doors of Target to get to their pharmacy department. As I was hurrying across the store (because I got locked out of the green doors but slipped through the blue doors) I walked by the dollar section. And what did I see...these exact mailboxes for $1 a piece. So if you like, hurry to your nearest Target!

Last night, we pulled out some stickers and got to work decorating our own mailboxes.


And then I took my napkin/utensil holder and turned it into our card/pen holder. 3x5 cards fit perfectly inside the mailboxes.


Now the kids can leave messages for each other. My little 6 year old boy was busy this morning before school writing notes. And he walked in the door after school and went straight to the table. I love it! In fact he even left a message for himself: "Dear Me, I make me laugh. Love, Me" We're not worried about self-confidence over her.


It's my goal to leave a note for everyone each night before I go to bed. I figure surely this won't be too difficult to do until Valentine's Day. We will then collect all their notes, put them in an envelope and into their memory boxes. These notes will be great to look back on someday.

Simple.

Easy.

Monday, January 24, 2011

Roll the Dice

I'm betting on my family today...

With Valentine's, comes Love.

With Love, comes my Family.

So tonight's Family activity will be focusing on loving each other with these two:


For the game, we'll sit in a circle and everybody takes turn rolling the dice.

One dice has things to do. Ours say: Blow a Kiss, Hug, Compliment, Handshake (I made up a fun handshake sequence we'll use), Chest Bump (a family favorite that gets everyone laughing), and Wish (which it helps to be specific when you tell them to say something you "wish" for that person so that your son doesn't say, "I WISH that she'd brush her teeth so her breath doesn't smell" - yes he said that while playing with this last night).

The other dice has pictures of each of us. That is the person who will receive the action you roll.

When we've played this game in the past, we've let the turns go around the circle several times until we've hit an obvious "time to stop now" moment. But the kids have always loved doing this.

When we've done this before, we just used a regular dice and I've typed up who is what action is what number (i.e. one = hug, two = compliment and one = mom, two = dad, etc.).

For tonight, I'd thought I'd make our own dice. So I gathered these items:

(Can you see my Spice Cookie trying to get into the picture?)

* Wood Blocks
* Pictures for each person in the family
* Pencil
* Scissors
* Sayings/Actions
* Mod Podge
* brush

Because my blocks were so small (they're just a little bigger than 1 inch), I just placed my block over the picture and traced the square around each person and action. Then I cut with scissors.


I then brushed my mod podge on the block, placed my picture on, then brushed more mod podge on. I didn't want to have to deal with corners matching up, so I cute my squares to be just a little bit smaller than the block. So you can see the edge of the blocks.

As soon as they were dry, my kids started playing. They love this. And it does help us to focus more on each other instead of a typical game where we're trying to beat each other...because I may or may not be competitive with my kids when we play games.


Today's Creative Blog

Monday, January 17, 2011

Once There Was a Snowman

It's that time of year...

Time to build a Snowman.

Whether you're starting to feel cabin fever from extreme winter weather or you're like us and snow just doesn't fall on our lawn, I've got the kid friendly activity for you.

Build your snowman inside.

We took this:


And made this:


I took some scrap fabric and made them into bean bags. I cut a front and back of each of the following:


*Hat
*Head
*Eyes
*Carrot nose


*Middle
*Bow tie or scarf
*Buttons


*Bottom
*Boots


I sewed them on the outside of the shapes using an overcasting zigzag stitch (That's a straight stitch on the inside and a zigzag on the outside. I used a contrasting thread because I thought it'd be cuter. Remember to leave just a small opening to fill.

The larger shapes (3 circles, hat, boots) I filled with pinto beans. I used a water bottle as a funnel. I just cut off half of the bottle.

The smaller shapes (5 circles, nose, bow) I filled with rice.

I then closed up the holes. I started sewing just a little before where I left off and went a little over the other end.

And when it was all done, we played with our new little friend.


We tossed all his parts in a bowl.
We had a starting line that you had to stay behind.
We then took each of his bits and built a snowman by tossing the beanbags one by one.

The kids loved it. Here are their first attempts:


This is Sugars Snowman:


This is SmallHubs Snowman: (I call him SmallHubs because he looks and acts just like his older model)


And we let Spice adjust the rules when she built her Snowman:

Only a 3 year old can build a snowman in a leotard and tutu (which was probably outfit number 6 for the day, I lose count).


Even Hubs tried to build a Snowman:


WARNING: No mittens were used in the building of these snowmen.


Get Your Craft On Tuesday