Showing posts with label Sewing. Show all posts

Monday, February 21, 2011

Tank It


My oldest spends every other Tuesday evening with the girls her age at church. She is often coming home with great things. A few weeks ago, she was asked to bring a tank top to the activity. I bought a bag of 4 tank tops for about $3, just in case other girls needed one. She came home with 3 extra tank tops and one darling bag. It was cute. It was simple. And she loves it.

So the other day when she had a friend over, she asked if they could make bags with the left over tanks. This is what we did.


I printed out the first initial of their name on Word. I taped it (backwards) to the window and had the girl trace the letter on Wonder Under.

After they cut the letter out, we ironed it onto the back side of some scrap fabric that they chose. Then cut the letter out of the fabric and iron it on the tank top.

They then chose ribbon and we sewed it around the tank top.


Finally we turned the tank top inside out and just sewed up the bottom.

Turn it back out and you have a bag.


These two little girls are currently rehearsing for the school musical. They are using these bags to keep their scripts in as they go to play practice.


Friday, February 4, 2011

For the little mommies...

Once upon a time I bought some flannel. I put those 2 yards of flannel in a bag in a closet and my life resumed. End of story. But then I saw this: 'click here' And then I remembered why I had purchased that flannel at the fabric store clearance sale! I had seen a similar tutorial and I had every intention of making a wrap for my daughter's baby dolls. She is constantly bringing me a doll and a blanket and wanting me to swaddle her baby, only to walk away and to have the doll completely unraveled within seconds!

I owe a big THANK YOU to Leslie at Little Apple Seed for reminding me why I had a bag of flannel in my closet!

I followed her excellent directions:

Here's my 24" x 24" square (cute fabric, huh?)


Before I sewed on the pocket, I grabbed the largest of the dolls to make sure all of the babies could enjoy the comforts of swaddling (this baby is in one of my daughter's preemie outfits. Bittersweet memories!)


All sewn together:


Now here's where my wrap takes a different turn from the tutorial I referenced. I added some velcro:


I used sticky back so it would stay put when I figured out where to place it. Then I sewed the strips on.


I placed a set on the bottom tip and on the pocket:


And then one on each "wing." One on the inside and the other piece on the outside.


And swaddling your baby doll is as easy as 1 - 2 - 3!


And then watch your baby love her baby!


(She was not in a cooperative mood today so I had to sneak up on her and snap a pic while she was in a Little Bear trance!)


Monday, January 17, 2011

Once There Was a Snowman

It's that time of year...

Time to build a Snowman.

Whether you're starting to feel cabin fever from extreme winter weather or you're like us and snow just doesn't fall on our lawn, I've got the kid friendly activity for you.

Build your snowman inside.

We took this:


And made this:


I took some scrap fabric and made them into bean bags. I cut a front and back of each of the following:


*Hat
*Head
*Eyes
*Carrot nose


*Middle
*Bow tie or scarf
*Buttons


*Bottom
*Boots


I sewed them on the outside of the shapes using an overcasting zigzag stitch (That's a straight stitch on the inside and a zigzag on the outside. I used a contrasting thread because I thought it'd be cuter. Remember to leave just a small opening to fill.

The larger shapes (3 circles, hat, boots) I filled with pinto beans. I used a water bottle as a funnel. I just cut off half of the bottle.

The smaller shapes (5 circles, nose, bow) I filled with rice.

I then closed up the holes. I started sewing just a little before where I left off and went a little over the other end.

And when it was all done, we played with our new little friend.


We tossed all his parts in a bowl.
We had a starting line that you had to stay behind.
We then took each of his bits and built a snowman by tossing the beanbags one by one.

The kids loved it. Here are their first attempts:


This is Sugars Snowman:


This is SmallHubs Snowman: (I call him SmallHubs because he looks and acts just like his older model)


And we let Spice adjust the rules when she built her Snowman:

Only a 3 year old can build a snowman in a leotard and tutu (which was probably outfit number 6 for the day, I lose count).


Even Hubs tried to build a Snowman:


WARNING: No mittens were used in the building of these snowmen.


Get Your Craft On Tuesday


Monday, January 10, 2011

Check!


(FRONT)


(BACK)

Check that baby off the list! Finally!

I started this quilt last year. And when I say "last year" I don't mean the last half of 2010. I don't even mean the first half of 2010. I really mean last January, this quilt was started.

You see, a year and a half ago, I had a woman at church who offered to teach anyone interested how to quilt. I was two years into being a proud owner of a sewing machine, meant for the purpose of quilting, and I didn't know how to use it. I was suddenly feeling confident enough to take this "new talent" on. So I showed up for class.

This quilt was the first quilt assigned to us to work on. It's a "log cabin" block quilt. It was my first real experience at piecing together a quilt. I loved how the quilt came together for me. It was exciting and thrilling. I sent it off to be professionally quilted.


When I got the quilt back I quickly sewed the binding to the front of the quilt using this method. But because this quilt didn't have a purpose, it was in trouble.


And once I got the binding attached to my quilt, it just sat. It's been sitting for a long time. It's been sitting long enough that I don't even notice it sitting in my room, next to my chair, waiting for me to handstitch the backside while watching all those shows waiting for me on my DVR.

So with the new year beginning, I decided it was time. It was time to cross this off my list...mostly because my oldest daughter kept reminding me that it wasn't finished and it was really starting to ware on me.

But here's where I admit that I cheated. I decided if I was going to get this quilt checked off my list, it was going to have to be finished by my machine.

So this is what a did.

I pinned the other side of my binding to the back side of the quilt. I made sure that it was just on the other side of the stitching from attaching the binding to the front.


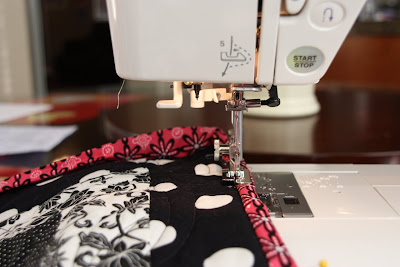
I then pulled out my blind hem foot. It has a metal bit that I used to have it run in the ditch between my binding and my quilt while I stitched on the front of the quilt using a thread that matched my pink binding.


Now, if I were an expert sewer, I could try to actually "stitch in the ditch" and have the thread just barely grab the material on the other side. But I am very aware of my skill, or lack thereof, and I decided to have my stitching show.

I am also able to create my mitered corners. I stitched from corner to corner (backstitching at both ends. I then would cut my thread. Fold my corners under, then begin again on the next side stitching from corner to corner.

I save that hand stitching on the backside for special quilts. But I'm beginning to learn that sometimes, you've got to take the easy route if you're going to get it finished.


Wednesday, January 5, 2011

Magnet Curtains

I know, I know...Magnet Curtains sounds like some new Infomercial product, but I promise I'm not trying to sell you anything. Although, this idea did come from necessity. Now I know this post won't apply to most of you, but for the few of you in my situation, it might be helpful.

Problem #1: Front door has a big window on it. People can just walk right up to our front door and observe our lives. See exhibit A.
Exhibit A

Problem #2: Door is a metal door and I don't want to screw in anything to the door to hold a window treatment.

Problem #3: We want to leave our kids home alone for a few hours while we do a little Christmas shopping. Our oldest is almost 10 and we think they can handle watching TV for two straight hours, but we don't want people peering into our door.

Hurried Solution #1: Husband wants to tape packing material in the window. (NOT SHOWN because I had a better idea...although still a little W.T.)

Hurried Solution Idea #2: Use magnets to hold said packing material to window so we don't get tape residue. See exhibit B.
Exhibit B
New Problem #1: It's weeks later and this is still on the the door. As you can see, the kids have been playing with the magnets.

New Solution #1: Made a curtain with Magnets in it. See Exhibit C.
Exhibit C
Here's how I did it.

First I tried to go to Joann's to buy some material, but they were closed. So, I sauntered over to Target next door and found this 42" wide x 84" long, brown window panel for $7.99 (which I think is actually cheaper than if I bought material at Joann's). Plus, there was already a big hem sewn in for me at the top so i could drop my magnets in it.
Sorry, I took it out of the package before I took a picture!
Then I measured how long I needed the panel and added 7 inches so I could make a big hem at the bottom to match the top (we need the magnets at the bottom, too). I cut the material and then pinned and sewed the bottom hem to match the top.
Pinned hem and then I sewed.
Then I tried to figure out how many magnets I would need to keep this weight of fabric up. I figured out it was 9 magnets. So then I measured out nine slots for the magnets evenly spaced.

Then I sewed the first side, dropped a magnet in and sewed the other side so the magnet stayed inside it's little pouch.
Can you see the little round heavy duty magnet? It's inside it's little pocket.
I sewed in all the magnets at the top and used that to guide my pockets for the bottom hem so they lined up.
On the top hem I even sewed a littler pouch for the magnet so it stayed at the bottom of the hem to give it the gathered look.
There you have it! A curtain for my metal door.
Notice my Christmas decorations still up...Saturday's project will be to pack up Christmas!

And when I'm feeling open and free and want more sunlight in, I just pull the curtain down. I think I'm going to make a few different colors or even find a patterned material.

NO-SEW VERSION: Decorate the magnets with buttons, or bling or flowers or anything you want. And then just magnet the material to the door folding over the hems. I might try that as an option, although then the kids start playing with the magnets....but you don't have to SEW!!!