Not sure if you all are on facebook or not, but one of my favorite things about the social network is when my friends post funny things their kids say on their status. Let the record show that I'm not all about posting your every move during the day, but if you have funny kids...post away. I think I love it because it amazes me how smart kids are and i love it because my kids say some funny things.
Whenever I post something cute my kids say on FB (that's text talk for facebook) guarantee someone says, "Make sure you're writing those things down." Which I do...on facebook. Then every few weeks or so, I look at my status updates and record the really funny ones in my journal.
As a treat or a fun game, my kids love for me to read the funny things I've recorded in my journal. They laugh and laugh and laugh. So I thought of a great gift for grandparents, stocking stuffers for spouses (YES....I did just make a Christmas reference) or even a fun gift for that child to have.
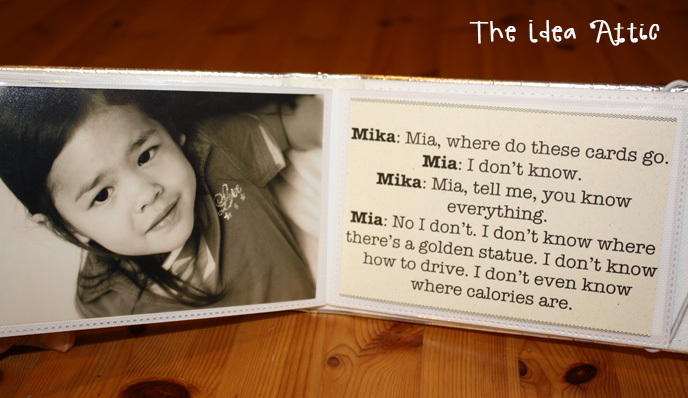
I just got a small photo album from michaels for $2.99 or so and I made a cover page. Then I put pictures on one side and funny quotes on the other. I'm sure you really crafty types could scrapbook those quote pages, but I'm lucky I printed them out.
Here are some of my pages...I'm sharing because I think they're funny.
Thanks for indulging me. For the record both Debbie and Melissa have the funniest boys. They are always saying great stuff...I'd actually love getting a book from them :)
I'd love to hear some of the funny things your kids say!
P.S. I made this for my mother, but the kids won't stop stealing it!
Showing posts with label Memories. Show all posts
Wednesday, September 29, 2010
Funny Stuff My Kids Say
Labels:
baby/kids,
brainstorm,
Children,
family time,
Gifts,
kids crafts,
Memories,
Noreen
Monday, September 27, 2010
You've Been Framed!
A frame.
Those who know me well, know I love frames! This was fun and quick to do.
I started with some left over material, a wooden frame ($1.99 full price), and some trim.

I ironed the material to make sure there weren't any wrinkles. I then traced the frame on the back side of the material. This material has a pattern that I wanted to make sure would come out straight. This way, I would know where to lay it when it was wet with glue. Before I started, I cut an X in the middle part of the material. This made it easier to work with after the frame was on and wrapping the material to the back.

I pulled out the trusty mod podge. (Melissa should be proud!) I brushed the front of the frame and then laid it on the material. I used the mod podge to keep the material flat and not see any glue bumps coming through.

I then pulled the material up on the back opposite sides. I brushed the mod podge on the back of the frame. (I did not put mod podge on the material on the front of the frame. I wanted to keep it looking soft).

To do the corners, I pulled out the glue gun. I wanted it to stick quickly. I folded the corners in and then down. I then covered the back to finish it off.

I also used the hot glue to apply trim to the frame.

And here's a look from the side:

Now... Back to my other project!

Wednesday, September 15, 2010
Masterpiece Display Case
Do you ever feel like all your friends are such incredible moms, but you don’t feel the “incredible-ness” for yourself? All their kids have perfect hair, with their matching outfits, sitting quietly in their uber-clean home. Their kids are either reciting scriptures, poetry or the capitals of all the countries in the world or they are masterfully playing their musical instruments.
Then I look at myself, with my messy house, mac’n’cheese for dinner, kids with wild “caveman” style hair, wearing that ugly shirt I’ve tried to throw away four times and they are reciting lyrics to songs that I pray they don’t understand while making “gassy” noises in their armpits. Yeah – sometimes I feel like kicking my friends.
However, today, I don’t harbor any of that animosity because today, I think I’m a pretty good mom. Why? Because I have found a way to make my child feel extra-special, while keeping the house a little cleaner…let me explain.
I love my children’s artistic tendencies. I love their creativity. I love their exploration of color, textures, and shapes. What I don’t love, is pretending that every single one of their creations is wall worthy. I tried that…all we got was a wall full of tape and torn pictures. They are always drawing me something and sending me off to work with their creations. But they insist that I keep ALL of their artwork somewhere, preferably displayed. TOO…MANY…PAPERS….
Insert the Artwork Display Case. It’s basically a shadow box frame that opens in the front (Michael’s $9.99, less with the 40% coupon). I bought it unfinished and just painted it inside and out.
Each child has his or her own display case. The rule is that each case can display their latest creation. They can fill it up, but when it gets full, they have to throw away some of their earlier pictures.
Of course if some of their artwork is exceptional, I put it in their memory box!
So, we all feel good. They feel like their pictures are getting their proper treatment and I don’t have any more tape on the walls…who am I kidding…I still have tape on my walls...tape and spaghetti (that's another post for another day).

Labels:
brainstorm,
Children,
decor,
Gifts,
Memories,
Noreen,
organize,
Parenting Tips,
Storage Ideas
Monday, August 30, 2010
Making Memories
Recently I talked about my daughter's BIG birthday and how number 8 is important to our family. One of the things I decided to start as a tradition was to make a memory quilt.
Before I share how I did it, let me preface it with, I am a BEGINNER. My mom never sewed. I took Home Ec in high school and loved it. But without a teacher by my side, I didn't know what to do.
A few years ago, my husband overheard me say that I would love to learn how to make quilts. That Christmas, there was a heavy rectangular box under the tree for me. I was convinced it was that Kitchen Aid mixer I had been hinting about. Imagine my surprise when I opened it and saw a sewing machine.
A nice sewing machine.
A sewing machine labeled as a Quilter's machine.
Let me remind you, I hadn't sewn since high school home ec (nearly 20 years ago - ouch! that's old) and didn't have a clue how to use my new machine.
Enter: The sweetest lady you could ever meet that I go to church with. She is an amazing quilter. She always has one or two quilts in the works. She offered to teach those at church who wanted to learn how to quilt. I took her up on her offer. I owe her for life!
So at this time, I was so excited to take on all this new quilting knowledge. I knew I wanted to make a memory quilt for Megan. I googled. I searched. I couldn't find anything that was what I had in mind.
So I decided to figure this out on my own. This is what I came up with:

I bought two Charm Packs from Moda. They are 5x5 precut squares.
I bought one Jelly Roll from Moda that coordinated with my Charm squares.
I bought two packs of transferable paper to material fabric from JoAnns (I used my 40% off coupons on both of them).
Plain white fabric
Fabric for binding and her name.
To Make The Pictures:
I chose the pictures that I wanted for the quilt. I cropped the pictures on the computer to a 4 and 1/2 inch square. (I wanted the whole picture on the square. I knew that I would use a 1/4 inch seam allowance on all four sides.) I then ran the paper through the printer. Then I followed the instructions on the package to iron and soak the material in water. Then trim your pictures into squares (leaving 1/4 inch of white around the picture).
To Make the Rows:
I simply sewed 10 squares across. I wanted a random look so I made sure that the colors were separated just right. I added the pictures squares randomly. Once all the rows were sewn together, I then sewed the rows one by one to each other. I even added one special square at the bottom right corner:

I took some of the strips from the Jelly Roll and sewed them together (I think I count 18 strips - before they repeat). After they were sewn together, I then used my ruler to cut them down the sewn strips to create 2 inch squares.

I cut a strip of white fabric the height and width I wanted. I added Megan's name using my handy Wonder Under following the same technique outlined here. To make the flowers, I used extra strips from my Jelly Roll and made individual circles, then ironed them together to make the flowers.
Quilting:
I sent this one off to be professionally quilted. I knew it was one that I want to last a long time, so it was worth the money to have it done. I love the daisy pattern that she used. And I especially loved how she added the daisy's to the banner.
Binding:
I love the binding technique that is offered here. It makes for easy corners. I used the same material for the binding that I used for her name.

Subscribe to:
Posts (Atom)