Showing posts with label Girls. Show all posts

Monday, February 21, 2011

Tank It


My oldest spends every other Tuesday evening with the girls her age at church. She is often coming home with great things. A few weeks ago, she was asked to bring a tank top to the activity. I bought a bag of 4 tank tops for about $3, just in case other girls needed one. She came home with 3 extra tank tops and one darling bag. It was cute. It was simple. And she loves it.

So the other day when she had a friend over, she asked if they could make bags with the left over tanks. This is what we did.


I printed out the first initial of their name on Word. I taped it (backwards) to the window and had the girl trace the letter on Wonder Under.

After they cut the letter out, we ironed it onto the back side of some scrap fabric that they chose. Then cut the letter out of the fabric and iron it on the tank top.

They then chose ribbon and we sewed it around the tank top.


Finally we turned the tank top inside out and just sewed up the bottom.

Turn it back out and you have a bag.


These two little girls are currently rehearsing for the school musical. They are using these bags to keep their scripts in as they go to play practice.


Friday, February 4, 2011

For the little mommies...

Once upon a time I bought some flannel. I put those 2 yards of flannel in a bag in a closet and my life resumed. End of story. But then I saw this: 'click here' And then I remembered why I had purchased that flannel at the fabric store clearance sale! I had seen a similar tutorial and I had every intention of making a wrap for my daughter's baby dolls. She is constantly bringing me a doll and a blanket and wanting me to swaddle her baby, only to walk away and to have the doll completely unraveled within seconds!

I owe a big THANK YOU to Leslie at Little Apple Seed for reminding me why I had a bag of flannel in my closet!

I followed her excellent directions:

Here's my 24" x 24" square (cute fabric, huh?)


Before I sewed on the pocket, I grabbed the largest of the dolls to make sure all of the babies could enjoy the comforts of swaddling (this baby is in one of my daughter's preemie outfits. Bittersweet memories!)


All sewn together:


Now here's where my wrap takes a different turn from the tutorial I referenced. I added some velcro:


I used sticky back so it would stay put when I figured out where to place it. Then I sewed the strips on.


I placed a set on the bottom tip and on the pocket:


And then one on each "wing." One on the inside and the other piece on the outside.


And swaddling your baby doll is as easy as 1 - 2 - 3!


And then watch your baby love her baby!


(She was not in a cooperative mood today so I had to sneak up on her and snap a pic while she was in a Little Bear trance!)


Thursday, January 20, 2011

Crocheted Beanies & Flowers

I don't think I ever told you guys that it snowed here in my little Southern California town on the first Sunday of the year. It was amazing! The kids had so much fun playing in the slushy snow. My son kept running to the back to see if the "pool has frozen, yet." Poor guy, I had to explain that that probably wouldn't happen, but he was excited nonetheless.

Now I don't want to make any of you jealous, so I'll try to refrain from talking about the 75 degree weather we're experiencing. It almost makes up for the ridiculous cost of living!

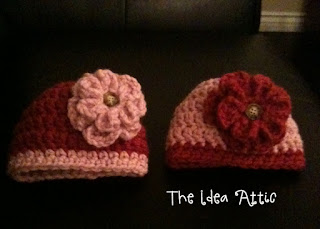
But knowing that most of the country is still experiencing winter, I decided that the perfect baby gift for twin girls would be Flower Beanies.


I'm all about the fast projects that look like you spent so much time on but seriously, these were pretty simple. I know not all of you have grasped the love of crochet or knitting, but it really is a stress reliever.

To me knitting is more difficult, I have to watch a youtube video every time I need to cast on. But crocheting is simple and if you use a big needle and thick yarn, these projects are QUICK!

There are a million free beanie patterns on the web, youtube, etc. You can find help with how to start, how to chain, how to double crochet...videos are helpful. I love this tutorial for the flower (click here).

I put my flowers on a hair clip so the parents could decide whether or not they want the flower on or off.
Then my baby girl got jealous of the presents for the newborns, so I had to whip this one out for her, too...with both colored flowers. I did this all in one evening, so you see...it's not too difficult.


I love making gifts for people. And it really is pretty cost effective. I spent $4/skein (2 skeins) and was able to do 3 beanies and 5 flowers. I think shipping is going to cost more than the present.

Happy Winter!

Friday, January 14, 2011

Because Super Heros need a place for their cape....

In case you don't know this, now is a great time to hit the thrift stores! Folks have donated to clear their closets for all of the new stuff from Santa. Plus it's a great way to beat cabin fever. It gets the kids out, it doesn't break the bank if I buy a $.50 plastic boat and it keeps an extremely busy 4 1/2 year old occupied for part of the day. (Plus I don't feel bad if I donate it right back a couple of weeks later!)

So thanks to these little escapes to the thrift stores, my project pile has grown! Fun and exciting things are coming your way!

Let's start with this little thing....


It was kind of a mess. It had bright, splotchy, pink paint. And whoever painted it must have done it on newspaper because there was paper stuck to it. But it was half off of $.69 and I had an idea!


I sanded the paint blobs and newspaper off. And then I gave it a coat of primer to try to hide some of the bright pink. And I used my paint pyramids. My brilliant husband got me these for Christmas! Are these perfect for my spray paint addiction or what?!


So after I primed it and sprayed it an off white.


I took it apart....


Modge Podged....


And look how pretty! Perfect for my daughter's room!


I used Command Adhesive strips to hang it. I didn't want to put holes in the door and with the strips I can move it up or down as much as I want.


Now my super hero child has a place to hang her cape and her ever-important purse, that has to go everywhere we go, has a peg as well!

Happy Friday!


Monday, September 20, 2010

Simplicity


I may or may not have a split personality.

Some days, I love the frills. I love everything done up just perfectly.

Other days, I thrive on simplicity. I like no clutter, vacuum lines and space.

This personality affects my daughters hair. Somedays, we love the flowers and ribbons and buns and ponies.

Others day, I just want a simple clip to keep the hair out of their eyes.

But simple doesn't have to mean ugly. Nor does it mean I can't have ribbon in their hair...because I love ribbon.

So today we're making simple ribbon clips. No bows. No flowers. No beads. No frills. Just a clip and a little ribbon.

So we start with these:

Materials Needed:
* an alligator clip (bought at Sally's Beauty Supply)
* ribbon of choice (3/8 inch)
* glue (I chose E6000 to save my fingertips from hot glue, but that works too)


Process:

Cut your ribbon to about 4 and 1/2 inches. I ran the ends of my ribbon through a flame to keep them from fraying.

I then applied glue to the back of the first part of my ribbon. I opened up my clip and placed the ribbon underneath the top part of the clip. I then folded my ribbon over the top of the clip and held it together.


After that part of the ribbon dried, I then proceeded to use glue to wrap the ribbon around the side of the clip. I chose to push my ribbon down on both sides.


And then I finished off by glueing to the back side. I chose not to have the ribbon go all the way down the back. I think it makes it harder to clip into the hair with the ribbon there. I like the raw clip on the underside.


And then it's complete:


And look...You can see those sweet eyes!


Here are some other clippies I've made:


Monday, September 13, 2010

Project Runway


As Heidi is famous for saying:

"One day you're in. And the next day you're out."

And that's how I'm feeling about the seasons. Summer, I love you, but you're out. I'm ready for Fall. I'm ready for apples and pumpkins and crunchy leaves and sweatshirts.

So today I'm getting ready for Halloween, Project Runway style.

Yes, Halloween.

Over the Summer, I took a few weeks to visit my parents with my children. One day I walked into a store to find that all of their fabric was 75% off. They were closing their fabric section. So I started grabbing. I had no idea what I was going to make, but I couldn't pass up buying fabric for a quarter of the cost. I decided I could figure out what I'd use it for later.

They had this Halloween material.


It is a panel.

This weekend, I figured out what to do with it. And this is where I felt like I was channeling my love for Project Runway.

I cut the panels apart and turned them into skirts for my girls.

(Just saying that makes me feel like I was channeling Julie Andrews on The Sound of Music. But I want to feel cool so we're going to stick with Project Runway).

I used 5 panels for my oldest daughter's skirt (she's 8). I then used 3 panels for my two little girls (age 3 and almost 1). I cut those 3 panels in half for the appropriate lengths and sewed them together.


I then sewed a band the same length of the material to the bottom and hemmed it.


After, I cut a strip of material (half the length of the bottom band) for the top band. I gathered the material and sewed the top band to the body of the skirt.

You can then sew the skirt together to finish the circle and add the elastic to it.


For full details of lengths and instructions, I used this awesome pattern I bought on Etsy. I made many skirts using her pattern. Love It!


DISCLAIMER: No buttons or zippers were used in the making of these skirts. That is far beyond my skill set. That's how simple this is!


The Girl Creative Party BlogMaking