Showing posts with label Hair. Show all posts

Monday, February 7, 2011

What About Love

Name the band and you'll know what today's post is about:


HEART...of course!


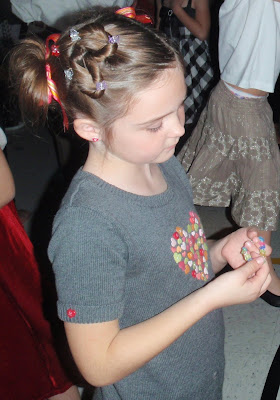
My Sugar has worn this HEART hair-do the last two years around Valentine's day and it's the one hair-do that she gets stopped by the yard duties, teachers and other parents. It's darling and it's easy. Here we go:

Start with a small pony. I like to use the little elastics.


Right on top of the pony, you're going to split it into two with your finger.
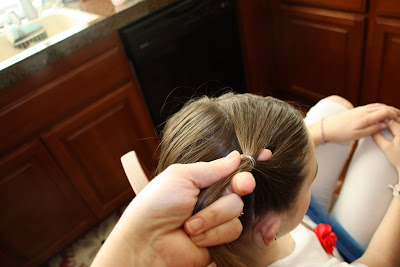


You're then going to take the pony through the hole. You're going to take it under so the pony ends up coming out the top. I think it's easiest if the hair is slightly damp.


You'll then split the pony into two. Once again, it's helpful if the hair is damp. I then start with one side and twist it. Have 5 small clippies ready to form it into the heart shape. I twist and put a clip at the top. I then twist a little more and put a clip in the middle of the side. Then I go to the next side to do that half.


I then finish off the heart at the bottom. Here I pulled her hair into one pony.


I've done it in the past where I do two ponies (with a side part on top for the heart).


I found this cute hairstyle a few years ago on a hair blog that I LOVED! I was so sad when she decided to stop blogging. She had the cutest hair styles and great tutorials. Luckily she has kept the blog active so YOU can now go and partake of her goodness. I'll link you to all of her HEART hair styles right HERE.

Before she quit blogging, she was blogging buddies with this momma stylist. If you haven't stumbled across her blog before, you probably aren't a mother of a Princess. Her link is HERE and she has amazing styles.

My friend used one of her HEART styles on her girls at church yesterday. You can see their darling do's HERE.

HAPPY HEARTS DAY! (That's for you Noreen! - I love ya!)


Thursday, January 20, 2011

Crocheted Beanies & Flowers

I don't think I ever told you guys that it snowed here in my little Southern California town on the first Sunday of the year. It was amazing! The kids had so much fun playing in the slushy snow. My son kept running to the back to see if the "pool has frozen, yet." Poor guy, I had to explain that that probably wouldn't happen, but he was excited nonetheless.

Now I don't want to make any of you jealous, so I'll try to refrain from talking about the 75 degree weather we're experiencing. It almost makes up for the ridiculous cost of living!

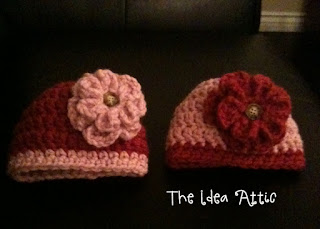
But knowing that most of the country is still experiencing winter, I decided that the perfect baby gift for twin girls would be Flower Beanies.


I'm all about the fast projects that look like you spent so much time on but seriously, these were pretty simple. I know not all of you have grasped the love of crochet or knitting, but it really is a stress reliever.

To me knitting is more difficult, I have to watch a youtube video every time I need to cast on. But crocheting is simple and if you use a big needle and thick yarn, these projects are QUICK!

There are a million free beanie patterns on the web, youtube, etc. You can find help with how to start, how to chain, how to double crochet...videos are helpful. I love this tutorial for the flower (click here).

I put my flowers on a hair clip so the parents could decide whether or not they want the flower on or off.
Then my baby girl got jealous of the presents for the newborns, so I had to whip this one out for her, too...with both colored flowers. I did this all in one evening, so you see...it's not too difficult.


I love making gifts for people. And it really is pretty cost effective. I spent $4/skein (2 skeins) and was able to do 3 beanies and 5 flowers. I think shipping is going to cost more than the present.

Happy Winter!

Monday, December 13, 2010

Christmas Clippies

Today, we're talking hair clippies. Hair clippies for the Holidays. And it all started when I had a friend drop off this cute little clippie she made for us just before the Thanksgiving holiday. How adorable! Right?


I love little clippies. Especially because I have 3 kiddos of the female variety. Lucky for me, I love hair too! (Between you and me, I secretly wanted to go to hair school instead of college but knew my dad wouldn't approve. His career has been in higher education administration, which is why he's biased. So I became a teacher. And met Noreen and Melissa -plus 4 other roomies-. But someday... )

So after falling in love with this little turkey on my turkey, my mind started going...

And I've come up with two new ideas.

The first is this little Christmas tree clippie.


All I needed for this were:


I started by covering the clip like I did in this POST.

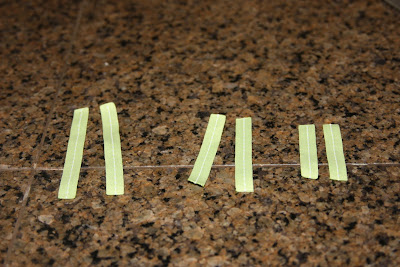
I then cut six strips of the green ribbon (2 each of three sizes):


I fray checked the ends with my lighter. I then put a dab of hot glue on the edge of one and folded it over - having only the ends glued together like this:


I then started hot gluing the layers on. Starting with the longest loops on the bottom and working my way to the smallest loops on top. I actually glued my star onto the top layer before I glued it to the clip.

And wah-lah:


Then I really tried to be creative and come up with a snowman clip. I actually ended up putting this one to a headband instead of a clip.


I started by cutting two circles out of white fabric and sewing around it, leaving an opening to turn and stuff.


I then hot glued a button for the face, with googly eyes, a carrot nose, a black hat, and a red scarf.


And I hot glued it to a head band like I did in this POST.

Now, does this mean I need to make 2 more so all three girlies can match?


Wednesday, October 20, 2010

Curly Grosgrain Ribbon Decor

First, before I go any further I just want to say Happy 100th Post to The Idea Attic. I can't believe we're already to 100. Debbie messaged me yesterday and instantly I thought, "We should have a give-away or something" and then my kids started fighting and I started unpacking and I totally forgot about a special something for our readers. So, if you'll forgive me on this one I promise I'll drum up something good for the holidays. We really do appreciate your comments and words of encouragement and look forward to the next 100 posts.

And now, for our regularly scheduled program. Ribbon! I never thought I'd be that kind of girl. The one who likes ribbon. I grew up with two brothers and no sisters and led a bit of the tom-boy lifestyle...a boy crazy tom boy. My brothers used to tease me that I would have to beat up a boy to marry me. They weren't laughing when I beat up people who were picking on them (yes, even my older brother). But little did we all know that as I grew older I would love pink, glitter, bling and ribbon!

Lately I've seen these cute little curly grosgrain ribbon hair bows...you know the ones at Gymboree...and they're too expensive for my taste. I can make that, right? Right!


(Please excuse the low resolution pictures from my iphone. Nice camera is in a box somewhere and I haven't gotten to it yet. When I find it I will replace with nicer pictures....but you get the idea, right?)

This project is so super easy that I did amidst unpacking the kitchen, painting a new entertainment center, cooking dinner, and helping my son with his California Landforms project (not to mention playing a few of my friends in "Words with friends") all after work!

So you'll need some dowels. I chose the "yellow" tagged ones at Michael's. Cut them to fit your cookie sheet. Then wrap the ribbon around the dowel securing it with some clothes pins.


Then pre-heat your oven to 250. Place your dowels on a cookie sheet and spray them with water. Then put your slightly damp dowels in the oven fo 20 minutes.  Then remove them and let them cool...they are hot. After they cool,  release the ribbon and nudge it off the dowel.


For the green bow shown, I cut 6 sections from each dowel. (I'm going to be showing you both the black and the green...but the green turned out cuter because the ribbon was skinnier). Then seal the edges with a candle or some anti-fray stuff so the ribbon doesn't come apart.


Next, you just sew them up the middle like this and after it's sewn together, I glued them to the hair clips like Debbie did in this post.


I also used these cute ribbons (on the hair clip) to decorate my no-carve pumpkins from last week. I also cut a vinyl bat to decorate my larger pumpkin.


Do you see the cute "pumpkin" hair clip? Don't you think it looks like the little white pumpkin is wearing an orange pumpkin costume? I think it's cute. Of course, I've turned into a big softy.


Today I linky-ed up to the following:

Sew Much Ado
The Thrifty Home 
Someday Crafts 
Blue Cricket Design

Monday, September 20, 2010

Simplicity


I may or may not have a split personality.

Some days, I love the frills. I love everything done up just perfectly.

Other days, I thrive on simplicity. I like no clutter, vacuum lines and space.

This personality affects my daughters hair. Somedays, we love the flowers and ribbons and buns and ponies.

Others day, I just want a simple clip to keep the hair out of their eyes.

But simple doesn't have to mean ugly. Nor does it mean I can't have ribbon in their hair...because I love ribbon.

So today we're making simple ribbon clips. No bows. No flowers. No beads. No frills. Just a clip and a little ribbon.

So we start with these:

Materials Needed:
* an alligator clip (bought at Sally's Beauty Supply)
* ribbon of choice (3/8 inch)
* glue (I chose E6000 to save my fingertips from hot glue, but that works too)


Process:

Cut your ribbon to about 4 and 1/2 inches. I ran the ends of my ribbon through a flame to keep them from fraying.

I then applied glue to the back of the first part of my ribbon. I opened up my clip and placed the ribbon underneath the top part of the clip. I then folded my ribbon over the top of the clip and held it together.


After that part of the ribbon dried, I then proceeded to use glue to wrap the ribbon around the side of the clip. I chose to push my ribbon down on both sides.


And then I finished off by glueing to the back side. I chose not to have the ribbon go all the way down the back. I think it makes it harder to clip into the hair with the ribbon there. I like the raw clip on the underside.


And then it's complete:


And look...You can see those sweet eyes!


Here are some other clippies I've made:


Monday, August 23, 2010

Accessorize!


So the first day of school is upon us.

It will be tomorrow.

My oldest will be a 3rd grader. My little guy will begin kindergarten. And my Cookie will start preschool in a week.

What will a mother of four do when she only has one child at home twice a week. Dance or cry? Or maybe I'll do both at the same time.

There's so much to do to get ready for that first day impression. And I'm not just talking about the small fortune I had to spend on school supplies to support my children's free education.

No, we're talking about the first day outfit. It's got to be just right. And it's not just the clothes that you pick out for that day. It's the nail polish and accessories that are just as important.

My third grader wanted a flower headband to match her new outfit. And for me, when you have something particular that you want, it's impossible to find in a store. So I came across a few of my favorite sites and decided to make my own material flower headbands.


I found two different methods that I tried: sewing and not sewing.

The not sewing method just used hot glue and scrappy material. It was super easy and super quick. Plus, I only lost two fingerprints (am I the only one that burns their fingers like crazy). I found this method on a little girl hairstyle website HERE. I followed her method pretty closely and ended up with this little bunch of flowers:


For the sewing method I found this on one of my favorite quilting blogs HERE. She has a tutorial for the flower for a broach. I just glued felt on the back of my flower. I glued it to the headband with hot glue. Then I covered the other side of the headband with a strip of felt.

I loved the way this looks the most! I promise you I have very basic sewing skills and I was able to do it in about 10-15 minutes. I had some left over fabric from a Moda Jelly Roll and it made it simple and easy. This will definitely be part of that first day en-sem.


And now...for the Mother of the Year Award: is it bad that I realized on Saturday that my son didn't have a first day outfit yet? We did buy a backpack a few weeks ago. We did buy all those supplies on the list. But he wasn't bugging me for weeks about what he was going to wear to school. Slipped my mind. Luckily he doesn't need accessories. So he got shorts and a shirt and we'll hope we can slip some gel in that hair for first day pictures.


Wednesday, June 9, 2010

Cute Satin Ribbon Headband

Don’t you love it when kids make up their own words? For example, my 4-year old says “giminant” or gym-in-ent when she means “really big.” For example, “Mom, I want a giminant ice cream cone,” or “I didn’t make this giminant mess” or my favorite, “Mom, I love you a giminant bit.”

When my other daughter was 4 she used to say, “libble dit” for “little bit.” “Do you want ketchup?” “A libble dit.” It was so cute.

We designate Mondays evenings for time with the family and call it Family Home Evening. However, when my son was little he would refer to it as Family Home Meeting which then morphed into Family Home Screaming (please don’t judge me).

I also like it when grown ups mess up…like the time my friend asked me what kind of dog a “chi-who-a-who-a” is. Or when playing Pictionary and my friend is trying to draw a comma when the word was coma. Or the time my friend thought the lyrics to the EnVogue song (yes I’m old) was “Freedom Mind and a nest of swallows” instead of “Free your mind, and the rest will follow.”

Actually, I had my own brain blip this week and only realize my mistake when I was looking at the lyrics on my ipod. The song is Time After Time by Cyndi Lauper. This was my first cassette as a youngster and I listened to it over and over till the tape broke. I’ve been singing the wrong lyrics my head…and out loud. I’ve been making this horrible faux pas for 25 years! (Another funny story is that  friend from work [that's post college] read "faux pas" for the first time and pronounced it "fox pass")

Anyway, speaking of Time After Time. As promised last week, I’m going to show you another way to use up 3 inch satin ribbon…if you happen to have a lot like I do.

This time we’re making a very cute headband.


You will need:
Two 13 inch pieces of 3-inch satin ribbon
Contrasting or matching ribbon (optional)
Sewing machine
Thread that matches your ribbon
(or if you are like me and too lazy to rethread the machine or wind another bobbin...everything is done in white thread)
Glue (I used a hot glue gun because I have no patience to wait for glue to dry)

I started out by wrapping my headband with the ribbon (I mainly did this because the headband I had was a recycle from another project that didn’t go so well). If you have a nice looking headband, you don’t even need to wrap it.


I glued the end of the ribbon to the end of the headband and then just wrapped it up and glued the other end of the ribbon to the end of the headband.


Then using the same technique as last week’s lei/necklace (click here for a refresher), sew the two 13-inch strips together to create a casing remembering to fold the ends in. Make sure the casing is big enough to fit around your headband with a little extra space.


Then just “thread” onto the headband. Decide where you want it and scrunch it together. Then glue the ends on the underside of the headband.


Isn’t it cute? I let my baby wear it the next day and it was a giminant hit!!!