
 I've been seeing a lot of these "make your own pastry cloche" or "covered dessert stand" all over the crafting blog-o-sphere. I finally decided that I had to do one myself! If I knew who originally came up with the idea, I'd certainly give them a shout out. But since it's too hard to tell, let's just give this genius craft queen a round of applause!
(image courtesy of flickr)
I am a thrift store shopper. I'm not ashamed to proclaim that to all of you internetters! That's why this project appealed to me. I knew I'd be able to find the right pieces to make this all come together! And as luck would have it, I found the cheese dish and candle holder on my first day of looking. Thrift stores are loaded with this kind of stuff!
Cheese dish $2
Candle holder $1
First thing I did was remove the little feet off of the bottom of the cheese plate. They were attached with a tiny nail so I didn't bother with any wood filler. (To my OCD friends: Fill away!)

I added this little wood disc to the candle holder so there would be a better surface for the plate to stick to. Sorry for the lousy picture!
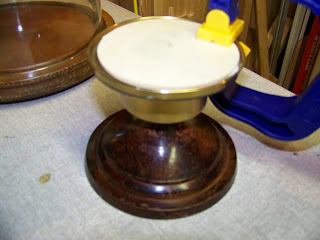
Now the messy part....put on your old t-shirt and spray away!

Glue these babies together and....


So why stop now? As long as I'm buying thrift store candle sticks, I might as well make another craft blog sensation -- Apothecary Jars! That's right! Who needs Pottery Barn when you can make your own Apothecary Jars?

I added this little wood disc to the candle holder so there would be a better surface for the plate to stick to. Sorry for the lousy picture!

Now the messy part....put on your old t-shirt and spray away!

Glue these babies together and....

Isn't she pretty?! I'm so excited to use this for my next party. It will be a part of a beautiful table setting with all of my Southern Living iron party ware!

So here's what I spent on my trip to the thrift store for this project:


Candle Stick $.99
Wooden Disc $.59
Candy Jar $.69
I already had the glue, the paint and the thin disc.
Not bad, eh??


Slap some paint on the candle stick, glue the pieces together....

And precariously place random items on it to hold it together while the glue sets.
And here she is....

Wooden Disc $.59
Candy Jar $.69
I already had the glue, the paint and the thin disc.
Not bad, eh??
The candle stick was a little skinny so I bought the round cut to help make a heavier base. I carefully glued it and stuck it in a clamp so it would dry centered.


I painted the thin, round disc black and glued that onto the bottom of my jar.

Slap some paint on the candle stick, glue the pieces together....

And precariously place random items on it to hold it together while the glue sets.
And here she is....

I love it! You can do so many things with these jars. You can etch a monogram on it and give it as a handmade wedding gift. Or a unique baby gift too! You can fill it with holiday candy and tie a festive ribbon around it. So many options! Have fun!!


No comments:
Post a Comment