So I've had a lot of really cute t-shirts in my life (I've even worked at a t-shirt company), like all my shirts from Hawaii (YEAH-BOY, 10 shirts for $20 at the Aloha Stadium Swap Meet), my senior class t-shirt "The Untouchables" (uh...did I just date myself?) and the very cute t-shirt my dad drew for me for girls' camp. We had to draw the thing we'd miss most while we were at camp for a week. Some people had a t.v., or a toilet...I had...Charlie Sheen. I'm such a dork.
Anyway, I guess my obsession with finding alternative uses for t-shirts comes from then. I felt guilty throwing away perfectly great shirts and I wanted to keep them as momentos...but how?
I wish I knew this trick back in the Charlie Sheen t-shirt days. This post is dedicated to my son who saw this project in a magazine and begged me to make this for him.
You will need:
A t-shirt (i used child size)
Scissors
Sewing machine
7/8 Eyelet and eyelet tool (GROMMETS)
about 2 yards of rope or something for the straps.
Safety pin
Seam Ripper or small scissors
Exacto knife or something to punch a whole in fabric
Hammer
Piece of wood or something to protect the surface of your table
Click on pictures for a bigger view!
Click on pictures for a bigger view!
1. Find a t-shirt
2. Cut off the arms and cut across the chest.
3. Turn it inside out and sew across the area you just cut.
4. Turn right side out & using an exacto or fabric punch, make a whole in the corner area. If t-shirt material is thin, cut and small extra piece of material and stick it on the inside and poke a whole through that, too.
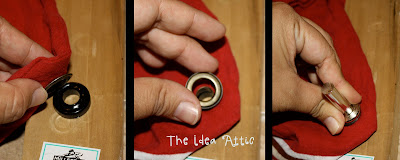
5. Take your eyelet and punch it through that hole.
6. Place your eyelet top on...oh wait...don't do this yet...you'll do it again in step 8, but I didn't want to change the picture.
7. Over your protection board, place the black holder down, place the bottom of the eyelet that you put through the hole over the black holder.
8. Place eyelet cap (with the teeth face down).
9. Place the tool into the eyelet and HAMMER HARD!!
10. Take a seam ripper or small scissors and rip the side seams of the hemming of the shirt. Do this to both seams. This is where your string will come through.
11. Place safety pin on string and pull the string through the casing (that use to be a hem). Go all the way through till you come out the same area you went in (picture 2). Do this to both sides...so that string is coming out from both sides. This is going to be your straps.
12. Pull so strings are all even. Measure your child so you know how much rope you need for straps. The with even ends, pull both ends of string through eyelet and then make a knot. Do this to both sides.
NOTE: If you were using string like I was, I burnt the edges so it wouldn't fray. You can also tape the ends with colored tape to make it more interesting.
And here you have it.
He was so excited to have this. His church bag had two huge holes at the bottom, so he's excited to have everything stay in the bag.
Pay no attention to his choice of mis-matched pajamas. I'm worried he'll grow up to be that man at the park with a fanny pack.


No comments:
Post a Comment