Tuesday, August 31, 2010

T-Shirt Backpacks

You may wonder why I love projects with t-shirts so much. I don't know where my fascination began, really. I had a lot of t-shirts growing up from family reunions, school projects, fund raisers, girls camp, etc. It seems like t-shirts are the easiest and most popular souvenir around. The thing is...I hate wearing t-shirts. Maybe it comes from being chubby all my life, and I would always have over-sized t-shirts so as to not display the muffin tops.  But, to me t-shirts are the most unflattering article of clothing I can wear...well...except maybe for stir-up pants, pant suits, and fanny packs (you may not think fanny packs are clothing, but I have seen some old men in the park who beg to differ).

So I've had a lot of really cute t-shirts in my life (I've even worked at a t-shirt company), like all my shirts from Hawaii (YEAH-BOY, 10 shirts for $20 at the Aloha Stadium Swap Meet), my senior class t-shirt "The Untouchables" (uh...did I just date myself?) and the very cute t-shirt my dad drew for me for girls' camp. We had to draw the thing we'd miss most while we were at camp for a week. Some people had a t.v., or a toilet...I had...Charlie Sheen. I'm such a dork.

Anyway, I guess my obsession with finding alternative uses for t-shirts comes from then. I felt guilty throwing away perfectly great shirts and I wanted to keep them as momentos...but how?

I wish I knew this trick back in the Charlie Sheen t-shirt days.  This post is dedicated to my son who saw this project in a magazine and begged me to make this for him.


You will need:
A t-shirt (i used child size)
Scissors
Sewing machine
7/8 Eyelet and eyelet tool (GROMMETS)
about 2 yards of rope or something for the straps.
Safety pin
Seam Ripper or small scissors
Exacto knife or something to punch a whole in fabric
Hammer
Piece of wood or something to protect the surface of your table

Click on pictures for a bigger view!


1. Find a t-shirt
2. Cut off the arms and cut across the chest.
3. Turn it inside out and sew across the area you just cut.


4. Turn right side out & using an exacto or fabric punch, make a whole in the corner area.  If t-shirt material is thin, cut and small extra piece of material and stick it on the inside and poke a whole through that, too.
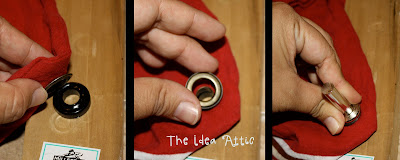
5. Take your eyelet and punch it through that hole.
6. Place your eyelet top on...oh wait...don't do this yet...you'll do it again in step 8, but I didn't want to change the picture.


7. Over your protection board, place the black holder down, place the bottom of the eyelet that you put through the hole over the black holder.
8. Place eyelet cap (with the teeth face down).
9. Place the tool into the eyelet and HAMMER HARD!!


10. Take a seam ripper or small scissors and rip the side seams of the hemming of the shirt. Do this to both seams. This is where your string will come through.
11. Place safety pin on string and pull the string through the casing (that use to be a hem). Go all the way through till you come out the same area you went in (picture 2).  Do this to both sides...so that string is coming out from both sides. This is going to be your straps.
12. Pull so strings are all even. Measure your child so you know how much rope you need for straps. The with even ends, pull both ends of string through eyelet and then make a knot. Do this to both sides.

NOTE: If you were using string like I was, I burnt the edges so it wouldn't fray.  You can also tape the ends with colored tape to make it more interesting.

And here you have it. 

He was so excited to have this. His church bag had two huge holes at the bottom, so he's excited to have everything stay in the bag.

Pay no attention to his choice of mis-matched pajamas. I'm worried he'll grow up to be that man at the park with a fanny pack.


NightOwlCrafting

Monday, August 30, 2010

Making Memories


Recently I talked about my daughter's BIG birthday and how number 8 is important to our family. One of the things I decided to start as a tradition was to make a memory quilt.

Before I share how I did it, let me preface it with, I am a BEGINNER. My mom never sewed. I took Home Ec in high school and loved it. But without a teacher by my side, I didn't know what to do.

A few years ago, my husband overheard me say that I would love to learn how to make quilts. That Christmas, there was a heavy rectangular box under the tree for me. I was convinced it was that Kitchen Aid mixer I had been hinting about. Imagine my surprise when I opened it and saw a sewing machine.

A nice sewing machine.

A sewing machine labeled as a Quilter's machine.

Let me remind you, I hadn't sewn since high school home ec (nearly 20 years ago - ouch! that's old) and didn't have a clue how to use my new machine.

Enter: The sweetest lady you could ever meet that I go to church with. She is an amazing quilter. She always has one or two quilts in the works. She offered to teach those at church who wanted to learn how to quilt. I took her up on her offer. I owe her for life!

So at this time, I was so excited to take on all this new quilting knowledge. I knew I wanted to make a memory quilt for Megan. I googled. I searched. I couldn't find anything that was what I had in mind.

So I decided to figure this out on my own. This is what I came up with:


I promise it was pretty simple.

I bought two Charm Packs from Moda. They are 5x5 precut squares.
I bought one Jelly Roll from Moda that coordinated with my Charm squares.
I bought two packs of transferable paper to material fabric from JoAnns (I used my 40% off coupons on both of them).
Plain white fabric
Fabric for binding and her name.

To Make The Pictures:
I chose the pictures that I wanted for the quilt. I cropped the pictures on the computer to a 4 and 1/2 inch square. (I wanted the whole picture on the square. I knew that I would use a 1/4 inch seam allowance on all four sides.) I then ran the paper through the printer. Then I followed the instructions on the package to iron and soak the material in water. Then trim your pictures into squares (leaving 1/4 inch of white around the picture).

To Make the Rows:
I simply sewed 10 squares across. I wanted a random look so I made sure that the colors were separated just right. I added the pictures squares randomly. Once all the rows were sewn together, I then sewed the rows one by one to each other. I even added one special square at the bottom right corner:


To Make the Smaller Square Sash:
I took some of the strips from the Jelly Roll and sewed them together (I think I count 18 strips - before they repeat). After they were sewn together, I then used my ruler to cut them down the sewn strips to create 2 inch squares.


To Make the Name Banner:
I cut a strip of white fabric the height and width I wanted. I added Megan's name using my handy Wonder Under following the same technique outlined here. To make the flowers, I used extra strips from my Jelly Roll and made individual circles, then ironed them together to make the flowers.


Quilting:
I sent this one off to be professionally quilted. I knew it was one that I want to last a long time, so it was worth the money to have it done. I love the daisy pattern that she used. And I especially loved how she added the daisy's to the banner.


Binding:
I love the binding technique that is offered here. It makes for easy corners. I used the same material for the binding that I used for her name.


And not only do I love it...Megan loves it too!


Friday, August 27, 2010

Life is a Picnic!

Time for another makeover of one of my fabulous thrift store finds! You may remember that my sister is expecting a baby girl and she has chosen a ladybug theme for the nursery. So when I found this great picnic basket for only $3 I had to incorporate into the room somehow!


The basket has some stains and the paint on the handles had worn off but it's heavy and well made. So I started with some spray paint for the handles and the lid. (The temperature has finally dipped below 95 so I can go back outside and paint!)


I then brought it back inside and sat at my kitchen table and painted the basket part with barn red acrylic craft paint. I opted not to spray paint this part because I didn't feel like covering and taping plus I think a brush would get into the crevices a lot better than spray. Sadly the pictures of this process are on the internal memory of my camera and I can't find the darn cord!

My final touch to the outside was a lady bug ribbon around the top edge.


The inside definitely needed something because it looked like someone had spilled a greasy lunch in this poor basket! I decided to use some black & white gingham. I cut poster board to match the inside of the basket and then I used spray adhesive to adhere the fabric onto the poster board. (I did this outside because I can't stand the stickiness of that spray!) I then used the spray adhesive to stick the fabric covered poster board to the inside of the basket.


A little bubble in the bottom but I'll pretend it's not there. My love/hate relationship with spray adhesive prevents me from redoing it!


All done! Pretty darn cute if I do say so myself!


It's hard to tell in the pictures but it's pretty roomy. I think it will be great storage for now and maybe serve as some kind of toy box later.


The extreme bedroom makeover is this weekend so stay tuned for some cute ladybug room pics!!

Happy Friday!


Wednesday, August 25, 2010

Dial-A-Prayer : A Timely Upcycle Project

I know not all The Idea Attic readers are religous, so don’t let the title of this post deter you from a great upcycling project. You can use this idea for a whole bunch of stuff…I promise to give you a list at the end.

Last week I wrote about how much of a struggle it is to get my kids ready in the morning. I think I’ve blogged about how hard it is for them to get to bed at night. And if my husband was posting, he would talk about how hard it is for him to get them to do their homework in the afternoon.

But I don’t want you thinking my kids are horrible. Much of the time, they are little angels. And what do little angels like to do besides make mommy A BUNCH of artwork to take to her office? They like to give kisses, laugh a lot and argue about whose turn it is to pray. Isn’t it ironic…don’t you think?

Now, each one of them has their own “argument.” The baby always wants to pray. Her sister always wants to pray. Their brother never wants to say the prayer. And no one wants Mommy or Daddy to pray because "it takes too long."

So, enter our Prayer Dial. And easy way to remember whose turn it is to pray.

You can use an old clock (one that is getting slow, or one you really want to replace). If you don't have a spare clock...Target has cheap ones for $3.99 right now.

First, take the plastic face off. This clock it was easy to slip something in between the plastics to pop it out. Others may be a challenge...just don't hurt yourself.

When you get the plastic off, the hands of the clock should pull right off (maybe some gentle tugging is required).


Then measure your clock diameter and cut out a circle from some pretty paper. Find the exact middle and make an "X" with an exacto knife.


I have a vinyl cutter, so I typed my phrase "Time for Family Prayer" and our names and cut them out. And then I applied it to the paper! You can also use a compass (think school supplies) to draw pencil circles and write whatever you want to write with a sharpie.

After that, you put your hands back on the clock. You need to put all the hands back on in order to keep it stable...so I just cut off the hand part and left the ring snug around the center of the clock.

And there's our Whose-Turn-Is-It-To-Pray Dial. It's working great!


You can also use pictures instead of names for families with non-readers.

So as promised, I'm going to list a couple of other things you can use this for...
- Chores. You can have different clocks for different rooms and different chores.
- Spotlight. You can take turns being extra kind to the Spotlight person in your home.
- Who's Birthday is next.
- Paint the face with chalkboard paint and use the clock for whatever you want like a "what's-for-dinner-dial
- A clean or dirty dial for the dishwasher.
- Feel free to add anymore ideas if you'd like.

As I write this my kids are running around screaming and tying each other up with rope (dad just gave son a lesson on knots for boy scouts). There's a mixture of laughter and tears and more screaming. Looks like Mommy needs a prayer dial with only her name on it!


NightOwlCrafting

Monday, August 23, 2010

Accessorize!


So the first day of school is upon us.

It will be tomorrow.

My oldest will be a 3rd grader. My little guy will begin kindergarten. And my Cookie will start preschool in a week.

What will a mother of four do when she only has one child at home twice a week. Dance or cry? Or maybe I'll do both at the same time.

There's so much to do to get ready for that first day impression. And I'm not just talking about the small fortune I had to spend on school supplies to support my children's free education.

No, we're talking about the first day outfit. It's got to be just right. And it's not just the clothes that you pick out for that day. It's the nail polish and accessories that are just as important.

My third grader wanted a flower headband to match her new outfit. And for me, when you have something particular that you want, it's impossible to find in a store. So I came across a few of my favorite sites and decided to make my own material flower headbands.


I found two different methods that I tried: sewing and not sewing.

The not sewing method just used hot glue and scrappy material. It was super easy and super quick. Plus, I only lost two fingerprints (am I the only one that burns their fingers like crazy). I found this method on a little girl hairstyle website HERE. I followed her method pretty closely and ended up with this little bunch of flowers:


For the sewing method I found this on one of my favorite quilting blogs HERE. She has a tutorial for the flower for a broach. I just glued felt on the back of my flower. I glued it to the headband with hot glue. Then I covered the other side of the headband with a strip of felt.

I loved the way this looks the most! I promise you I have very basic sewing skills and I was able to do it in about 10-15 minutes. I had some left over fabric from a Moda Jelly Roll and it made it simple and easy. This will definitely be part of that first day en-sem.


And now...for the Mother of the Year Award: is it bad that I realized on Saturday that my son didn't have a first day outfit yet? We did buy a backpack a few weeks ago. We did buy all those supplies on the list. But he wasn't bugging me for weeks about what he was going to wear to school. Slipped my mind. Luckily he doesn't need accessories. So he got shorts and a shirt and we'll hope we can slip some gel in that hair for first day pictures.