I was kicking around the workshop trying to get some inspiration for my upcoming post. As I was looking at my collection of crafty odds and ends, I noticed my husband has quite a collection of odds and ends as well....odd pieces of wood. There are scraps of wood he's saved from various projects in a stack under the work bench. So I grabbed couple pieces of 2x4 and cut some random size blocks.
Then I painted those blocks. (should have primed them because this bare wood drinks up craft paint!)
Modge Podged some scrapbook paper and letters on them....
Sanded and distressed a bit...
And we have ourselves some cute blocks! (just in time for a weekend with snow in the forecast!)
And the with the leftover blocks, can you guess what my son and I created?
Raise your hand if you have a boy! I know some of you have many boys, but I only have one son and he's my oldest and lately, I have found myself getting increasingly irritated at him. He loves to bug his sisters and make them cry, he doesn't love to read, he loves to play with his legos, he doesn't love to pick them up (OUCH!). But my son is still 9 and he's in that limbo place where he wants to be a boy-boy, but he still wants to snuggle mommy. I love that.
Last week, just when I thought I was going to pull my hair out, I come home from work and he's waiting by the door. He has a surprise for me...which sometimes brings huge messes...so I'm a little skeptical. He said that he knew I loved crafts and he bought something from his teacher for me. I asked him if he spent all his behavior points on my gift and he said that he didn't have enough, but he wanted them for me so he took his own money to school and asked his teacher if he could buy them for me. Of course I started crying because I thought that was so sweet...and then he had his dad's look of confusion...was it a good cry or a bad cry. I hugged him so tight! And I thought...this is what Christmas is all about. The joy of giving and the joy of receiving a gift of love!
So, my idea this week is an idea for a gift and it was an idea that could showcase my son's cute gift to me which here below! Aren't they cute push pins. They're something Simple Made Beautiful! They are buttons glued to push pins! So simple, but so cute.
But I didn't even have a cork board...and this is where today's idea comes in.
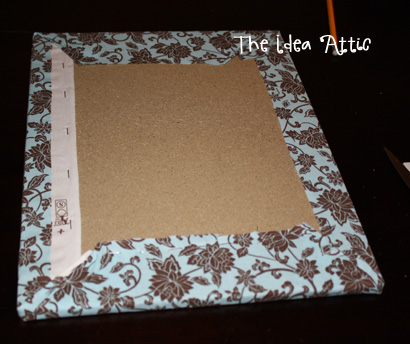
You just need a frame without glass, a piece of cork board that fits your frame, some crazy securing do-dads, fabric and a staple gun. And then off course you can add the cute push pins after.
Cut the fabric to be able to cover the cork and fold over the sides. Then staple the fabric to the cork board, pulling tightly all the way around.
And then place into the frame. I secured the cork board with something the guy at Michael's told me to use...it was totally wrong though. These are to secure the glass, but my husband stepped in with his putty knife and made a slit in the frame and pushed these pieces in for me.
And then I added the pushpins. I think this is going to make a beautiful message board right on the wall in kind of a busy place. And I'll get to see my son's push pin present and be reminded that he's a sweet, sweet boy...even if he does smell like metal after playing outside.
P.S. If you're looking for ideas for neighborhood gifts or teacher gifts you can make, browse through our site. You might really like these easy projects:
Last Summer, my husband's family spent a long weekend at Lake Tahoe celebrating his parents 50th Wedding Anniversary. As part of the activities, my sister-in-law brought along all the items for a girl's day craft. I loved what we made, so I'm sharing with you today.
The items you need are:
* a metal star (I got mine at the coveted TaiPan Trading Co. for under $4. One of my "must hit" stores when I go home to visit. The star I made for this measured 6 in. from center to tip of one point. The one above measures 16 inches per point) * scrapbooking paper * mod podge and brush * glitter spray
The first thing I did was trace the side of one of my stars. I cut it to be just a little smaller than the side. I then made a template using a cereal box. I used that template to trace out on my scrapbook paper.
I chose 10 different papers. You could do 5 and use each design twice. You could do two papers and alternate between the two. Or you could just do the same design all the way around.
When you're tracing your paper, make sure you flip your template back and forth to match the shape of the side of the star. I always hold my template to the side of the star before tracing to make sure it's turned the right way.
When we made these with my SIL, we used spray glue. But, I've never been really good at spraying and getting it just right. Plus it's December and now cold to hang outside to do crafts. Also, I love my mod podge. So I used that to adhere the paper. I brushed it on the star, slapped the paper on, then brushed over the paper again.
Once it was all dry, I took my star outside and sprayed some Glitter all over it.
I'm so happy it's finally legal to celebrate Christmas and shout it all over the place! It is the most wonderful time of the year! Enjoy!
I saw today's project in the Holiday issue of Crafts 'n Things magazine. I knew this cute Button Christmas tree was right up my alley! The supplies were easy to find and I could do it after my kids go to bed and still make it to bed at a decent time myself!
This is all that I needed...
A styrofoam cone, pearl ended pins and a whole lotta buttons!
And here's what I made...
So cute! And kid proof....my four year old doesn't want to touch it because he knows it's full of pins! Hee hee!
Geesh! It's already December 1st? Do you know the pressure I feel to post something amazing for this Holiday Season? There were so many ideas roaming around my brain (neighbor gifts, teacher gifts, advent calendars, Christmas traditions, etc....) I couldn't really concentrate...remember my craft A.D.D?
Anyway, I thought I'd share a few ideas with you today involving Santa, Halloween candy and felt!!! From the title of the post, you can see that coming up I'll feature the tutorial for this cute decoration that can be for Christmas or just as beautiful decor...here's a sneak peek...
But first, let me tell you a little something I do with my Halloween candy. This year the kids managed to bring home 5- 1 gallon ziploc bags full of candy. I let them have at 3 of them and have saved the other two for our cute advent calendar. Our calendar is a great little house that we bought at Costco a few years ago (at press time, my Christmas decorations are still in the garage and not unpacked...we just moved remember...how long can I use that excuse...so there's no picture of said advent house). This house has 24 little doors and I put a piece of candy for each child in each of the doors along with a family activity. Some top favorites are:
* Make cookies and take them to friends houses.
* Everyone say 3 nice things about _________ (each person gets their own day)
* Do an anonymous act of service and just leave these hearts at the scene of the "crime"
* Sing Christmas Songs together
* Play freeze-dance to Christmas songs
* Each child pick a Christmas book to read or to be read.
* Drive around to look at Christmas lights
* Drink hot chocolate outside
And on and on....the best part is the kids never know that the candy is from Halloween (I don't put Halloween branded things in the advent house).
Idea #2 - Santa Letters
Those of you who are fans of ours on Facebook, might have seen my post yesterday about an idea I had to try to make the kids focus on others rather than themselves. Instead of writing letters to Santa telling him what they want, they had to write letters to Santa telling them what their siblings wanted and why they deserve those presents this year. So, below is a link to download our standardized letters. I also included a place where they could rate their own behavior. Hopefully it helps them think about their actions as well.
I found the idea for this here and on this tutorial she cut out 286 3-inch circles with a scissors one at a time. She says it took her 12-15 hours for this project. Well, I loved the idea, but I didn't love all the cutting. So I did a little research and spent a little money and cut the time of this project. I made this in 2-3 hours with the help of a handy tool that cuts any size circles out of fabric, vinyl, leather, paper. It cost $24.99 at Michael's but I had my trusty 40% off coupon so it only cost me about $15 (plus the astronomical amount of sales tax here in CA, but that's another topic for another day).
It looks complicated, but it isn't. So for this swirly felt wreath, you can click on the link above and get her tutorial, or just sit back and relax and stay here as I take you on a journey through my project.
You will need:
*Afore mentioned fabric circle rotary cutter.
* Self healing mat
*Wreath form. I was too cheap to pay $6.99 for styrofoam, so like in Melissa's post here, I bought a straw form for $2.99
*About 1.5 yards of felt if you use your cutter, about 2 yards if you are going to cut them out by hand.
*About 300 straight pins
* Small piece of scrap ribbon for hanger
* Ribbon or fabric to wrap the form (OPTIONAL)
Start out by cutting out 280 3-inch circles. I cut them out with double layers of felt. It would have probably been easier to cut them out one layer at a time, but it cut my labor time in half....plus after you've cut out about 80 of them, you get into a rhythm and it's pretty easy. This is where I saved all my time. It took me about 30 minutes to cut out 280 of these circles vs. the 12 hours doing it by hand.
So, with the cutter, you need a self-healing mat and it has a sharp pin that anchors the material to the mat and a sharp rotary cutter that moves around. It was so easy and I love this thing! I'm not getting sponsored to endorse this, but if the OLFA people see this...I'm a fan!!!
So, with the straw form, since straw is messy, I left the plastic on and wrapped the thing with leftover ribbon. You can use fabric, too. It's just nice to have a pretty "back" to the wreath.
I just used the straight pins to secure the ribbon to the form. And then at the end, I just tucked the ribbon in and secured them with pins as well like this:
Then with the circles I folded them in half (sorry about the blurry picture) and folded it in half again and pinned it to the form.
Then start filling in the wreath. Space them pretty far from each other, you can always go back and fill in. I made the mistake of putting them too close together and then it was hard to rearrange. You'll be surprised how "forgiving" these little rosettes can be. You might not even need as many circles if you space it more open. I did the edges first and then filled it in...you can do it whichever way you want.
At the end, I just took a scrap piece of ribbon and made a hangy thing on the back!
This is how it turned out. I haven't had time to decorate it with ribbon and ornaments for Christmas, but I think I can keep this up all year long and just decorate it for different Holidays.
So there you have it. Three ideas to kick off the Christmas season! Now time to hear your ideas. What do you think I can do with the felt scraps? I was thinking a cool scarf...any other ideas?